Octopus baby toy
My friend is having a baby, and I waned to make a baby toy to welcome the little one into this world. I have paired this gift with the Crochet Blanket, Crochet Baby Teething Ring and Crochet Pacifier holder (click HERE for free patterns 1 and 2)
I thought that this Octopus might be a fun addition, since I know it is traditionally made for the preemies. Although the baby I am making this for is not a preemie, I am sure she will enjoy it!
Materials:
White, grey, mint worsted weight yarn
3.00 mm crochet hook
Stuffing material
Stitch marker, scissors, needle
Steps and Procedure:
1. Head:
- Make a Magic Ring
1. 6 SC in the Magic Ring (6 SC)
2. SC INC in every stitch around (12 SC)
3. SC in the next stitch – INC in the next st (repeat around) (18 SC)
4. SC in the next 2 stitches – INC in the next st (repeat around) (24 SC)
5. SC in the next 3 stitches – INC in the next st (repeat around) (30 SC)
6. SC in the next 4 stitches – INC in the next st (repeat around) (36 SC)
7-12. SC in every stitch around (36 SC)
13. SC in the next 4 stitches – DEC in the next st (repeat around) (30 SC)
14. SC in every stitch around (30 SC)
15. SC in the next 3 stitches – DEC in the next st (repeat around) (24 SC)
16. SC in every stitch around (24 SC)
17. SC in the next 2 stitches – DEC in the next st (repeat around) (18 SC)
18. SC in the next stitch – DEC in the next st (repeat around) (12 SC)
- stuff the head firmly with the stuffing material
19. in the Back Loop Only - SC in the next st – DEC in the next st (repeat around) (8 SC)
2. Tentacles (make 8)
- without cutting the yarn ch 50
- make 2 SC in every chain
- sl st in the next stitch (on the head)
- repeat 7 more times for a total of 8 tentacles
- when finished with the last tentacle sl st to Row 19 in the Front Loop Only
- do not forget to embroider the eyes to the head, and your toy octopus is completed!
mini MINION
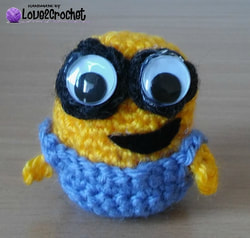
Researching through Pinterest and other great resources on line I found some great tutorials on how to make the Amigurumi toys. "Amigurumi (編みぐるみ) is the Japanese art of knitting or crocheting small, stuffed yarn creatures. The word is a derivative of the Japanese words ami, meaning crocheted or knitted, and nuigurumi, meaning stuffed doll. " At first I was resistant since I thought they were too complicated to make and create. But, yesterday, I decided to give it a try. So, I made this cute little mini-Minion! It was easier then I thought it would be. I followed the pattern completely as it was in this youtube tutorial and it turned out so adorable. As you can see in my images, the googly eyes, and the mouth are glued (I used the hot-glue gun). I would recommend it to all who wish to try making an Amigurumi.
Thank you Juspeachy for the tutorial:)
www.youtube.com/watch?v=XfAcGce3-R4
Thank you Juspeachy for the tutorial:)
www.youtube.com/watch?v=XfAcGce3-R4
a blue kitten

Wow, what a great craft this was. I found this great amigurumi website that offers free patterns and I made the best use of it. This is the link, it is in Dutch, but it has free downloadable PDF patterns in English: stipenhaak.nl/gratis-patronen/
This Kitten was easy to make. I used 2.50 mm crochet hook. The whole pattern was made in rounds, so make sure you use a marker! Instead of ch2 as indicated at the beginning I always used a Magic Circle as it works best for me. I also hot glued the fluffy cheeks, the googly eyes and the nose on the face instead of sewing them on. This is one pattern that is definitely worth checking out as the directions are written wonderfully and clearly. It is about 14 cm tall. If you want it smaller you could use a smaller hook:) And here are a few pics of my Amigurumi Kitten:)
This Kitten was easy to make. I used 2.50 mm crochet hook. The whole pattern was made in rounds, so make sure you use a marker! Instead of ch2 as indicated at the beginning I always used a Magic Circle as it works best for me. I also hot glued the fluffy cheeks, the googly eyes and the nose on the face instead of sewing them on. This is one pattern that is definitely worth checking out as the directions are written wonderfully and clearly. It is about 14 cm tall. If you want it smaller you could use a smaller hook:) And here are a few pics of my Amigurumi Kitten:)
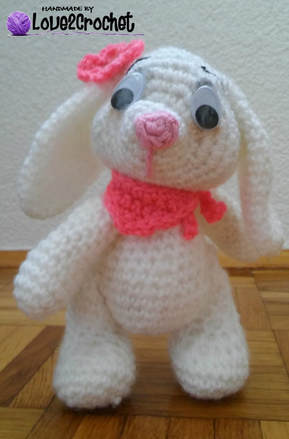
sweet BUNNY
I am officially hooked on Amigurumi toys. I have been making nothing but Amigurumi for the past few weeks and that is all I have been thinking about. This is another one I have recently made - Amigurumi Bunny. This pattern originally calls for 1.5 mm crochet hook, but I have used 2.5 mm crochet hook, so my Bunny turned out a bit bigger. But, not any less adorable, that is for sure:)
The finished Bunny measures 18 cm so it is a pretty large toy. Follow the instructions from the website completely as it is written very concisely and nicely and I had no problems with the pattern.
I have also made a simple flower to embellish my Bun-Bun:
- using a 2.5 mm crochet hook
- Color 1: Make a Magic Circle, ch 1 and make 6 SC inside the ring, slip stitch to the 1st stitch and change color
- Color 2: *(ch 2, 1 DC) into 1st st, (1 DC, ch 2, sl st) into next st*. Rep from * to * 4 times to end of round. Fasten off and weave in ends.
I have also made a tiny bandanna and put it around the Bunny's neck:
- using 2.5 mm crochet hook
worked in continuous rows:
- 2 ch, 2SC into the second loop from the needle, ch1 and turn (2 SC)
- 2 SC increase, ch 1 and turn (4SC )
- 2 SC, Sc, Sc, 2 sc, ch 1 and turn (6 SC)
- 2 SC, sc in the next 4 st, 2 SC, ch 1 and turn (8 SC)
- 2 SC in the 1st stitch, SC in the next 6 st, 2 SC in the last stitch, ch 1 and turn (10 SC)
-ch 12, make a 1 SC in each chain down the ch line (11 SC) and continue making SC until you reach the other end of the triangle (10 SC)
- when you reach the other end of the triangle, make another ch 12 and SC down the line (11 SC)
- sl st down the 2 left over edges of the triangle
- tie it around the bunny’s neck
And here is the link to the complete Bunny Amigurumi:
amigurumi.today/crochet-bunny-amigurumi-pattern/
Here are a few pics of my finished project..... I hope you enjoy making this Bunny as much as I did:) I just love how fluffy this little tail turned out to be:)
|

|
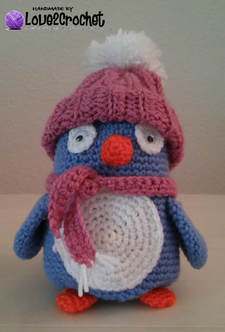
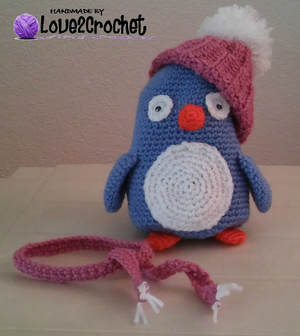
winter PENGUIN
This pattern for the Amigurumi Penguin was one of the best patterns I have ever come across. It was so detailed and well explained, I felt guided and pampered as a wee baby beginner crocheter - it was awesome! Follow it completely HERE!
I have again used the 2.5 mm crochet hook, just because it is the smallest one I own. The pattern calls for 2.00 mm crochet hook which would make the Penguin smaller than mine (and again, I used a slightly bigger hook). Mine measured 21 cm with the hat. So, if you want your Amigurumi Penguin to be smaller, use a smaller hook.
I cannot even start to tell you how much in AWE I was as I was working through the pattern - so detailed and so well explained. The interesting thing about this pattern is that the whole toy was made from the bottom to the top (feet to head). So, don't be confused as you begin, you are not reading it wrong:) And again, so well written, and worked in continuous rounds. So, grab your stitch marker, your crochet hook, favorite color yarn, get comfy and enjoy crocheting......
Here are a few pics of my Penguin.....
|
|
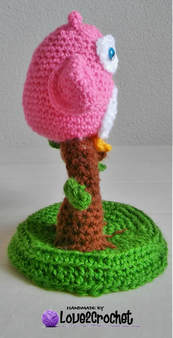
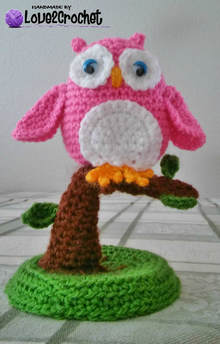
OWL ON A TREE
I have been circling around this Amigurumi Owl pattern for some time now, never having the courage to start this (what seemed like) lengthy endeavor. But, finally, yesterday, I reached into the depths of my soul, found the remnants of the "oomph", took my crochet hooks and yarn, and started the journey.....
I found this free pattern on the Ravelry site downloads: www.ravelry.com/patterns/library/an-owl-is-born
The original pattern calls for 0.75 mm crochet hook, but the smallest one I had was 2.5mm so that is the one I ended up using. I also usd 3.5mm to make the tree, so my owl turned out a bit bigger.
I have changed the pattern for the tree, leaves and the base to fit my needs, but the owl pattern is the same as in the original.
So, here it is, the changed patterns for the tree, leaves and the base.....
Owl - I used 2.5mm crochet hook, follow the original pattern in the links stated at the beginning of this post.
Tree
- 3.5 mm crochet hook, with brown yarn
- make a magic ring, work in continuous rounds
R1 - 4sc into magic ring (4)
R2 - inc, sc in each of next 3sts around (5)
R3 - sc, sc, inc, sc, sc (6)
R4 - inc, sc in each of next 5sts around (7)
R5 - sc in each st around (7)
R6 – R9 – sc in each stitch around (7)
R10 - inc, sc in each of next 6sts around (8)
R11 – R19- sc in each st around (8)
R20 - inc, sc in each of next 7sts around (9)
R21, R22- sc in each stitch around (9)
R23 - inc, sc in each of next 8sts around (10)
R24, R25 - sc in each st around (10)
R26 - *inc, sc, sc, sc* twice, 1 SC in the nest 2 stitches (12)
R27 – 1 SC in each stitch around (12)
R28 - *inc, sc, sc, sc, sc, sc* 2 times (14)
R29 – 1 sc in each stitch around (14)
Fasten off, leaving a tail for sewing, insert pipe cleaner and sew onto the base, embroider the roots
Tree branch (I used 2.5 mm crochet hook)
- Yarn through the chosen stitch on the already created tree
- ch 3 and sc down the chain (2 SC)
- sl stitch to the beginning stitch
- weave through the yarn and finish off
Leaves ( I used 2.5 mm crochet hook)
Big leaf:
- ch 5, sc in 2nd stitch from the hook
- hdc in the next, dc in the next, work in the last stitch (2 hdc – ch2, sc in the second chain – 2 hdc)
- working on the other side of the foundation chain: dc, hdc, sc in the last stitch
- sl to the beginning stitch
Small leaf:
- ch 4, sc in 2nd stitch from the hook
- dc in the next, work in the last stitch (hdc – ch2, sc in the second chain – hdc)
- working on the other side of the foundation chain: dc, sc in the last stitch
- sl to the beginning stitch
Base (10 cm jar lid, 3.5 mm hook):
- make a magic ring, work in continuous rounds
1. 6sc into magic ring (6)
2. 2sc in each st around (12)
3.*sc, inc* repeat around (18)
4. *sc, inc, sc* repeat around (24)
5. *inc, sc, sc, sc* repeat around (30)
6. *sc, sc, sc, inc, sc* repeat around (36)
7. *inc, sc, sc, sc, sc, sc* repeat around (42)
8. *inc, sc, sc, sc, sc, sc, sc* repeat around (48)
9. *inc, sc, sc, sc, sc, sc, sc, sc* repeat around (54)
10 and 11 (back loop only) sc in each st around (54)
12. sc in each st around (54)
Fasten off, weave in loose ends
A few reminders:
- hot glue the googly eyes on the owl
- hot glue the owl to the tree
- make sure your tree is sturdy so it can withstand the weight of the owl, I put the pipe cleaner and stuffed it with the cotton toy stuffing
- embroider the beak with the same color yarn as the feet
- this Amigurumi toy measures 18 cm from the base to the top of the owl's head
|

|
|
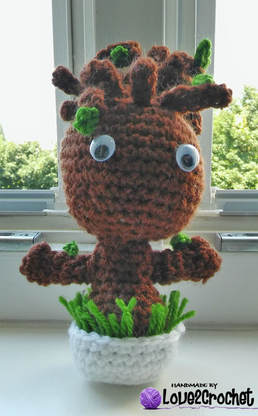
"I AM GROOT"
I watched the movie "Guardians of the Galaxy 2" recently and fell in love with the Baby Groot!:) So, I looked for the crochet patterns on Pinterest, because I just had to make me my very own Baby Groot. So, I found this link HERE!
The pattern is super easy and quite simple to follow and complete. I have made some changes, so here is my own version, only slightly different than the original (my Groot is about 20 cm tall)
Materials:
- brown yarn, green yarn, white yarn
- 2.5 mm and 3.00 mm crochet hook
- polyester or cotton filling
- yarn needle and scissors
- googly eyes
Steps and Procedures:
- HEAD
1. (in Brown) make a Magic Ring and 6 SC (6)
2. [ inc ]x 6 (12)
3. [ inc, sc ]x 6 (18)
4. sc, [ inc, sc 2 ]x 5, inc, sc (24)
5. [ inc, sc 3 ]x 6 (30)
6. sc 2, [ inc, sc 4 ]x 5, inc, sc 2 (36)
7-12. sc 36 (36)
13. sc 2, [ dec, sc 4 ]x 5, dec, sc 2 (30)
14. sc 30 (30)
15. [ dec, sc 3 ]x 6 (24)
16. sc, [ dec, sc 2 ]x 5, dec, sc (18)
- stuff the head at this point
17. [ dec, sc ]x 6 (12)
18. dec 6 (6)
Finish off and close up the little gap.
Glue the eyes between rows 9 and 10, with about 6 stitches in between (I used the hot glue gun)
HAIR
1. (in Brown) ch 10
2. turn, sc downt the chain (9 SC)
For the hair/bark we’re going to crochet a bunch of curly pieces. You can make as many or few pieces as you want, of whatever lengths you want. The above example is for a piece that’s 9 stitches long. For a piece 4 pieces long, just replace the 4 with a 9.
I made the following lengths:
3 x 9 stitches long
2 x 8 stitches long
3 x 7 stitches long
2 x 6 stitches long
2 x 4 stitches long
3 x 3 stitches long
Leave a tail for each one, long enough to use it to attach to the head later on.
- ARMS (make 2)
1. (in Brown) MR 6 (6)
2. sc 6 (6)
3. popcorn 4sc, sc 5 (6)
4-7. sc 6 (6)
Finish off, leaving enough of a tail to attach to the body later. I also crocheted a small green leaf for each hand.
- LEAVES (make as many as you wish):
- using 2,5 mm crochet hook
- ch 3, SC down the chain (2 SC)
- use the tail of the leaves to attach to the arms and the hair
- BODY
1. (in Brown) MR 6 (6)
2. inc 6 (12)
3. [ inc, sc ]x 6 (18)
4. BLO sc 18 (18)
5-6. sc 18 (18)
7. [ dec, sc 7 ]x 2 (16)
8. [ dec, sc 6 ]x 2 (14)
9. [ dec, sc 5 ]x 2 (12)
10. [ dec, sc 4 ]x 2 (10)
11-13. sc 10 (10)
Finish off, leaving a tail long enough to attach the head and stuff the body.
- POT
1. (in White) MR 6 (6)
2. [ inc ]x 6 (12)
3. [ inc, sc ]x 6 (18)
4. sc, [ inc, sc 2 ]x 5, inc, sc (24)
5. BLO sc 24 (24)
6-8. sc 24 (24)
Finish off and hide the tail.
Assembly:
- Put the longer hair pieces in the middle of the head and use slightly shorter pieces until you reach the edge. Some of them will have uneven lengths (for example, I usually make 3 pieces that are 7 stitches long). This just means that his hair won’t be completely symmetrical.
- glue the googly eyes
- sew in the leaves on the arms
- sew in the leaves of the hair
- sew in the arms to the body
- I also glued some green yarn strands on the bottom of the body and then glued the body to better fit into the pot
Can't you hear him? - "I AM GROOT!"
|

|
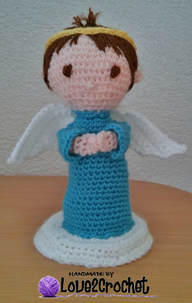
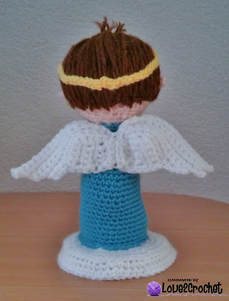
christmas ANGEL

I have been obsessed with making Amigurumi toys. My newest creation are these Angels... a boy and a girl.......
These Angels are about 20 cm tall and the base on which they stand is 11 cm in diameter.
Materials:
- white, blue, yellow, light pink, brown worsted weight yarn (or dark pink for the dress if you choose to make a girl Angel)
- 2.5 mm crochet hook
- sewing needle, scissors
- a round wooden plate, 11 cm in diameter (or - used a jar lid)
- stuffing material
- a marker
Steps and Procedures:
- I crocheted in rounds, so use a marker to track your progress
1. Head/body:
- with pink yarn:
1. make a magic ring, 6sc into magic ring (6)
2. 2sc in each st around (12)
3. *sc, inc* repeat around (18)
4. *sc, inc, sc* repeat around (24)
5. *inc, sc, sc, sc* repeat around (30)
6. *sc, sc, sc, inc, sc* repeat around (36)
7. sc in each st around (36)
8. *inc, sc, sc, sc, sc, sc* repeat around (42)
9- 15. sc in each st around (42)
16. *dec, sc in each of next 5sts* repeat around (36)
17. *sc, sc , sc, dec, sc* repeat around (30)
18. *dec, sc, sc, sc* repeat around (24)
- Start stuffing the head
19. *sc, sc, dec* repeat around (18)
20. *dec, sc* repeat around (12)
- Change color (blue or dark pink)
21. sc in each st around (12)
22. *sc, inc* repeat around (18)
23.*sc, inc, sc* repeat around (24)
24.-26. sc in each st around (24)
- Stuff the head firmly
27. *sc in each of next 7sts, inc* repeat around (27)
28.-30. sc in each st around (27)
31. *sc in each of next 8sts, inc* repeat around (30)
32.-34. sc in each st around (30)
35. *sc in each of next 9sts, inc* repeat around (33)
36.-38. sc in each st around (33)
39. *sc in each of next 10sts, inc* repeat around (36)
40.-44. sc in each st around (36)
- Fasten off, leaving a long tail for sewing
2. Arm (make 2): sleeves and hands are crocheted separately
Sleeve (make 2): with blue (or pink), make a magic ring ( leave a long tail for sewing in the beginning), work in rounds
1. 6sc into magic ring (6)
2.-4. sc in each st around (6)
5. *sc, sc, inc* repeat around (8)
6. sc in each st around (8)
7. *sc, sc, sc, inc* repeat around (10)
8. sc in each st around (10)
9. *sc, sc, sc, sc, inc* repeat around (12)
10. sc in each st around (12)
11. *sc, sc, sc, inc* repeat around (15)
- Fasten off, leaving a tail for sewing
Hand (make 2): with light pink, make a magic ring, work in rounds
1. 6sc into magic rind (6)
2.-7. sc in each st around (6)
- Fasten off
3. Hair
- with brown yarn
- Hair is basically just strands of brown sewn on the surface of the head. The original pattern has a great photo. Check it out here:
www.facebook.com/DoubleTrebleTrinkets/photos/pb.654549781254587.-2207520000.1453721204./973952219314340/?type=3&theater
- if making a girl Angel, tie a dark pink ribbon on the pig tails
4. Base:
- with white yarn
1. 6sc into magic ring (6)
2. 2sc in each st around (12)
3. *sc, inc* repeat around (18)
4. *sc, inc, sc* repeat around (24)
5.*inc, sc, sc, sc* repeat around (30)
6. *sc, sc, sc, inc, sc* repeat around (36)
7. *inc, 1 sc in the next 5 stitched* repeat around (42)
8. *inc, 1 sc in the next 6 stitches* repeat around (48)
9. *inc, 1 sc in the next 7 stitches* repeat around (54)
8. (back loop only) sc in each st around (54)
9. sc in each st around (54)
- Fasten off, weave in loose ends
5. Wings:
- with white yarn
- for wings, check out this website. My wings came out super cute.
kimlapsley.blogspot.ba/2012/10/buddy-angel-costume.html?m=1
6. Eyes, Ears and Nose:
- with light pink yarn
- Eyes: I just embroidered with some brown yarn in the spots that I'd like my eyes in
- Ears: MR and make 4 SC in the MR. Pull the thread and leave a long tail for sewing the ears onto the head.
- Nose: I just embroidered a nose with the pink yarn
7. Halo:
- with yellow yarn
- ch 51, and slip stitch down the chain (50 SC), attach to form a circle
- leave a long tail for sewing and sew it to the head
Assembly: you can assembly as you'd like, but I suggest the following
- make a head and body (stuff the head as you crochet)
- make arms (hands, sleeves)
- sew in the arms to the sleeves
- make a base
- sew on the hair (the longest process ever, but well worth it at the end) - check out the photo tutorial posted above
- make wings
- stuff the body
- sew in the body to the base (after the body is stuffed)
- sew on the wings
- sew on the ears and eyes and nose
- sew on the halo
- sew on the arms, and sew the palms of the hand together at the tip as if praying - after all, it is an Angel:)
- hot glue the base to the lid (or wooden disk)
- find a special place in your home for showing off your precious Angels for all to see and admire, or make it as a gift to make someone happy:)
|

|

|
|
tiny TEDDY BEAR

It has been a while since I posted on my blog..... not that I have not been crocheting! I truly have been crocheting up a storm lately, but never had the time to post about my completed projects.... so here we go now.....
One of my newest projects is this cute little Teddy Bear:) I have made him to decorate the door to my classroom (and it is doing so at this very moment). The kids love it - they keep poking, pulling, tugging on the Teddy Bear while they wait to enter my classroom.... Not that it makes me happy, but the Teddy is here for them....
The pattern is from this lovely lady Monica and the complete description and the pattern is found here:
www.crochetpattern.org/2016/05/little-teddy-bear.html
It is worth checking out, her pattern is super easy to read and follow. And this is how my Teddy Bear turned out....
"BEE" BADGEs

Recently our school was involved with the local community project called "Save the Bees". A fellow teacher asked me to help out and make some promotional and incentive materials that could be awarded to the students who were involved in the project. The first thing I thought about were the bee badges, and how making them and displaying them would be a great incentive for the kids. So, I found this pattern for the Bee key chain, which could easily be transformed into a badge. Thank you RepeatCrafterMe for the free pattern! And here is my version.... (Big and Small Bee badges)....
Materials:
yellow, black, white yarn
3.00 and 3.50 mm crochet hook
safety pin (for the back of the badge)
glue gun
googly eyes
scissors, needle
Steps and Procedure:
- with yellow yarn
1. Big Bee: (10cmx6cm)
- with 3.50 mm crochet hook
1. Make a Magic ring, chain 1 and make 6 SC in ring, join, chain 1
2: 2 SC in each stitch around, join, chain 1 (12 SC)
3: 2 SC in first, SC in next, repeat around, join, chain 1 (18 SC)
4-8: SC in each stitch around, join, chain 1 (18 SC)
- change to black yarn
9-10: SC in each stitch around, join, chain 1 (18 SC)
- change to yellow yarn
11: SC in each stitch around, join, chain 1 (18 SC)
12: SC Decrease, SC in next, repeat around, join, chain 1
- change to black yarn
13: SC in each stitch around, join, chain 1 (12 SC)
14: SC Decrease around.
- fasten off and weave in the ends
Big Bee Wings: (make 2)
- with 3.50 mm crochet hook and white yarn
- ch 7
1. Make 1 SC down the chain line (6 SC), ch 1 and turn
2, 3. Make 1 SC down the line (6 SC), ch 1 and turn
4. Make 1 SC in next 3 st, ch 1 and turn
5, 6. Make 1 SC in next 3 SC, ch 1 and turn
- SC around the edge of the wings, making 2 SC in every corner, making a SC-sl st-SC at the bottom of the wing, and sl st at the center (the indentation tip)
Big Bee Antenna: (make 2)
- using 3.50 mm crochet hook and double strands of black yarn
- ch 4,and sew onto the top of bee head
2. Small Bee: (8cmx4cm)
- with 3.00 mm crochet hook
1. Make a Magic ring, chain 1 and make 5 SC in ring, join, chain 1
2: 2 SC in each stitch around, join, chain 1 (10 SC)
3: 2 SC in first, SC in next, repeat around, join, chain 1 (15 SC)
4-6: SC in each stitch around, join, chain 1 (15 SC)
- change to black yarn
7-8: SC in each stitch around, join, chain 1 (15 SC)
- change to yellow yarn
9: SC in each stitch around, join, chain 1 (15 SC)
10: SC Decrease, SC in next, repeat around, join, chain 1 (10 SC)
- change to black yarn
11: SC in each stitch around, join, chain 1 (10 SC)
12: SC Decrease around. (6 SC)
- fasten off and weave in the ends
Small Bee Wings: (make 2)
- with 3.00 mm crochet hook and white yarn
- ch 5
1. Make 1 SC down the chain line (4 SC), ch 1 and turn
2, 3. Make 1 SC down the line (4 SC), ch 1 and turn
4. Make 1 SC in next 2 st, ch 1 and turn
5. Make 1 SC in next 2 SC, ch 1 and turn
- SC around the edge of the wings, making 2 SC in every corner, making a SC-sl st-SC at the bottom of the wing, and sl st at the center (the indentation tip)
Small Bee Antenna: (make 2)
- using 3.00 mm crochet hook and double strands of black yarn
- ch 3,and sew onto the top of bee head
Assembly: (for both Big and Small bee)
- sew the wings onto the back of the bee body
- use the hot glue gun to glue the safety pin between the L and R wing
- glue the googly eyes on the face
- sew on the antennas
- embroider the smile
"QUEEN BEE"

Our school was involved with the local community project called "Save the Bees". A fellow teacher asked me to help out and make some promotional and incentive materials. We thought that a silent auction would be a great way to help raise the funds for the "Save the bees" project and the award would be this BIG Queen Bee Amigurumi toy.
I found the pattern for this project here: sylkecrafts.com/old-patterns/
I have followed the pattern completely, and did not make any changes at all. I made a very big bee, using double strands of yarn and a 6.00 mm crochet hook. It turned out big, (40cmx17cm) which is exactly what I was going for. On this website you can also find the pattern for the Queen Bee Crown, which you will need for the project.
Check it out, it is a great pattern!
"HELLO KITTY" PENCIL TOP

I love making crochet items for my nephews! They love showing off pencil cases, hats, snuggle sacks and all those wonderful things I make for them. Lately, I have discovered this cute "Hello Kitty" pencil top and have immediately made one. I am sharing the pattern here, it is super cute and so worth the time and effort. Enjoy!
Materials:
White, pink, magenta, black yarn
1.30 and 1.75 mm crochet hook
Polyester fiberfill
Stitch marker for working in the round
Needle for sewing
Scissor
Hot Glue
Pencil
Steps and Procedures:
1. Head:
- with white yarn and 1.75 mm crochet hook
- ch 6
R1: starting from 2nd chain from hook, 4 sc, 3 sc in last st, continue your work st around the other side of chain, 3 sc, 2 sc in last st. (12)
R2: inc, 3 SC, 3 inc, 3 SC, 2 inc (18)
R3: inc, 6 SC, 3 inc, 6 SC, 2 inc (24)
R4: inc, 7 SC, inc, SC, inc, SC, inc, 7 SC, inc, SC, inc, SC (30)
R5-7: SC around (30)
R8: dec, 7 SC, dec, SC, dec, SC, dec, 7 SC, dec, SC, dec, SC (24)
R9: dec, 6 SC, 3 dec, 6 SC, 2 dec (18)
- stuff the head
R10: SC, dec, rep 6x (12)
- stuff completely
R11: dec, rep 6x (6)
Continue working for pencil cover
2. Pencil Cover:
- with white yarn and 1.75 mm crochet hook
R12: SC, inc, rep 3x (9)
R13-20: SC around (9)
- change color to pink
- change to 1.30 mm crochet hook
R21-22: SC around
R23: dec, SC (repeat – 6)
R24: SC around (6)
- fasten off
3. Ears (make 2):
- use white and 1.75 mm crochet hook
- make a Magic Ring
R1: SC, inc, rep 2x (6)
R2: 2 SC, inc, rep 2x (8)
R4: 8 SC
- fasten off
4. Bow
- with magenta yarn and 1.75 mm crochet hook
- Ch 3, make 2 DC in the 1st st, ch 3, sl st to the 1st st
- ch 3, make 2 DC in the center stitch, ch 3, sl st to the center stitch
Assembling:
- glue (or sew) the ears on the head
- using black yarn, embroider the eyes and the whiskers.
- using pink yarn, embroider the nose between eyes
- glue (or sew) the bow on the head
- put it on the pencil top
"SEA CREATURES" PENCIL TOPS

I found this great website with free patterns for the "Sea Creatures" crochet pencil tops. I have immediately made all 3 pencil tops - the Octopus, the Whale and the Angelfish. The following are the materials I have used, which differ a bit from the original pattern:
Materials:
1.75 mm crochet hook
stuffing material
googly eyes
glue gun
white, grey, magenta, sky blue, light blue yarn
scissors, needle, stitch marker
The following is the link to these awesome patterns! Thank you Irene Strange for the original pattern!
www.topcrochetpatterns.com/crochet-patterns/crochet-pencil-toppers
"CACTUS" PENCIL TOP

These are super cute, and super easy pencil tops to make. It took me 10 min to make each one. I hope my nephew likes them on his pencils, and enjoys showing them off:)
Materials:
Dark green, light green, pink, red yarn
1.75 mm crochet hook
Stitch marker
Scissors, needle
Steps and Procedure:
Flower:
- with 1.75 mm crochet hook and pink/red yarn
1. Make a Magic Ring and make * a sl st, 2 DC * (repeat 5 times), sl st to center
- close the Magic Ring to form the circle and create the flower
Cactus Body:
- with 1.75 mm crochet hook and dark green/light green yarn
R1: Make a Magic Ring and make 6 SC inside the ring
R2-20: Make 1 SC in each stitch (6 SC)
Cactus Arm 1: (dark green)
- with 1.75 mm crochet hook and dark green yarn
R1: Make a Magic Ring and make 6 SC inside the ring
R2-4: Make 1 SC in each stitch (6 SC)
R5-7: Make 2 SC – 2 DC – 2 SC (6 st)
R8: SC decrease, 4 SC (5 SC)
R9-10: 5 SC
Cactus Arm 2: (dark green)
- with 1.75 mm crochet hook and dark green yarn
R1: Make a Magic Ring and make 6 SC inside the ring
R2-4: Make 1 SC in each stitch (6 SC)
R5-7: Make 2 SC – 2 DC – 2 SC (6 st)
R8: SC decrease, 4 SC (5 SC)
R9: 5 SC
Cactus Arm 1a: (light green)
- with 1.75 mm crochet hook and light green yarn
R1: Make a Magic Ring and make 6 SC inside the ring
R2-7: Make 1 SC in each stitch (6 SC)
R8,9: Make 2 SC – 2 DC – 2 SC (6 st)
R10: SC decrease, 4 SC (5 SC)
R11: 5 SC
Cactus Arm 2a: (light green)
- with 1.75 mm crochet hook and light green yarn
R1: Make a Magic Ring and make 6 SC inside the ring
R2-5: Make 1 SC in each stitch (6 SC)
R6,7: Make 2 SC – 2 DC – 2 SC (6 st)
R8: SC decrease, 4 SC (5 SC)
R9: 5 SC
- stuff the cacti arms with stuffing material
- glue the flower on top of the cactus body
- glue the cacti arms onto the cactus body
flowers in the watering can
I recently found this amazing pattern for these lovely „Flowers in a Watering Can“ designed and created by "Little Raven Fiber Arts". I worked on the patterns, and changed them a bit to suit my needs. The hook suggested in the original pattern made the flowers/watering cans way too big for my taste, so I used a smaller hook. The size of each of these beauties is approximately 20x25 cm. If you want it smaller, I suggest a smaller hook.
Flower pens: about 20 cm tall
Watering can: about 8 cm tall, 25 cm wide (including spout and handle), 13 cm wide (without spout and handle)
Here is my version of the pattern. Thank you to furlscrochet.com/blogs/amigurumi-crochet-tutorials/may-flowers-pen-amigurumi for the original and free design and a pattern......
Materials:
- worsted weight yarn in two colors for the watering can (white, grey, blue, pink), brown, green, and flower colors (red, yellow-orange, white-yellow)
- 3.00 mm crochet hook
- cardboard to reinforce the base
- generic ballpoint pen
- stuffing material
- tapestry needle
- stitch marker
Steps and Procedure:
1. Watering Can
With grey/blue/pink, make a magic ring
R1: 7 sc in magic ring (7)
R2: 2 sc in each sc around (14)
R3: *2 sc in 1st sc, sc in next sc* (repeat around) (21)
R4: *2 sc in 1st sc, sc in next 2 sc* (rep around) (28)
R5: *2 sc in 1st sc, sc in next 3 sc* (rep around) (35)
R6: *2 sc in 1st sc, sc in next 4 sc* (rep around) (42)
R7: *2 sc in 1st sc, sc in next 5 sc* (rep around) (49)
R8: *2 sc in 1st sc, sc in next 6 sc* (rep around) (56)
- Trace the circle on your cardboard, cut out, set aside.
R9: in Back Loop Only, sc dec, sc in next 26 sc, sc dec, sc in last 26 sc (54)
R10-24: sc in each sc around (54)
- Place the cardboard disc into the bottom of the can. Make sure it is a snug fit.
R25: in BLO, *sc dec, sc in next 25 sc*(rep 2x) (52)
R26: in BLO, sc in 1st 12 sc, sc dec, sc in next 24 sc, sc dec, sc in last 12 sc (50)
R27-30: in both loops, sc in each sc around (50)
- CHANGE COLOR to brown
R31: in Front Loop Only, sc in each sc around (50)
R32: in both loops, *sc dec, sc in next 6 sc* (rep 6x), sc in last 2 sc (44)
R33: *sc dec, sc in next 5 sc* (rep 6x), sc in last 2 sc (38)
R34: *sc dec, sc in next 4 sc* (rep around) (32)
Roll the interior of the can down into the can base (like the cuff of a sock) until Rnd 25 makes a flat rim. The dirt should be forming a little mound inside. (for the detailed pic go to the original pattern pics)
Continue crocheting like this.
R35: *sc dec, sc in next 3 sc* (rep around), sc in last 2 stitches (26)
- Stuff the inside of the can: do not stuff under the folded rim.
R36: *sc dec, sc in next sc* (rep 8x), sc in last 2 sc (18)
R37: sc dec, sc in next 4 sc, sc dc, sc in next 3 sc, sc dec, sc in next 3 sc, dec sc (14)
- Fasten off
With brown, make a magic ring
R 1: 7 sc in the magic ring (7)
R2: 2 sc in each sc around (14)
R3: in FLO, sc in each sc around (14)
R4-10: sc in each sc around (14)
FO and work the tube into the hole in the stuffing of the watering can. Sl st the tube to the center of the watering can.
Watering Can Handle
With grey/blue/pink, ch 9, join with a slip stitch to form a ring (be careful not to twist the ch)
R1: sc in each ch around (8)
R2-18: sc in each sc around (8)
R19: 2 sc in 1st sc, sc in last 7 sc (9)
R20-23: sc in each sc around (9)
FO leaving a medium tail for attaching to the can base. Flatten the tube.
Sew the wide end of the handle just under the rim of the watering can. Weave in this end. Sew the narrower end of the handle to the bottom of the can. Make sure the top and the bottom of the handle are vertically aligned with each other.
Spout
With white yarn make a magic ring
R1: 7 sc in the magic ring (7)
R2: 2 sc in each sc around (14)
R3: *2 sc in 1st sc, sc in next sc* (rep around) (21)
CHANGE COLOR to grey/blue/pink
R 4: *2 sc in 1st sc, sc in next 2 sc* (rep around) (28)
R5: in BLO, *sc dec, sc in next 2 sc*( rep around) (21)
R6: sc in each sc around (21)
R7: *sc dec, sc in next 2 sc* rep *-* 4x, sc dec, sc in next sc, sc dec (15)
R8: *sc in 1st 4 sc, sc dec* (rep 2x), sc in last 3 sc (13)
R9: in Back Loop Only, sc in each sc around (13)
STUFF the spout end firmly
R10: now in both loops, sc dec, sc in last 11 sc (12)
R11-18: sc in each sc around (12)
R19: hdc in 1st sc, dc in next 3 sc, hdc in next sc, sc in next sc, slp st in next sc, TURN
R20: sk slp st, sc in next 6 sts
FO leaving remaining stitches unworked. STUFF the neck of the spout firmly and evenly. Sew it to the bottom of the can - directly across from the handle. Weave in ends.
And here are the Flower patterns....
1. DAISY
Petals (make 12)
- With white, ch 9
R1: sc in 2nd ch from hook and in next 2 ch, hdc in next 3 ch, sc in next ch, 2 sc in last ch, turn the work so you’re working along the bottom edge of the ch, sc in next ch, hdc in next 3 ch, sc in next ch, slp st in last 2 ch
- Fasten Off
- Arrange all the petals into two sets of six.
- Using the FO tails of each petal, attach to next petal to the 1st sc of R1. (You’ll have two six-petaled flower layers)
- Pull the tail ends of the top set of six petals through the center hole of the bottom set of six petals.
- Arrange the top layer of petals so they’re offset from the bottom.
Center
- With yellow, make a magic ring
R1: 6 sc in the magic ring (6)
R2: 2 sc in each sc around (12)
- FO
- There are 12 petals, and 12 stitches around this circle.
- In order to keep the petals arranged in their stacked offset, we’re going to stitch the center on by matching each sc of this circle to each petal.
- This will form a stitched yellow circle around the backside of the petals: this won’t be visible once we sew the stem on. Once you’ve affixed all 12 petals to all 12 stitches of the yellow center, weave in the yellow end.
- You can tie the white ends together at the back and trim them, stuffing the trimmed ends into the back of the flower center. They will end up hidden under the stem.
Stem
- With green, ch 7, join with a slip stitch to form a ring (be careful not to twist chain)
R1: work 6 sc in ring (6)
R2-23: sc in each sc around (6)
R24: slp st in 1st 3 sc, dc in next sc, 2 dc in next sc, dc in last sc (7)
R25: 2 sc in each sc around (14)
- Fasten Off
- Sew to the underside of the daisy, covering the yellow stitches that aligned the petals, weave in the ends.
- Uncap the ballpoint pen and fit the stem over it like a sleeve. It should be snug enough that you won’t need to glue the pen to keep it inside, and this way when the ink runs out, it’s easy to replace!
Leaves (make 2)
- With green, ch 10
R1: sc in 2nd ch from hook and in next 2 ch, hdc in next 3 ch, dc in next 2 ch, [dc, ch 2, dc] in last ch, turn the work so you’re working along the bottom edge of the ch, dc in next 2 ch, hdc in next 2 ch, sc in last 4 ch
- Fasten Off
- Sew to the sides of the stem, one higher and one lower. Weave in the ends.
2. DAFFODIL
Petals (make 6)
- With yellow, ch 9
R 1: hdc, dc in 3rd ch from hook, 2 dc in each of the next 2 ch, dc in next ch, hdc in next ch, sc in next ch, slp st in last ch, CH 2, slp st in same ch, turn the work so you’re working along the bottom edge of the ch, hdc in next ch, dc in next ch, 2 dc in each of the next 2 ch, dc, hdc, sc, slp st to join
- Fasten Off
- Arrange the petals into two groups of three. Use the FO ends to tack one set of three petals together, repeat with the second set of three petals (the idea is the same as with the daisy petals).
- Layer both sets of three on top of each other, offset, and tack them together with a few whipstitches. Knot the ends off at the back, you can trim these down, they will be concealed under the stem.
Corona (center cup)
- With orange, make a magic ring
R1: 6 sc in the magic ring (6)
R2: 2 sc in each sc around (12)
R3-5: sc in each sc around (12)
R6: *2 sc in 1st sc, sc in next sc* (rep around) (18)
R7: *ch 1, slp st in next sc* (rep around)
- FO and weave in this end. Use the beginning tail to stitch the corona to conceal the open center of the petals. Weave in the end.
Stem
- With green, ch 7 and join with a slip st to form a ring (be careful not to twist chain)
R1: sc in each ch around (6)
R2-25: sc in each sc around (6)
R26-27: slp st in 1st 3 sts, dc in last 3 sts (6)
R28: 2 sc in each st around (12)
- FO, sew this end of the stem onto the back of the daffodil, concealing the tied-off ends from the petals and the open center.
- Uncap the ballpoint pen and fit the stem over it like a sleeve. It should be snug enough that you won’t need to glue the pen to keep it inside.
Leaf
- With green, ch 19
R1: sc in 2nd ch from hook and in each of the next 13 ch, slp st in last 4 ch, ch 2 and turn the work so you’re working along the bottom edge of the ch, slp st in next 6 ch, sc in remaining ch (11)
- FO, sew the bottom of the leaf to the stem of the daffodil, weave in all remaining ends.
3. TULIP
Inner Flower
With red, make a magic ring
R1: 6 sc in the magic ring (6)
R2: 2 sc in each sc around (12)
R3: *2 sc in 1st sc, sc in next sc* (rep around) (18)
R4: *2 sc in 1st sc, sc in next 2 sc* (rep around) (24)
R5-7: sc in each sc around (24)
R8: *sc dec, sc in next 2 sc* (rep around) (18)
R9-10: sc in each sc around (18)
- STUFF the inner flower firmly
R11: *sc dec, sc in next sc* (rep around) (12)
R12: *sc dec, sc in next sc* (rep around) (8)
- STUFF the flower more if necessary
R13: sc dec (2)
- FO and weave in the ends.
Outer petals (make 2)
With red, ch 4
R1: sc in 2nd ch from hook and in next ch, 6 dc in last ch, turn the work so you’re working along the bottom edge of the ch, sc in next ch, sc in same ch as 1st sc (10)
R2: 2 sc in 1st sc, sc in next 2 sc, 2 dc in each of the next 5 sts, sc in last 2 sc (16)
R3: (sc, ch 1, sc) in 1st sc, sc in next 3 sc, 2 dc in next 9 sts, sc in last 3 sts (26)
- FO leaving remaining sts unworked. Sew the bottom half of the teardrop shape to either side of the inner flower. The bottom of each outer petal should touch/overlap round 1 of the inner flower. Weave in ends.
Stem
Ch 7, join with a slip stitch to form a ring (be careful not to twist chain)
R1: work 6 sc in ring (6)
R2-23: sc in each sc around (6)
R24: 2 sc in each sc around (12)
- FO, weave in the first end. Use the FO end to sew the stem to the bottom of the tulip flower. Weave in end.
- Uncap the ballpoint pen and fit the stem over it like a sleeve. It should be snug enough that you won’t need to glue the pen to keep it inside.
Leaves (make 2)
- with green ch 20
R1: dc in 3rd ch from hook, dc in next 13 ch, hdc in next 2 ch, sc in next ch, slp st in last ch, ch 1, turn the work so you’re working along the bottom edge of the ch, slp st in same ch, sc in next ch, hdc in next 2 ch, dc in last 14 ch
- FO and sew the bottom of the leaves to each side of the stem, right where it would meet the dirt (if you sew it to the very bottom of the pen, it makes the stem too wide to fit). Weave in ends.

TIger joe

A friend commissioned this funny Tiger Joe doll recently.... This was such a fun pattern to make, and it did take a few days, since it is a very intricate pattern with lots of details. The original pattern is by Allison Hoffman from www.craftyiscool.com/. She has lots of free patterns on her site, but this pattern is one of the paid ones, so I am not able to share it here. Please go to her website for details and the pattern.
Materials:
2.50 and 3.00 mm crochet hook
skin color, dark blue, brown, dark brown, turquoise, silver grey, yellow, orange, white, black, pink yarn
4 black google eyes
glue gun
16 gauge wire
brown, black felt
8 - 6 mm silver jump rings
silver chain 8 cm long
black sharpie marker
Steps and Procedure:
- Tiger Joe is about 32 cm tall and the Tiger Cub is about 8 cm tall
I have followed the instruction and the pattern from www.craftyiscool.com/product-page/tiger-king-joe-exotic-crochet-pattern entirely, therefore do not take any credit for the creativity of this project.
I did, however, had to change a few things, just because I did not have them or could not buy them in my part of the world.
1. I did not have the blue safety eyes, so I crocheted a MR and 6 SC inside the ring with turquoise yarn for the eyes
2. The black center for the eyes was a cut out from the google eyes, which I just glued onto the blue and to the face in the eye sockets
3. I did not have a cat nose, so I embroidered the black on the muzzle of the tiger
- I followed all all the other steps and procedures from the original pattern stated in the link above
This was such a fun project to make, and I do hope my friend likes it as a gag gift. Here is how my Tiger Joe turned out!
HAWAIIAN MINION

I LOOOOOOOOOVE making Amigurumi toys! It is such a satisfying experience to finish a cute toy, to put in so much time, effort and dedication, and to have it displayed in your home! And this adorable Hawaiian Minion is just the thing! I love this pattern! It is a completely free pattern found here: amigurumi.today/hawaiian-minion-crochet-amigurumi-pattern/
It did take me two days to make this adorable amigurumi, and I fully intent to display it proudly in my classroom that is supposed to have an Ocean theme - I think that my little Minion would be a great fit! I will just have to be very careful, and not let the kiddles touch him too much, but I know it will be nearly impossible since he is "sooooo daaaaarn cuuuuute"!
Anyways.... if you'd like to make one just like this, click on the link above to make it yourself - it is so worth it! My Minion is 25 cm long, and his guitar is 18 cm, but you can make it smaller by using a smaller hook.
Materials:
2.50 mm crochet hook
yellow, green, brown, beige, black, white, grey, red, blue, pink, purple worsted weight yarn
white sewing thread
needle, scissors
stitch marker
glue gun (optional) for gluing the flowers onto the head
jewelry wire
stuffing material
small amount of cardboard
I promise you that this pattern is completely free and accessible at no cost. If you'd like a PDF pattern you will however have to pay a small amount, but if you do not mind (like me) looking at the website's link, just sign up. Have fun!

