|

|

In the spirit of the upcoming Christmas and New Year Holidays, I have decided to make these adorable Christmas trees. They are so easy to make, such a quick project. I made them as tree ornaments, and they are super cute. So, here is the pattern...
Materials:
3.00 mm crochet hook
green yarn, light green, dark green
glue gun
sparkling shapes for decorating the tree
stuffing material
Steps and Procedure:
- making the Body of the Tree
- using 3.00 mm crochet hook and a green yarn of your choice, make a Magic Ring and make 6 SC
R1: inc, sc, inc, sc, inc, sc (9)
R2: 9 SC around (1 SC in every stitch around)
R3: inc, sc2, inc, sc2, inc, sc2 (12)
R4: 12 SC around
R5: inc, sc3, inc, sc3, inc, sc3 (15)
R6: 15 SC around
R7: inc, sc4, inc, sc4, inc, sc4 (18)
R8: 18 SC around
R9: inc, sc5, inc, sc5, inc, sc5 (21)
R10: 21 SC around
R11: inc, sc6, inc, sc6, inc, sc6 (24)
R12: 24 SC around
R13: inc, sc7, inc sc7, inc, sc7 (27)
R14: 27 SC around
R15: inc, sc8, inc, sc8, inc, sc8 (30)
R16: 30 SC around
R17: inc, sc9, inc, sc9, inc, sc9 (33)
R18: 33 SC around
R19: inc, sc10, inc, sc10, inc, sc10 (36)
R20: 36 SC around
- Making the Base of the Tree:
- Make a Magic Ring with 6sc.
R1: inc into each st (12)
R2: [inc, sc] repeat (18)
R3 [inc, sc 2] repeat (24)
R4: [inc, sc 3] repeat (30)
R5: [inc, sc 4] repeat (36)
- sl st the base to the body of the tree, do not forget to stuff with the stuffing material
- use the glue gun to glue various sparkling shapes onto the tree
- glue the star to the top of the tree
- pull the silk line through the top for hanging onto the tree as an ornament

|
|

Here it is, another patter for the Christmas tree. This one was more elaborate and it took a bit more time to make because of the rippled effect. This one is even cuter and more realistic. Give it a try....
Materials:
3.00 mm crochet hook
green yarn of your choice
stuffing material
glue gun
sparkly items as decoration
stitch marker
Steps and Procedure:
- Making the Body of the Tree
R1: Make a Magic Ring and 4 sc (4 sc)
R2: Sc in each sc (4 sc)
R3: [INC, SC] 2 times (6 sc)
R4 (working only in back loops): [INC, SC in next 2 stitches] 2 times (8 sc)
R5: (working in both loops) - Sc in each sc (8 sc)
R6 (only back loops): [INC, sc in next 3 sc] 2 times (10 sc)
R7 (both loops): Sc in each sc (10 sc)
R8 (only back loops): [INC, sc in next 4 sc] 2 times (12 sc)
R9: Sc in each sc (12 sc)
R10 (only back loops): [INC sc in next 5 sc] 2 times (14 sc)
R11: Sc in each sc (14 sc)
R12 (only back loops): [INC, sc in next 6 sc] 2 times (16 sc)
R13: Sc in each sc (16 sc)
R14 (only back loops): [INC, sc in next 7 sc] 2 times (18 sc)
R15: Sc in each sc (18 sc)
R16 (only back loops): [INC, sc in next 8 sc] 2 times (20 sc)
R17: Sc in each sc (20 sc)
R18 (only back loops): [INC sc in next 9 sc] 2 times (22 sc)
R19: Sc in each sc (22 sc).
- Join with a slip stitch to first sc. Do not fasten off, but continue working the branches of the tree.
- Ch 3, join this with a slip stitch to the front loop of 1st st in round 18.
- In the front loop of each of the next 22 stitches you will be making [sc, ch 6, sc].
- When you have completed the round join with a slip stitch to the 1st stitch of the round.
- Ch 3 and join with a slip stitch to the front loop of 1st stitch of the previous back loop round from round 16.
- In the front loop of each of the next 20 stitches you will be making [sc, ch 6, sc].
- Ch 3 and join with a slip stitch to the front loop of 1st stitch of the previous back loop round from round 14.
- In the front loop of each of the next 18 stitches you will be making [sc, ch 5, sc].
- Ch 3 and join with a slip stitch to the front loop of 1st stitch of the previous back loop round from round 12.
- In the front loop of each of the next 16 stitches you will be making [sc, ch 5, sc].
- Ch 3 and join with a slip stitch to the front loop of 1st stitch of the previous back loop round from round 10.
- In the front loop of each of the next 14 stitches you will be making [sc, ch 4, sc].
- Ch 3 and join with a slip stitch to the front loop of 1st stitch of the previous back loop round from round 8.
- In the front loop of each of the next 12 stitches you will be making [sc, ch 4, sc].
- Ch 3 and join with a slip stitch to the front loop of 1st stitch of the previous back loop round from round 6.
- In the front loop of each of the next 10 stitches you will be making [sc, ch 3, sc].
- Ch 3 and join with a slip stitch to the front loop of 1st stitch of the previous back loop round from round 4.
- In the front loop of each of the next 8 stitches you will be making [sc, ch 2, sc].
- Making the Base of the Tree
- Make a Magic Ring with 4 sc.
R1: inc into each st (8)
R2: [inc, sc] repeat (12)
R3 [inc, sc 2] repeat (16)
R4: [inc, sc 3] repeat (20)
R5: [inc, sc 9] repeat (22)
- sl st the base to the body of the tree, do not forget to stuff with the stuffing material
- use the glue gun to glue various sparkling shapes onto the tree
- glue the star to the top of the tree
- pull the silk line through the top for hanging onto the tree as an ornament
|

|

This is a cute layered Christmas tree with snow on its branches and a tiny jingle bell on top! Cuteness!
Materials:
3.00 mm crochet hook
green yarn of your choice, white yarn
stitch marker
scissors, needle
stuffing material
tiny jingle bell
Steps and Procedure:
This tree is made in three layers that are stacked on top of each other and sewn together at the end
- Bottom Layer
- with green yarn
R1: 6 sc in a Magic Circle (6 sts)
R2: (inc, sc in next 2 sts) 2 times (8 sts)
R3: (inc, sc in next 3 sts) 2 times (10 sts)
R4: (inc, sc in next 4 sts) 2 times (12 sts)
R5: (inc, sc in next 5 sts) 2 times (14 sts)
R6: (inc, sc in next 6 sts) 2 times (16 sts)
R7: (inc, sc in next 7 sts) 2 times (18 sts)
R8: (inc, sc in next 8 sts) 2 times (20 sts)
R9: (inc, sc in next 9 sts) 2 times (22 sts)
R10: (inc, sc in next 10 sts) 2 times (24 sts)
R11: (inc, sc in next 11 sts) 2 times (26 sts)
R12: (3 sc in next st, sl st in next st) 13 times (52 sts)
- change to white and make 1 SC along the edge ripple (52 SC)
- Fasten off and weave in all ends. Set the piece aside until assembly.
- Middle Layer
- with green yarn
R1: 6 sc in a Magic Circle (6 sts)
R2: (inc, sc in next 2 sts) 2 times (8 sts)
R3: (inc, sc in next 3 sts) 2 times (10 sts)
R4: (inc, sc in next 4 sts) 2 times (12 sts)
R5: (inc, sc in next 5 sts) 2 times (14 sts)
R6: (inc, sc in next 6 sts) 2 times (16 sts)
R7: (inc, sc in next 7 sts) 2 times (18 sts)
R8: (inc, sc in next 8 sts) 2 times (20 sts)
R9: (inc, sc in next 9 sts) 2 times (22 sts)
R10: (3 sc in next st, sl st in next st) 11 times (44 sts)
- change to white yarn and make 1 SC in each st around (44 SC)
- Fasten off and weave in all ends. Set the piece aside until assembly.
- Top Layer
- with green yarn
R1: 6 sc in a Magic Circle (6 sts)
R2: (inc, sc in next 2 sts) 2 times (8 sts)
R3: (inc, sc in next 3 sts) 2 times (10 sts)
R4: (inc, sc in next 4 sts) 2 times (12 sts)
R5: (inc, sc in next 5 sts) 2 times (14 sts)
R6: (inc, sc in next 6 sts) 2 times (16 sts)
R7: (inc, sc in next 7 sts) 2 times (18 sts)
R8: (3 sc in next st, sl st in next st) 9 times (36 sts)
- change to white yarn and make 1 SC in each stitch around (36 SC)
- Fasten off and weave in all ends. Now with your bottom, middle, and top layers complete, you can assemble the final tree.
- Base:
- with green yarn
R1: 6 sc in a Magic Circle (6 sts)
R2: (inc) 2 times (12 sts)
R3: (inc, sc in next 1 st) repeat (18 sts)
R4: (inc, sc in next 2 sts) repeat (24 sts)
R5: (inc, sc in next 11 sts) repeat (26 sts)
- Stack the finished layers on top of each other starting from the bottom (the biggest layer)
- pass the needle with the yarn multiple times through the center of all 3 layers securing the tight fit
- sew the tiny jingle bell on top (optional)
- stuff the tree lightly and sl st the Base to the inside of the R11 (bottom layer)
- attach the silk line if making an ornament
|

|
So, here it is.... It is that time of the year where the Christmas tree is being decorated and the Christmas decorations are everywhere. In that fashion, I have decided to add another section to my blog - Christmas decorations.
The first pattern I have made to celebrate this festive season is, of course, the Candy Cane. Here is the pattern!
Materials:
3.00 mm crochet hook
white, green/red yarn
soft wire for shaping the candy cane
glue gun
Steps and Procedure:
- with 3.00 mm crochet hook and white yarn, ch 40
- make 2 HDC in the 4th ch from the hook and 3 HDC in each chain to the end of the chain
- fasten off
- with 3.00 mm crochet hook and red/green yarn, ch 40
- make 2 HDC in the 4th ch from the hook and 3 HDC in each chain to the end of the chain
- fasten off
- twist both coils around each other to from the candy cane. I have added the wire for the more durable shape retention. Bend slightly.
- to secure the ends and prevent uncoiling, use the glue gun to glue the both ends to the wire.
- make the hanging loop using the silk line
|
|
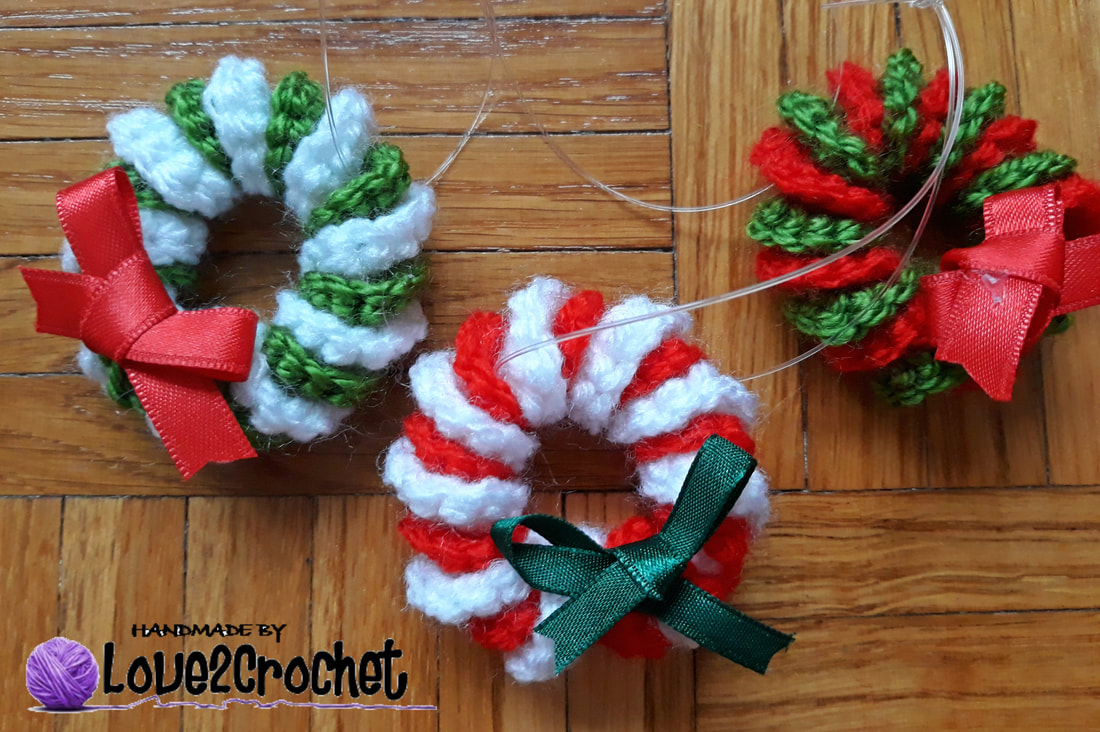
Here is another pattern for the Christmas decorations to festively decorate your home - the easy Christmas wreath. Here is the pattern:
Materials:
3.00 mm crochet hook
white, green/red yarn
glue gun
Steps and Procedure:
- with 3.00 mm crochet hook and white yarn, ch 30
- make 2 SC in the 2nd ch from the hook and 3 SC in each chain to the end of the chain
- fasten off
- with 3.00 mm crochet hook and red/green yarn, ch 30
- make 2 SC in the 4th ch from the hook and 3 SC in each chain to the end of the chain
- fasten off
- twist both coils around each other to from the wreath. Shape it in a circle, and to secure the ends and prevent uncoiling, use the glue gun to glue the both ends together.
- glue the bow to the top for a more festive look
- make the hanging loop using the silk line
- play around with different colors, I made red/white, green/white and red/green combinations

|
|

The Gingerbread man is a must when it comes to Western Christmas traditions. So, I have also decided to crochet one that could be put up onto a Christmas tree. Here is the pattern
Materials:
3.00 mm crochet hook
beige/honey, white yarn
glue gun
decorative items to glue as buttons
silk line (for hanging)
scissors, needle
Steps and Procedure:
- making the Body (make 2)
- with beige/honey yarn, ch 4.
R1: Work 2 sc in 2nd ch from hook and each ch across, turn—6 sc.
R2–5: Ch 1, sc in each sc across, turn.
R6: Ch 1, [sc2tog] 3 times, turn—3 sc.
R7: Ch 5, sc in 2nd ch from hook and in next 3 ch, sc in next sc, 2 sc in next sc, sc in next sc, turn—8 sc.
R8: Ch 5, sc in 2nd ch from hook and in next 3 ch, sc in each sc across, turn—12 sc.
R9: Ch 1, sc2tog, sc in last 10 sc, turn— 11 sc
R10: Ch 1, sc2tog, sc in next 7 sc; leave remaining sts unworked, turn—8 sc.
R11: Ch 1, sc in first 6 sc; leave remaining sts unworked, turn—6 sc.
- making the First Leg
R1: Ch 1, sc in first 3 sc; leave remaining sts unworked, turn—3 sc.
R2: Ch 1, sc in each sc across, turn.
R3: Ch 1, 2 sc in first sc, sc in next 2 sc, turn—4 sc.
R4: Ch 1, sc in each sc across. Fasten off.
- making the Second Leg
R1: With wrong side facing, join beige/honey yarn with sc in first unworked sc of Row 11, sc in next 2 sc, turn—3 sc.
R2: Ch 1, sc in each sc across, turn.
R3: Ch 1, sc in first 2 sc, 2 sc in last sc, turn—4 sc.
R4: Ch 1, sc in each sc across.
R5: Ch 1, sc in each sc across;
- Aline both gingerbread men and and connect them to each other working across ends of rows, in sts, and in opposite side of foundation ch, sc evenly spaced around working 2 sc as needed in rows at curved edges; join with slip st in first sc.
- Fasten off
- Attach white yarn and sl st along the edges of the gingerbread man.
- Embroider the eyes, smile, and along both arms and legs
- Glue on the decorative buttons
- Attach the silk line on top of head to hang on the tree
|
|
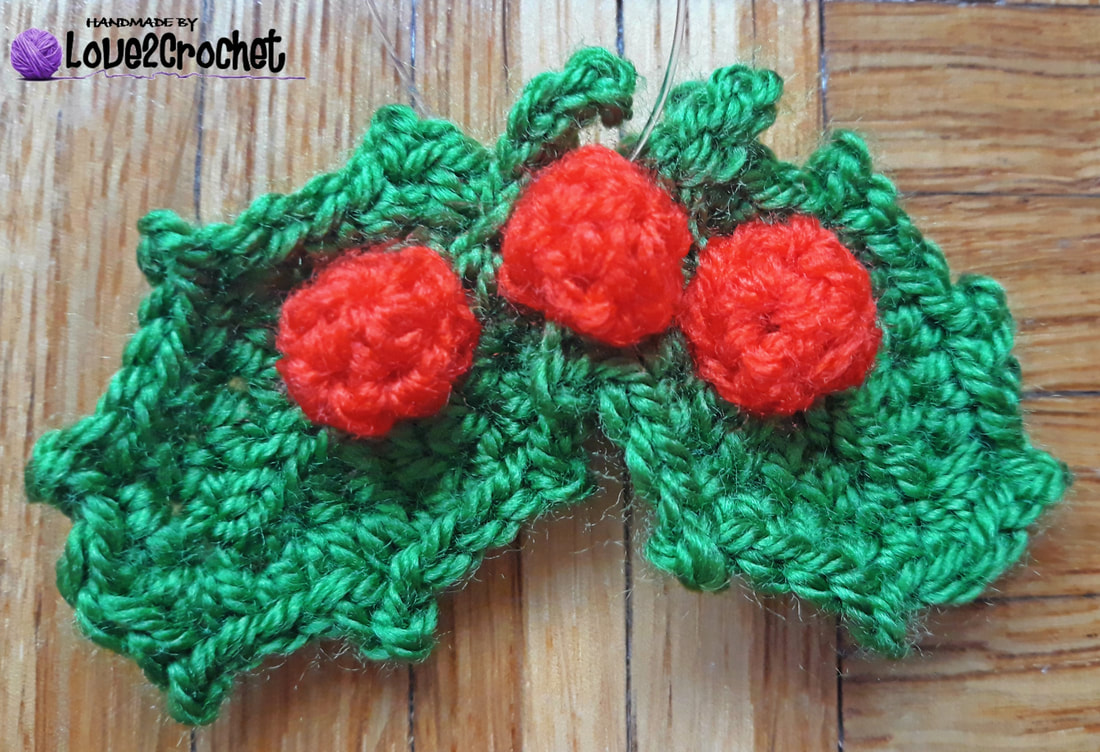
Oh, the Mistletoe, the best indicator of Winter and Christmas, a true representation of this lovely season - I love the Mistletoe... Here is the pattern for this fast project...
Materials:
3.00 mm crochet hook
green, red yarn
silk line for making the hanging line
Steps and Procedure:
- with 3.00 mm crochet hook and green yarn
- Making the leaves: (make 2 in Green)
R1: ch 10, sl st in the 2nd chain from the hook, SC, HDC, DC in the next 3 st, HDC, SC, sl st in the last stitch, ch 2 and sl st in the same st
- working on the opposite side of the chain:
- SC, HDC, DC in the next 3 st, HDC, SC, sl st in the last st
R2: sl st in the next 2 stitches, ch 1, SC in the same st, (ch 2+sl st in the 2nd chain+SC in the next 3 st) - repeat 2 times, ch 2, sl st in the 2nd chain from the hook, SC in the next 2 st, (SC, ch 2, sl st in the 2nd chain from the hook, SC) in ch 2 space, SC in the next 2 st, (ch 2, sl st in the 2nd chain from the hook, SC in the next 3 st) - repeat 2 times, ch 2, sl st in the 2nd chain from the hook, SC in last st, sl st
- do not fasten off
- Making the stem:
- ch 4, sl st in the 2nd chain from the hook and in the next 2 st
- surface crochet up to the center of the leaf
- fasten off
- Making the berries: (make 3 in Red)
- make a magic ring, make 6 HDC inside the ring
- Assembly:
- sew all 3 berries onto the leaves
- attach the silk line to make it into a tree ornament
|

|
I added another Christmas Wreath to my collection of Christmas decorations. This one is more intricate and detailed to make, and I had so much fun! Here is the pattern.....
Materials:
3.00 mm crochet hook
green, red yarn
ribbon for the bow
scissors, needle, glue gun
Steps and Procedure:
- With red/green yarn, ch 24, join with a SL ST into first CH to form a ring
R1: Work 2 SC into next ST, work 1 SC into next 3 STS. (Repeat until end - 30 SC)
R2: Work 2 SC into next ST, work 1 SC into next 4 STS. (Repeat until end - 36 SC)
R3,4: Work 1 SC into each ST until end (36 SC)
R5: working into back loops only – work 1 SC into each ST until end (36 SC)
R6: Work 1 SC into each ST until end (36 SC)
R7: SC2tog, work 1 SC into next 4 STS. (Repeat until end - 30 SC)
R8: SC2tog, work 1 SC into next 3 STS. (Repeat until end - 24 SC)
Fasten off and leave a tail of approx. 30 cm. (enough to close up wreath and to make a hanging chain)
- Press flat and sew inside of wreath closed
- Thread tail through wreath and pull out at the top
– insert hook into one of the exposed loops and chain approx 20, SL ST into same loop, fasten off and weave in end.
- With white/green/red yarn, insert hook to the Back Loop stitch from R5 and work the following:
R1: 1 SC, 1 DC, 1 SC into loop, SL ST into next loop.
R2: Work 1 SC, 1 DC, 1 SC into next loop, work 1 SL ST into next loop. Repeat all around until last loop, fasten off and weave in ends.
- using the glue gun, glue the decorative items on the wreath
- using the glue gun, glue a small bow to front

|
|

Oh, my goodness! How cute is this pattern! I fell in love with these tiny snowmen and I absolutely had to add them to my crochet collection of Christmas decorations! A huge thank you to Janine from mojimojidesign.com/teeny-tiny-snowmen/ for the free pattern! So, here it is....
Materials:
3.00 mm crochet hook
white, Color 1 and 2 (orange/red, blue/turquoise, pink/magenta)
stitch marker
googly eyes, glue gun
orange yarn for carrot nose
silk line
Steps and Procedure:
- Making the Hat, Head and Body (Working in continuous spiral rounds)
- With C1 yarn make the magic ring (making the hat)
R1: 6 sc in the magic ring (6 SC)
Place marker at beginning of next round, move marker up with each completed round.
R2: 2 sc in each of next 6 st. (12 sts)
R3: [Sc in next st, 2 sc in next st] 6 times. (18 sts)
R4-5: Sc in each st around. (2 rounds)
- Change to C2 yarn (making the brim of the hat)
R6: Hdc in each st around.
- Change to White yarn (making the body)
R7-8: Sc in each st around. (2 rounds)
R9: [Sc in next st, invisible dec] 6 times. (12sts)
R10: Sc in each st around.
R11: [Sc in next st, 2 sc in next st] 6 times. (18sts)
R12-18: Sc in each st around. (7 rounds)
R19: [Sc in next st, invisible dec] 6 times. (12 sts)
- Stuff head and body with stuffing material.
R20: [Invdec] 6 times. (6 sts)
- Fasten off, leaving a long yarn tail for finishing. Thread yarn tail onto yarn needle, pick up front loop only of remaining 6 stitches. Pull tight to close the hole. Weave in end.
- Making the Scarf:
- With C2 yarn make 30 ch. Cut C2 yarn, fasten off, leaving a small yarn tail.
- Change to C1 yarn
R1: Sc in each st to end. (30 sts) Fasten off, leaving a small yarn tail. Tie a knot in the two left over ends to form a small tassel at each end of scarf. Trim tassel to required length. Place scarf around snowman's neck, crossing over the two ends at center front. Pull fairly tightly to accentuate neck shaping. You can sew in place with a few stitches.
- Making the Arms: (Make 2 pieces)
- With White yarn make a magic ring
R1: make 6 sc in the magic ring (6 sts)
R2-3: Sc in each st around. (2 rounds)
- Fasten off, leaving a long yarn tail for sewing. Do not stuff. Sew to sides of body, just under scarf.
- Making to Bobble for the hat:
- With C2 yarn make 1 piece
R1: make 6 sc in the magic ring (6 sts)
R2-3: Sc in each st around. (2 rounds)
- Fasten off, leaving a long yarn tail for sewing. Do not stuff. Sew to the top of the hat
- Glue two googly eyes
- Choose a third color and sew running stitches in and out of stitches between Rnds 5 and 6 of the hat
- Making the carrot nose:
- with orange yarn
ch 3 and make a sl st in the 1st st and a SC in the 2nd stitch
- sew on the carrot nose
- use the silk line to attach to the top of the hat to make it as an ornament
Snowmen

Here it is, another adorable pattern for the Snowmen. So cute, easy to make, a perfect Christmas tree ornament! Here is the pattern...
Materials:
3.00 mm crochet hook
white, orange, blue, red, purple, brown yarn
googly eyes
glue gun
stuffing material
Steps and Procedure:
- Making the Body:
- Starting at the top of the head with white
1. Magic Ring, 6 SC in ring (6)
2. INC in each (12)
3. 1 SC, INC, 2SC, INC, 2SC, INC, 2SC, INC, 1SC (16)
4. 3SC, INC, 3SC, INC, 3SC, INC, 3SC, INC (20)
5. 4SC, INC, 10SC, INC, 4SC (22)
6. SC around (22)
7. 4SC, DEC, 10SC, DEC, 4SC (20)
8. DEC, 3SC, DEC, 3SC, DEC, 3SC, DEC, 3SC (16)
9. 1SC, DEC, 2SC, DEC, 2SC, DEC, 2SC, DEC, 1SC (12)
10. 1SC, INC, 2SC, INC, 1SC, INC, 2SC, INC, 1SC, INC (17)
11. 2SC, INC, 3SC, INC, 3SC, INC, 3SC, INC, 2SC (21)
12. 3SC, INC, 6SC, INC, 6SC, INC, 3SC (24)
13. 10SC, INC, 13SC (25)
14. SC around (25)
15. 13SC, DEC, 10SC (24)
16. 3SC, DEC, 6SC, DEC, 6SC, DEC, 3SC (21)
17. 2SC, DEC, 3SC, DEC, 3SC, DEC, 3SC, DEC, 2SC (17)
18. DEC, 1SC, DEC, 2SC, DEC, 1SC, DEC, 2SC, DEC, 1SC (12)
Leave a long tail for sewing.
- Making the Nose:
1. Ch 5, turn
2. starting at 2nd from hook, sl st in first 2, SC in last 2
Sew nose in the middle of the face.
- Making the Base:
1. MR, 6 SC in ring (6)
2. (INC) repeat around (12)
3. (1, INC) repeat around (18)
4. (2, INC) repeat around (24)
5. (3, INC) repeat around (30)
- Make 2 bases and sl st them together.
- Stuff the body and sew it to the base.
- Making the Arms:
- with 3.00 mm crochet hook and brown yarn
ch 8, sl st 3
ch 4, sl st 3
sl st 4 down the base chain
- make 2 arms and sew them onto the opposite sides of the body
- Making the Scarf:
- with 3.00 mm crochet hook and color of your choice
ch 46, SC down the chain (45 SC)
- sew the body to the base
- sew the arms onto the body
- tie the scarf around the neck
- glue the googly eyes onto the face
- pull the silk line through a few stitches the top of the head if making an ornament

|

|

