"cat" sleep mask

The gift giving season is upon us. I have decided to put this cute sleep mask on my Christmas give away list. My sister will like it and enjoy it. So, here is the pattern...
Materials:
4.00 and 5.00 mm crochet hook
double strands of gray yarn
single strands of pink yarn (for inside ears)
needle, scissors
Steps and Procedure:
Mask:
- with double strands of gray yarn and 5.00 mm crochet hook
1. ch 17, make 3 SC in the 2nd chain from the hook, SC in the next 14 st, 3 SC in the last ch, (continue crocheting on the other side of the chain), make 1 SC in every stitch (34 SC), sl st to the 1st SC made, ch 1 and turn
2. Make 1 SC in the next 14 st, 2 SC in the next 3 st (repeat around) (40 SC), sl st to the 1st SC made, ch 1 and turn
3. *Make 2 SC in the next st, make 1 SC in the next st (repeat around 3 times), SC in the next 14 st*, repeat (**) around (46 SC), sl st to the 1st SC made, ch 1 and turn
4. Make 1 SC in the next 15 st, (2 SC in the next st, SC in the next 2 st)- repeat 3 times, SC in the next 14 st, (2 SC in the next st, make 1 SC in the next 2 st) - repeat 2 times, 2 SC in the next st, SC in the next st, (52 SC) sl st to the 1st SC made, ch 1 and turn
5. SC in the next st, (2 SC in the next st, make SC in the next 3 st) - repeat 3 times, SC in the next 14 st, (2 SC in the next st, make 1 SC in the next 3 st) - repeat 3 times, SC in the next 13 st, (58 SC) sl st to the 1st SC made, ch 1 and turn
6. HDC in the next 3 st, DC in the next 9 st, HDC in the next 3 st, SC in the next 9 st, HDC in the next 3 st, DC in the next 3 st, HDC in the next 3 st, sl st in the next 3, sl st in the row bellow, sl st in the next 3 st, HDC in the next 3 st, DC in the next 3 st, HDC in the next 3 st, SC in the next 9 st, (58), sl st to the 1st HDC made, fasten off
Ears: (make 2)
- with double strands of gray yarn and 5.00 mm crochet hook
1. ch 7, SC in 2nd chain and down the chain line (6 SC), ch 1 and turn
2. SC2tog, SC in next 2 st, SC2tog (4 SC), ch 1 and turn
3. SC in every stitch (4 SC), ch 1 and turn
4. 2SCtog (twice) (2 SC), ch 1 and turn
5. 2SCtog (1 SC), ch 1 and turn
- continue crocheting making 1 SC in every stitch around the ear, making 3 SC in all three corners of the ear
- make the inside of the ears with 4.00 mm crochet hook and pink yarn by following the same pattern for the outer ears written above
- sl st (or sew) the pink inside ear to the outer ear
- sew the ears onto the mask
- embroider the eyes and the eye lashes
- ch 20 (double strands of gray yarn and 5.00 mm crochet hook) on both sides of the mask to make the ties
headphones holder
Like so many of us, I use headphones on the regular basis. I plug them into my phone to listen to music as I work out, as I meditate, during my commute....you all know the drill. After I am done with my headphones I put them in my purse as we all do, just to find later on that they are completely entangled and it will take me forever to put them back to their original form. I really dislike that! I have wanted to resolve this problem, and crocheting some sort of a headphones holder proved to be the perfect thing to do. So, here it is..... the pattern.....
Materials:
4.00 mm crochet hook
yarn of your choice
a fancy button
scissors, needle
Steps and Procedures:
1. ch 6
2. make 1 SC in the 2nd chain from the hook and down the chain line (5 SC in total), ch 1 and turn
3. make 1 SC in each stitch of this row, ch 1 and turn (5 SC)
4-14. continue making 1 SC in each stitch, ch 1 and turn (5 SC)
15. ch 5, turn and slip stitch to the last stitch of the row of the shorter end
16. ch 1 and continue to make 1 SC in each stitch around, making sure you put 3 SC in each corner
17. when you get to the other side of the ch 5, make 7 SC inside the ch-5 space, and sl st to the first SC made.
- fasten off, sew in the tails, and sew on the fancy button
I have made 2 headphones holders (the smaller one had 11 rows). I have found that the smaller/shorter one was better and it was easier to tie the headphones on it, as it held them tighter together.
Here are a few pics:

|

|
brainy Smurf Glasses holder
I have been circling around this pattern for a year. I like to crochet gifts for my family for Christmas, and I thought my father would get a kick out of this one. Sadly, he passed away before Christmas and I was unable to give it to him as a gift. I have still completed it and have wrapped it and it will be sitting under the Christmas tree this year waiting for him. It is a wonderful pattern, and this is the original post:
www.repeatcrafterme.com/2017/05/crochet-brainy-smurf-glasses-holder.html
I have changed the pattern a bit, and here is my additional version.
Materials:
white, blue and black yarn
5.00 mm crochet hook
Polyfil Fiber Stuffing (or cotton stuffing)
needle, scissors
Steps and Procedures:
Head:
With blue yarn
- make sure you use a stitch marker, do not sl st or ch 1 at the end of the round
Magic ring and make 12 SC in ring
R2: 2 SC in first, SC in next, repeat around (18 SC)
R3: 2 SC in first, SC in next 2, repeat around (24 SC)
R4: 2 SC in first, SC in next 3, repeat around (30 SC)
R5: 2 SC in first, SC in next 4, repeat around (36 SC)
R6: 2 SC in first, SC in next 5, repeat around (42 SC)
R7: 2 SC in first, SC in next 6, repeat around (48 SC)
R8: 2 SC in first, SC in next 7, repeat around (54 SC)
R9: 2 SC in first, SC in next 8, repeat around (60 SC)
R10-18: SC in each stitch around (60)
R19: SC decrease, SC in next 8, repeat around
R20: SC in each stitch around
R21: SC decrease, SC in next 7, repeat around
R22: SC in each stitch around
R23: SC decrease, SC in next 6, repeat around
R24: SC in each stitch around
R25: SC decrease, SC in next 5, repeat around
R26: SC in each stitch around
- stuff with polyfil
R27: SC decrease, SC in next 4, repeat around
R28: SC decrease, SC in next 3, repeat around
R29:SC decrease, SC in next 2, repeat around
- completely stuff with polyfil
R30: SC decrease, SC in next stitch, repeat around
R31: make 6 decreases
- fasten off and weave in the ends
Nose:
with blue yarn, use a stitch marker
Magic ring, chain 1 and make 6 SC in ring
R2: 2 SC in each stitch around
R3-6: SC in each stitch around
R7: SC decrease, SC in next, repeat around
- Stuff with polyfil
R8: SC decrease until closed.
- Nose should be attached longways
Ears: make 2
with blue, using a stitch marker
Magic ring, chain 1 and make 10 SC in ring
R2: 2 SC in first stitch, SC in next, repeat around (15 SC)
R3: SC in each stitch around (15 SC)
R4: 2 SC in first stitch, SC in next 2, repeat around (20 SC)
R5: SC in each stitch around (20 SC)
R6: 2 SC in first stitch, SC in next 3, repeat around (25 SC)
R7-9: SC in each stitch around (25 SC)
R10: SC decrease, SC in next 3 stitches
R11: SC in each stitch around
R12: SC decrease, SC in next 2, repeat around
stuff lightly with polyfil, molding the ear as you stuff it.
R13: SC decrease until closed.
- When attaching ear to head, make a small stitch with yarn and tapestry needle in the upper middle part of the ear, pull tight to allow an indent.
Eyes: make 2
- With white, using a stitch marker
Magic ring, chain 1 and make 8 SC in ring
R2: 2 SC in first stitch, SC in next, repeat around (12 SC)
R3: 2 SC in first stitch, SC in next 2, repeat around (16 SC)
R4: SC in first, HDC in next, 2 DC in next 4, HDC, SC in last 9, join to first SC, fasten off leaving long tail to sew onto head.
- Be sure the eyes are overlapping when you stitch them on.
- with black for eye centers:
Magic ring, make 4 SC in ring
- make 2 and sew on the white
Hat:
With white, using a stitch marker
Magic ring, chain 1 and make 10 SC in ring
R2: 2 SC in each stitch around (20 SC)
R3: SC in each stitch around (20 SC)
R4: 2 SC in first stitch, SC in next, repeat around (30 SC)
R5-12: SC in each stitch around (30 SC)
R13: [2 SC in first stitch, SC in next ] do this 4 times, SC in next 12, [2 SC, SC in next] do this 5 times (39 SC)
R14: SC in each stitch around (39 SC)
R15: 2 SC in first 9, SC in next 21, 2 SC in last 9 (57 SC)
R16- 26: SC in each stitch around (57 SC)
- Fasten off leaving long tail.
- Stuff top of hat
- Fold brim over, stuff lightly and sew brim closed.
- Sew hat onto top of head.
The smile is long piece of yarn loosely stitched in with a tapestry needle and then carefully (with just a dab) glued down into place.
I know I will never see my father use this adorable Smurf, but I will put on his glasses on it, so that I can have a little memento of my father close by at all times.

|

|

|
fish in a jar
www.suviscrochet.com/Patterns/Sea-Life-Blue-ChromisMy sister has 2 kids - 2 rowdy, wild, adorable toddlers. The younger one just had her 2nd birthday. My sister told me, or should I say shouted - NO LIVE PETS ALLOWED!
So, I decided to make her kiddles a pet in a jar - you don't have to walk it, feed it, cuddle with it, clean it! You just have to gaze adoringly at it:)
I found this cute little idea here: edenreborn.com/crochet/no-fuss-fish-free-crochet-pattern/
I changed the fish and the weed patterns and here is my version:
Materials for the weed/plant:
- 2.50 mm crochet hook
- green yarn
- glittery glue (mod podge, Elmer's Glue...)
Steps and Procedures:
- make a Magic Ring, 6 sc in the circle, sl st in the 1st SC on the round to close the circle
- Chain 7, sl stitch in 2nd and 3rd chain from hook, sc in next four chains, sl st to the center of the MR
- Chain 12, slip stitch in 2nd, 3rd and 4th chains from hook, sc in next 8 chains, sl st to the center of the MR
- Chain 9 , slip stitch in 2nd and 3rd chains from hook, sc in next 6 chains, sl st to the center of the MR
- Fasten off and sew the ends
The following are the patterns for the two fish I made:
1. purple (with bluish enges): www.suviscrochet.com/Patterns/Sea-Life-Blue-Chromis
2. pink (with black edges): www.suviscrochet.com/Patterns/Sea-Life-Yellow-Tang
- I also crocheted the cover for the lids and here is the pattern:
I used 3.00 mm crochet hook and a blue worsted weight yarn, and a marker to mark the beginning stitch
- Make a Magic Ring and 6 SC inside the ring
- make 6 increases (12 SC)
- 1 SC + increase around (18 SC)
- 2 SC + increase around (24 SC)
- 3 SC + increase around (30 SC)
- 4 SC + increase around (36 SC)
- 5 SC + increase around (42 SC)
- 6 SC + increase around (48 SC)
- 7 SC + increase around (54 SC)
- make 1 SC in each stitch around only in Back Loop (54 SC)
- make 1 SC in each stitch around (54 SC)
- make 1 SC in each stitch around (54 SC)
- tie off and weave in the ends
Additional notes:
- use the glue gun to glue the pebbles to the bottom on the glass jar
- glue the plant to the pebble and glue it to the bottom
- use the silk yarn and attach one end to the fish, and glue the other to the bottom of the jar lid
- glue the crocheted jar lid cover to the lid
- cover the plant with some glittery glue and let it dry over night for a sparkling effect
- glue the googly eyes on the fish face
So, there you have it. Now, you can gaze adoringly at your pet fish and it won't even try to swim away ........

|

|

|
Crochet wolf badge/broach

It is that time of the year - the new school year will be starting soon and I am already thinking about our School's logo and a mascot - the wolf. I found this pattern for the wolf applique and have transformed it into a badge/broach.
The pattern is from Trish and it is originally the fox. This is the link to the original post:
genuinemudpie.ca/2014/10/09/squinty-fox/
I have made some alterations and have made a cute wolf badge that I intent to wear for our School's events and promote our School's Spirit. It might catch on and I might make a few more for some other peeps in my School, hopefully:)
So, this is my pattern.....
Materials:
- worsted weight yarn in gray, white, black
- 2.5 mm crochet hook
- tapestry needle for embroidering and sewing
- marker for crocheting in rounds
- clothes pin
- hot glue gun
Steps and Procedures:
Head
R1: with white, 4 sc in magic ring, sl st in first sc to join.
- use the marker to mark the 1st stitch
R2: (1 sc in next sc, 2 sc in next sc) all the way around (6 sc)
R3: 2 sc in each sc around (12 sc)
R4: (1 sc in next sc, 2 sc in next sc) around (18 sc)
R5–6: 1 sc in each sc around (18 sc)
- stuff the head before the ear row
Ears
Press the top opening of the head flat so that the stitch on the hook is on the top left corner edge of the head. We’re now crocheting through both layers of the head.
- ch 2, 2 dc tog over the next 2 sc, ch 1, sl st in top of 2-dc-tog just made, ch 2, sl st in the second st of the 2-dc-tog, sl st in next 4 sc, ch 2, 2 dc tog over next 2 sc, ch 1, sl st in top of 2-dc-tog just made, ch 2, sl st in last sc on the top corner edge of the head.
- fasten off
White Whiskers on the face
- find a suitable stitch closest to the edge of the white nose and work towards the ears on the edge of the face
- with white yarn, ch 1 and SC in the same stitch
- HDC in the next stitch
- DC in the next stitch, ch 1 and sl st into the same stitch
- make another whisker on the other side of the face
Body
- worked in rounds, so use the marker to mark the 1st stitch of the round
R1: With gray, 6 sc in magic ring
R2: 2 sc in each sc around (12 sc)
R3-6: Continue making 1 sc in each sc around
R7: (1 sc in next sc, 2 sc tog) 4 times around (8 SC)
R8-12: 1 sc in each sc around (8 SC)
- stuff the body if you’d like
R13: (2 sc tog) 4 times around (4 SC)
R14: 4 SC
- fasten off, leave a tail for sewing
Tail
*Note: Loop stitch is worked on only one side of the tail.
- crocheted in rows
R1: with gray (leaving a longer tail for sewing), ch 3, sc in second ch from hook, sc in next sc, ch 1, turn.
R2: lp st (loop stitch) in each sc across, ch 1, turn
R3: 1 SC in each stitch (2 SC), ch 1, turn
R4: lp st (loop stitch) in each sc across, ch 1, turn
R5: 1 SC in each stitch (2 SC), ch 1, turn
R6: lp st in first st, 2 lp st in next st, ch 1, turn.
R7: 1 SC in each stitch (3 SC), ch 1, turn
R8: lp st in first st, 2 lp st in next st, lp st in last st, ch 1, turn
R9: 1 SC in each stitch (4 SC), ch 1, turn
R10: lp st in first st, 2 lp st in next st, lp st in next st, lp in next st, ch 1, turn
R11: 1 SC in each stitch around (5 SC), ch 1, turn
- switch to white
R12: lp st in first st, skip next st, lp st in the next 3 st, ch 1, turn.
R13: 1 SC in each stitch around (4 SC), ch 1, turn
R14: lp st in first st, skip next st, lp st in the next 2 st, ch 1, turn.
R15: 1 SC in each stitch around (3 SC), ch 1, turn
R16: lp st in first st, skip next st, lp st in last st
- fasten off, weave in all ends.
Assembly:
- Embroider the white in the inner ears
- embroider black nose and sleepy eyes
- Attach body to head by sewing together the top row of the body to the first row of gray (after the white part) on the back of the head, sewing through all layers of the body to the head.
- Attach tail to bottom of the back of the body.
- I used the hot glue gun to attach the clothes pin to the wolf

|

|
Crochet Bikini Top

I never thought I would crochet a bikini top, but I ended up doing it:) This top was made for one of my girlfriends upon request. It was very simple to make and I followed a youtube video as a tutorial.
I used crochet hook 3.00 mm and two different colored yarns. This tutorial fits the cup size 5"x5" inch. (Size S, Cup A)
Here is the pattern:
- Begin with a slip knot and ch 15.
- R1 : Dc in 4th ch from hook, dc across, 7 dc in the last ch, continue to dc on the other side across. Turn.
- R2: Ch 3, dc in each of the nxt 12 sts,* 2 dc in nxt st, 3dc in nxt st, 2dc in nxt st*, dc in each of the nxt 13 sts. Turn.
- R3: Ch 3, dc in each if the nxt 14 sts, repeat *to *, dc in each of the nxt 15 sts.
- R4-7: Repeat previous steps.
- Ch 1, fasten off and make another cup. Do not cut off yarn for the second cup, continue at the bottom of the cup.
- Ch 1, make 2 sc in each of the dc space across, ch 5, connect with 2 sc in the other cup dc space, 2 sc in each of the dc space across, 3 sc in the last dc space.
- Continue to make the string. Ch 100, sc in 2nd ch from hook, sc across, sl st in dc space.
- Now we are going to make the edging. Ch 3, dc in the same dc space, *skip nxt st, sc in nxt st, ch 2, dc in same st*, repeat *to* 10 times until you reach the 3 dc in the same st, sc in nxt st.
- Continue to make the string. Ch 100, sc in 2nd ch from hook, sc across, sl st in dc space. Continue with the edging. Sl st in nxt st, sc in nxt st, ch 2, dc in same st, repeat *to* 11 times, hdc in each of the nxt 5 sts across, sl st in dc space, ch 3, dc in the same dc space, repeat the steps like the previous cup to make the edging and string.
- Finally, sl st in the first sc, ch 1, fasten off. Weave in ends. And we’re done.
Here is the youtube link pattern:
www.youtube.com/watch?v=aDuRpQ22-CU
And here is how mine bikini top turned out:)

|
|
I wanted to crochet some items to add to my crochet craft fair. I thought about making a 3D butterfly that I could make into a keychain.
I have used this simple tutorial from Bella Coco:
www.bellacoco.co.uk/2015/08/crochet-butterfly-pattern.html
She has a written pattern on her website as well as the youtube tutorial. It is super easy and worth chacking out. I have made my butterflies in many colors and have used the 3.00 mm crochet hook. Thank you Bella Coco for the pattern and the insporation:)
And here are my pretty little butterflies...
Crochet Craft Fair
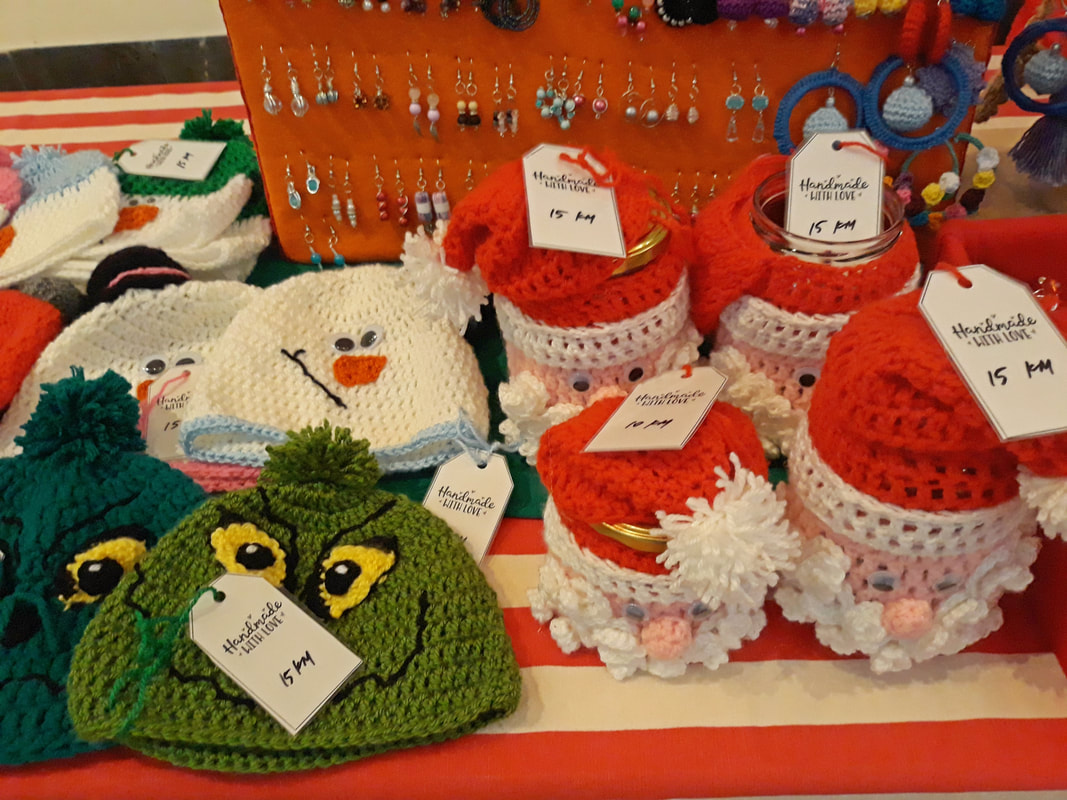
I am so very proud and grateful that I had a chance to display my crochet work at my School's Craft Fair during our Winter Concert. I had displayed loads of items all made specifically for this occasion to celebrate our School's Spirit - hats, badges, bookmarks, mug cozies, water bottle holders..... I am planning to make many more, and this was an awesome opportunity for me to show my work....
I have learned a great deal from this experiance and my crocheted items will be slightly differently displayed next time.....
I have found many great ideas and printables I have used to package my items:
froggingalong.com/2015/11/28/free-gift-giving-printables/
froggingalong.wordpress.com/2014/11/21/hooked-with-heart-templates-and-patterns-for-free-oh-my/
www.mikocoffey.com/blog/2014/01/17/free-download-laundry-care-labels/
buttonsblogging.blogspot.ba/2013/12/freebie-for-you-printable-wrappers-for.html
www.justbehappylife.com/2015/12/gift-tags-free-printables.html
Thanks for the freebies ladies:))
I know that for my next craft fair I will not individually wrap each item.....
These are a few photos of my display table......

|

|

|

|
|

|
Crochet Bookmark
I am a teacher.... a music teacher in a fabulous school.... Sometimes I teach and hold After school activities that do not necessarily involve me teaching the subject I teach every day. So, to start the first set of ASA sessions for this school year I chose to do Crocheting. I have many students who signed up and I am psyched and excited! I chose to do simple crocheting project, and this crocheted Bookmark is the first one...
I found this on this website - thank you Sewrella for the free pattern. She has great pictures and details on how to make a tassel, it is worth checking out:)
www.sewrella.com/2016/08/finger-tassel-tutorial-monogram.html
I rewrote and changed the pattern a bit so here it is in whole:
Materials:
yarn in any colors - I used 2 colors
-Size 4.00 mm crochet hook
-Tapestry needle
- In color 1: Chain 7, Sc in second st and down the chain line, Ch 1, turn (you chould have 6 stitches)
- Rows 2-23: Sc across, Ch 1, turn
- Row 24: Sc dec, Sc, Sc, Sc dec, Ch 1, turn
- Row 25: Sc dec, Ch 2 (to make a space to tie the tassle), Sc dec, Ch 1
- Row 26: Sc around perimeter of bookmark, (making sure you make 2sc in each corner (4 corners) around the bookmark), sl st to join
- Row 27: Join color 2, Ch 1, Sc around perimeter, sl st to join, finish off, weave all ends
- Embroider letter monogram using a surface slip stitch.
- Make a finger tassel:
1. Hold three fingers of your hand together in a straight position.
2. Wrap yarn around your fingers between the middle knuckle and the knuckle by your fingernail. Wrap until the yarn creates a thick cushion.
3. Cut the yarn from the skein.
4. Cut 2 small pieces of yarn (about 6 in. each).
5. Thread one piece of yarn between your fingers & through the wrapped yarn.
6. Slide your fingers out and tie the threaded yarn in a tight knot.
7. Cut the yarn along the bottom, opposite your knot.
8. Take your second 6 in. piece of yarn and tie it around the top of your tassel, about a centimeter from the top knot.
9. Tie a tight knot and trim the ends.
10. Trim the end of your tassel to be even.
11. Attach to your bookmark - thread your top strings through the Ch 2 space on Row 25. Tie a tight knot and trim the ends.
This is a quick and easy project. It took me more time to wave in the end then to crochet the whole bookmark:) And this is how it turned out....

|

|
|
|

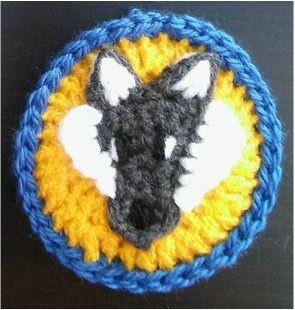
Appliques are great to add and embellish all crocheted items. I found this great fox applique, and have changed it a bit to fit my needs.... I changed the color; I omitted some rows, and it was a perfect wolf face applique that could be made in 10-15 min and be sewed in on anything you wanted.....This is the original pattern:
www.repeatcrafterme.com/2014/10/f-is-for-fox-crochet-fox-applique.html
I kind of like the wolf's face to be leaner and longer, so I changed the pattern a bit:
Starting with grey…
Chain 2, 2 SC in second chain from hook and in last chain (2 SC)
Row 2-5: SC in each stitch across, chain 1, turn (2 SC)
Row 6: 2 SC in first stitch, 2 SC in second stitch, chain 1 turn (4 SC)
Row 7: 2 SC in first stitch, SC in next 2, 2 SC in last stitch, chain 1, turn (6 SC)
Row 8: SC in each stitch across (6 SC)
Do not turn, continue to SC around edges. When you get back to the top right corner, chain 4, SC in 2nd chain from hook, HDC in next, DC in last. Skip 2 stitches and join to next stitch with a slip stitch. Slip stitch in the next 3, repeat from * to make the second ear. Fasten off leaving long tail.
Attach white yarn right under ear. Chain 3, TC, DC, DC, HDC, HDC, SC, slip stitch to join. Do the same on other side of face but working the stitches in backwards order (attach yarn, SC, HDC, HDC, DC, DC, TC + chain 3 and join). Fasten off and weave in ends.
I also used 2,50 mm crochet hook for a small wolf and a 4,00 mm hook for a bigger wolf face applique.
This is how mine turned out... I used it to embellish this badge I made....
|
|
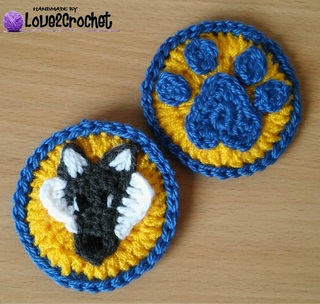
The School Spirit Badges were my next project..... Again, blue and yellow, but I added a wolf face applique and a paw applique....
The Badge was made like this:
using 4,00 mm crochet hook
(Reminder: the ch 2 at the beginning of each round DOES NOT count as a stitch)
-magic circle, ch 2, 12 DC inside the Magic circle (12 DC)
- ch 2, 2 DC in each stitch around (24 DC)
- ch 2, DC in stitch no 1, 2 DC in stitch no 2 - repeat around (36 DC)
I made 2 sides and slipped stitch them together to make it a bit thicker.
Paw Print applique:
I used 2,50 mm hook
paw:
-magic circle, ch 1, 15 SC inside the magic circle
-ch 2, 1 DC - 2 DC - 1 DC - 1 SC - 2 SC - 1 SC - 3 DC - 1 SC - 2 SC - 1 SC - 1 DC - 2 DC - 1 DC - ch 2, slip stitch
fingers:
- magic circle, ch 1, 2 SC, 2 DC, 2 SC inside the magic circle - make 4
I sewed on the applique to the badge, sewed on the safety pin and I was good to go:) And this is how my badges turned out...
Crochet Bookmark 2
I needed another project for my boosting my School's spirit... Crocheting this simple bookmark was a perfect solution... a quick and easy project completed in 30 minutes tops...
Materials:
4.00 mm crochet hook
yarn
sewing needle
Procedure:
1. ch 7, SC down the chain starting from the ch 2 (6 SC), ch 1
2. make 25 rows of 6 SC, making sure you ch 1 at the end of each row.
3. fasten off
4. make 2 bookmarks
5. SC around connecting 2 bookmarks together.
6. I sewed on the wolf face applique.....
7. take 4 strands of blue (or any color you desire) yarn 20 cm long, find the middle of the top of the bookmark, slip stitch to the top and ch 5 to make the tassel. There you go, you are done!

|

|

|
|

This is a super cute and easy project. I found it on this website:
moonysmindcraft.blogspot.ba/2014/04/kawaii-star-keychain-pattern.html
I have changed the pattern a bit to suit my needs and preferences.
Materials:
2.5 mm crochet hook
Worsted weight yarn of your preferred color
Your preferred stuffing material
googly eyes
Split key ring
Procedure:
I join my rounds for this project, so no slip stitching at the end of each round.
Body of the star (Make 2 - front and back):
- 5 SC in magic ring (5 SC)
- make 2 SC in each stitch around (10 SC)
- make 1 SC in the next stitch, make 2 SC in the next stitch and repeat all around (15 SC)
- 3 SC, ch 1, turn, 3 SC, ch 1, turn, *decrease* across all three SC (1 SC)
(To do the *decrease*, insert the hook into the first SC and pull up a loop. Insert the hook into the next SC and pull up another loop. Then insert the hook into the last SC and pull up another loop (4 loops on the hook), then yarn over and pull through all the loops on the hook)
- You have just made one star point, you have 4 left. Before you continue to the next star point slip stitch down the side of the previous point. To make the next star point and all the rest repeat the previous step (3 SC, ch 1, turn, 3 SC, ch 1, turn, *decrease* across all three SC (1 SC) After the 5th star point, ch 1 and SC around the whole star evenly and fasten off.
- To attach the front to the back side of the star, slip stitch the parts together with the wrong sides facing.
- Glue gun the googly eyes and attach the loop for the key chain and you are done...

|
|

This is the cutest key holder I have seen! It is so fun to make and I have a pattern for you! Follow the instructions, and you will be able to make this cutie in 30 min or so. Have fun!
Materials:
blue and pink yarn
3.00 and 3.50 mm crochet hook
stuffing materials
glue gun, googly eyes
scissors, needle, stitch marker
Steps and Procedure:
- Making the Monster:
- with blue yarn and 3.50 mm hook
1. ch 6, and sl st to form a ring, and 6 SC inside the ring
2. Make an INC in every st around (12 SC)
3. INC - 1 SC (repeat around) (18 SC)
4. Make 1 SC in every stitch around (18 SC)
5. INC - 2 SC (repeat around) (24 SC)
6. Make 1 SC in every stitch around (24 SC)
7. INC - 3 SC (repeat around) (30 SC)
8-9. Make 1 SC in every stitch around (30 SC)
10-11. Make 1 SC in the next 19 st, ch 1 and turn
12. Make 1 SC in the next 19 st, ch 11, connect with the sl st to the beginning of the R12
13. Make 1 SC in every st around (including the ch 11) (30 SC)
14-23. Make 1 SC in every st around (30 SC)
24. DEC - 3 SC (repeat around) (24 SC)
25. DEC - 2 SC (repeat around) (16 SC)
26. DEC - 1 SC (repeat around) (12 SC)
27. DEC (repeat around) (6 SC)
- make a row of SC with the pink yarn around the mouth edge (30 SC)
- Making the Heart:
- with peach yarn and 3.00 mm hook
1. Make a Magic Ring and 6 SC inside the ring
2. Make an INC in every st around (12 SC)
3-4. Make 1 SC in every st around (12 SC)
- repeat to make 2 circles (top of the heart)
- connect the 2 circles together side to side and sl st to join
5-7. Make 1 SC around both circles to join them (24 SC)
8. DEC - 2 SC (repeat) (18 SC)
9. DEC - 1 SC (repeat) (12 SC)
- stuff the heart tigtly with the stuffing material
10. Make 1 SC in every st around (12 SC)
11. DEC around (6 SC)
- close the circle completely, and make sure it is stuffed tightly
12. ch 40 and sl st to the 1st ch at the bottom of the heart
- pass the chain through the hole on top of the monster's head
- glue the googly eyes onto the face
- attach the keys through the ch line, and your key holder is done:)

|
|
Materials:
2.50 mm crochet hook
5 hair clips
white, yellow, orange, red, pink, purple, green yarn
colorful beads (for decoration)
glue gun, scissors, needle
Steps and Procedure:
- Making the "Body":
1. Make a Row of SC around the hair clip (I did not count the number of SC I mde in mine this will depend on hoe big/thick your hair clip is
- Making the Flowers:
- with 2.50 mm hook and the color of your choice
1. Make a Magic Ring inside the ring make the following stitches: *ch 3- 3 DC-sl st inside the ring*
2-5. Repeat from * to * to make a 5 petal flower.
- Making the Center of the Flower:
- with 2.50 mm hook and white yarn
1. Make a Magic Ring and 6 SC inside the ring, close the ring and fasten off
- Making the Leaves:
- with 2.00 mm crochet hook and green yarn
- ch 8, make the following stitches down the chain line: SC - HDC - DC - DC- DC - HDC - SC and sl st in the last st
Assembly:
- after making the body:
1. glue the leaves onto the tip of the hair clip
2. glue the flower
3. glue the center of the flower
4. glue the bead of your choice (optional)
5. glue the bead on the other side of the hair clip (optional)
I intend to give these to my little niece, I do hope she finds them as cute as I do:) Enjoy making these little cuties:)

|

|

