Crochet Glasses Case
This glasses case is based on the pattern I found online, from Rescued Paw Designs. This is the original pattern link: rescuedpawdesigns.com/2016/06/10/glasses-case-crochet-pattern/
I did some changes to my pattern and am posting it here. I embellished it a bit and made it a bit bigger.
So here it goes:
Materials:
cotton yarn
Crochet hook size 5.00 mm and 4.00 mm (for crocheting the border)
button
yarn needle
scissors
Pattern:
Foundation Row: ch 25
Row 1: in 3rd ch from hook hdc, *sk 1 ch, hdc 2 times in next ch, repeat from * ending with 2 hdc’s in last ch. ch 2 (23 stiches)
Row 2: in first st hdc, *sk 1 st, hdc 2 times in next st, repeat from * ending with 2 hdc’s in last st. ch 2 (23)
Row 3-21: Repeat row 2 (23)
Row 22: Ch 1, Sc in first st, * sc in next, sl st in next * (repeat * for for a total of 5 times (10 stitches), ch 3 skip 1 st, and sl st in the in next stitch * sc in next and sl st in next st* (repeat * for a total of 5 times (10 stitches)
Row 22 should also have 23 stitches. Fasten off.
Finish and embelishment:
- Fold up bottom and using a 4.00 mm crochet hook single crochet around to attach the sides together and create a border.
- When you come to each corner make 2 sc. This makes the sides more rounded and smoother.
- When you get to the button hole make 6 HDC inside the button hole, and continue sc around.
- Sew in the button and you are good to go.
I have made these two glasses cases as gifts. This is a cute and a quick project to complete.


Crochet Plastic Bag Dispenser
The other day I found myself at the checkout line in the supermarket. Suddenly I remembered that I had forgotten my reusable cotton grocery bag at home and that I would again (for the hundredth time) have to buy loads of plastic bags to put all of my groceries in. So, there I was - heading home with 5 plastic bags that I was planning, as always, on reusing. As much as I complain about the excess amount of plastic bags laying around in my kitchen cupboard drawer, I use them for so many things around the house and they are super handy. What is not handy is the amount of space I use in my kitchen drawers to put them in. So, when I came across this nifty little crocheted pattern I thought that it was the answer to my prayers! The Bag Keeper "Par-Excellence"! I whipped it up in about 30 min and it looks great hanging on my kitchen cupboard door.
The awesome tutorial is from Totally Snappy! Thank you Heidi for the freebie!:)
snappy-tots.com/freebie-bag-keeper-pattern/
And this is how mine turned out..... A life-saver and a space-saver out of this world!
The awesome tutorial is from Totally Snappy! Thank you Heidi for the freebie!:)
snappy-tots.com/freebie-bag-keeper-pattern/
And this is how mine turned out..... A life-saver and a space-saver out of this world!

|

|

|

|
Crochet Soap Savers
Crocheting these Soap Savers has proved to be a quick and easy task. I followed the pattern of a lady called Jona Martinez and her youtube video tutorial. The link is here:
www.youtube.com/watch?v=bj3qZ5HYYj
I made three, all in different colors, but I used a bit thicker yarn for the brown one... Me likey...... The men in my family will enjoy these as Christmas gifts....
www.youtube.com/watch?v=bj3qZ5HYYj
I made three, all in different colors, but I used a bit thicker yarn for the brown one... Me likey...... The men in my family will enjoy these as Christmas gifts....


Crochet Coin Purse
Cute as a button! Easy as pie! Sweet as sugar!......
I can go on, and on, and on, and on......
Wait until you see this gem! Thank you to HappyBerry Crochet for her pattern:)
www.youtube.com/watch?v=gtazZxmuuS8
I made mine in yellow and purple and they turned out great:)
I can go on, and on, and on, and on......
Wait until you see this gem! Thank you to HappyBerry Crochet for her pattern:)
www.youtube.com/watch?v=gtazZxmuuS8
I made mine in yellow and purple and they turned out great:)
|
|

|

|
Crochet Fruit Pouches
1. Apple Pouch

I found this great little project for school accessories – fruit pouches/pencil cases/make up purses. This is so easy to make and it turns out super cute. I followed the pattern from repeatcrafterme.com, but have used a different pattern for the leaf/stem zipper pull. Super cute:)
- Materials:
3.5 mm crochet hook
Red, green, brown, white worsted weight yarn
Red 20 cm zipper
Needle
Brown felt for apple seeds
Thin material for inside lining
- Steps and Procedures:
- starting with white yarn
R1: Make a Magic Ring, ch 2 and make 10 DC inside the MR (10 DC)
R2: 2 DC in each stitch around, join, ch 2 (20 DC)
R3: 2 DC in each stitch around, join, ch 2 (40 DC)
R4: 2 DC in first stitch, DC in next 3, repeat around, join, ch 2 (50 DC)
R5: 2 DC in first stitch, DC in next 4, repeat around, join, ch 2 (60 DC)
R6: 2 DC in first stitch, DC in next 5, repeat around, join, ch 2 (70 DC)
- change to red yarn
R7: DC in each stitch around, join, fasten off leaving long tail (70 DC)
- I found some simple lining lying around my craft room and sewed it on the inside of the pouch for a cleaner, neater look.
- Fold circle in half and add in your zipper. Sew through the ends of the zipper and continue to sew the zipper to the edge of the pouch.
- Finish it off by creating a leaf and a stem zipper pull!
- Stem
Ch 12. Dc in 3rd ch from hook, hdc in next ch, sc in next 2 ch, sl st in next 6 ch. Fasten off leaving a long tail to sew the stem to the zipper pull.
- Leaf
Ch 10. Sc in 2nd ch from hook, hdc in next ch, dc in next ch, htr (see below) in next 3 ch, dc in next ch, hdc in next ch, sc in last ch. Ch 2, sl st in 2nd ch from hook. Working along the other side of the chain, sc in next ch, hdc in next ch, dc in next ch, htr in next 3 ch, dc in next ch, hdc in next ch, sc in last ch. Fasten off leaving a long tail to sew the leaf to the zipper pull.
(Htr (half treble crochet): Yarn over 2 times, insert hook in stitch and draw up a loop (4 loops on hook), yarn over and draw through 2 loops (3 loops on hook), yarn over and draw through 3 loops (1 loop left on hook).
- Cut out 6 small tear drop shapes out of the felt (for the seeds) and hot glue them on the pouch.
- The measurements for the apple pouch/pencil case is 9 cm by 18 cm.
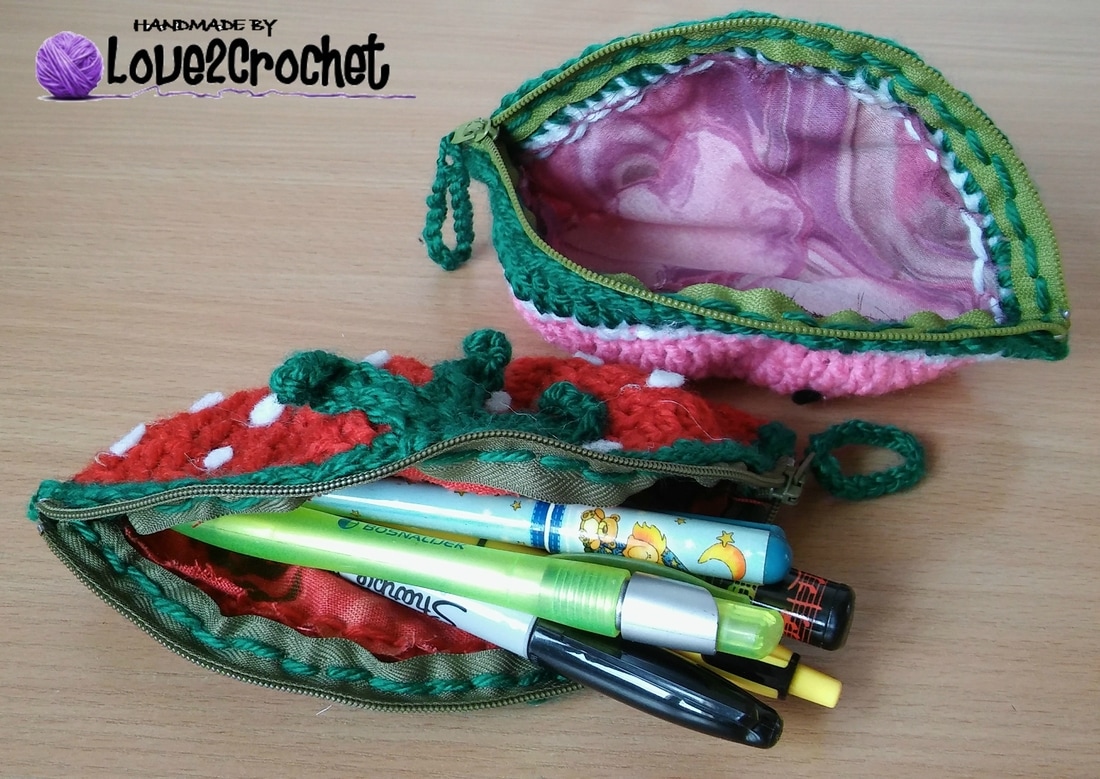
2. WATERMELON Pouch

After I made my Apple Pouch I decided to create “other kinds of fruit” pouches. I followed the same pattern with some variation.... So here it is the pattern for the Watermelon Pouch.
- Materials:
3.5 mm crochet hook
Pink, green, white worsted weight yarn
Green 20 cm zipper
Needle
Black felt for watermelon seeds
Thin material for inside lining
- Steps and Procedures:
- starting with pink yarn
R1: Make a Magic Ring, ch 2 and make 10 DC inside the MR (10 DC)
R2: 2 DC in each stitch around, join, ch 2 (20 DC)
R3: 2 DC in each stitch around, join, ch 2 (40 DC)
R4: 2 DC in first stitch, DC in next 3, repeat around, join, ch 2 (50 DC)
R5: 2 DC in first stitch, DC in next 4, repeat around, join, ch 2 (60 DC)
R6: 2 DC in first stitch, DC in next 5, repeat around, join, ch 2 (70 DC)
- change to white yarn
R7: SC in each stitch around, join, ch 2 (70 SC)
- change to green yarn
R7: DC in each stitch around, join, ch 2 (70 DC)
- I found some simple lining lying around my craft room and sewed it on the inside of the pouch for a cleaner, neater look.
- Fold circle in half and add in your zipper. Sew through the ends of the zipper and continue to sew the zipper to the edge of the pouch.
- Finish it off by creating a zipper pull (ch 10 and connect with the slip stitch to a zipper pull)
- Cut out 20 small tear drop shapes out of the felt (for the seeds) and hot glue them on the pouch.
- The measurements for the watermelon pouch/pencil case is 9 cm by 18 cm.
3. lemon/orange pouch

Again, another fruit pouch on the menue today….. After I made my Apple and the Watermelon pouches I decided to create the Lemon and Orange pouches. Here it is the pattern for the Lemon/Orange Pouch.
- Materials:
3.5 mm crochet hook
Yellow, Orange, White worsted weight yarn
Yellow/Orange 20 cm zipper
Needle
Thin material for inside lining
- Steps and Procedures:
- starting with white yarn
R1: Make a Magic Ring, ch 2 and make 10 DC inside the MR (10 DC)
R2: 2 DC in each stitch around, join, ch 2 (20 DC)
- change to yellow/orange yarn
R3: 2 DC in each stitch around, join, ch 2 (40 DC)
R4: 2 DC in first stitch, DC in next 3, repeat around, join, ch 2 (50 DC)
R5: 2 DC in first stitch, DC in next 4, repeat around, join, ch 2 (60 DC)
R6: 2 DC in first stitch, DC in next 5, repeat around, join, ch 2 (70 DC)
- change to white yarn
R7: SC in each stitch around, join, ch 2 (70 SC)
- change to yellow/orange yarn
R7: DC in each stitch around, join, ch 2 (70 DC)
- Embroider the 6 lines from the inner white circle to the edge (white circle) to resemble the cut lemon/orange slice
- I found some simple lining lying around my craft room and sewed it on the inside of the pouch for a cleaner, neater look.
- Fold circle in half and add in your zipper. Sew through the ends of the zipper and continue to sew the zipper to the edge of the pouch.
- Finish it off by creating a zipper pull (ch 10 and connect with the slip stitch to a zipper pull)
- The measurements for the lemon/orange pouch/pencil case is 9 cm by 18 cm.
4. Strawberry pouch

I followed the same simple principle and a variation of the pattern to create the Strawberry pouch. Here is the pattern:
- Materials:
3.5 mm crochet hook
Red, green worsted weight yarn
Green 20 cm zipper
Needle
White felt for strawberry seeds
Thin material for inside lining
- Steps and Procedures:
- starting with red yarn
R1: Make a Magic Ring, ch 2 and make 10 DC inside the MR (10 DC)
R2: 2 DC in each stitch around, join, ch 2 (20 DC)
R3: 2 DC in each stitch around, join, ch 2 (40 DC)
R4: 2 DC in first stitch, DC in next 3, repeat around, join, ch 2 (50 DC)
R5: 2 DC in first stitch, DC in next 4, repeat around, join, ch 2 (60 DC)
R6: 2 DC in first stitch, DC in next 5, repeat around, join, ch 2 (70 DC)
- change to green yarn
R7: DC in each stitch around, join, ch 2 (70 DC)
R7: SC in each stitch around, join, fasten off (70 SC)
- Green leaf/pedal:
- ch 10, SC down the chain (9 SC)
- ch 10, SC down the chain (9 SC)
- ch 10, SC down the chain (9 SC)
- now you have three long leaves, SC across the top of the pedal (2 SC in each stitch for a total of 6 SC)
- sew on the green border
- I found some simple lining lying around my craft room and sewed it on the inside of the pouch for a cleaner, neater look.
- Fold circle in half and add in your zipper. Sew through the ends of the zipper and continue to sew the zipper to the edge of the pouch.
- Finish it off by creating a zipper pull (ch 10 and connect with the slip stitch to a zipper pull)
- Cut out 30 small tear drop shapes out of the felt (for the seeds) and hot glue them on the pouch.
- The measurements for the strawberry pouch/pencil case is 9 cm by 18 cm.

|

|

|
|

|
|

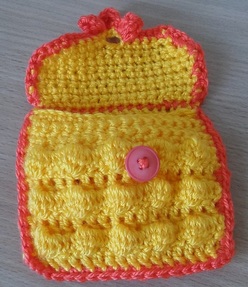
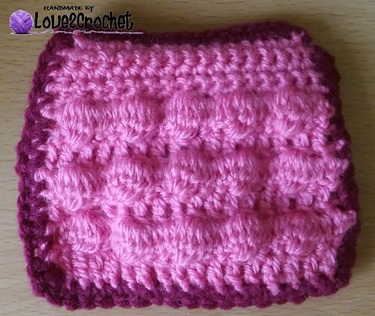
This was a super easy and a quick project. It took me about an hour to make it completely, and here is the pattern:
Materials:
3.5 mm crochet hook
yarn of your choice
needle, scissors
button
Steps and Procedure:
- using 3.5 mm hook and a yarn of your choice - ch 33, SC in the 2nd stitch from the hook, and make 1 SC in each ch down the line (32 SC)
- when you get to the end of the line ch 2 and turn
R1: make a "puff" in the 1st stitch after the ch 2 (yarn over-insert your hook in the stitch-pull up a loop (3x), your should have 7 loops on your hook - yarn over and pull through all 7 loops, ch 1
- skip 1 SC and make another "puff" (at the end of the row you should have 16 puffs)
- in the last stitch make 1 DC, ch 2 and turn
R2: make a puff in the same stitch as the DC from the previous row, and continue making puffs in ch 1 space from the previous row
- at the end of the row, make a DC connecting with the ch 2 from the previous row
- repeat R1 and R2 until you have a total of 24 rows
- The red pouch is 20 cm wide and 12 cm tall, and the blue one is 23 cm wide and 16 cm tall (because I used double stranded yarn for a thicker effect)
- I found some lining and sewed it on the inside of the pouch
- I slip stitched the sides together, and SC around for a neater, cleaner look. I also made ch 5 for the button hole at the center of the top edge.
And here are some pictures of the finished product:)

|

|

|

|

|

|
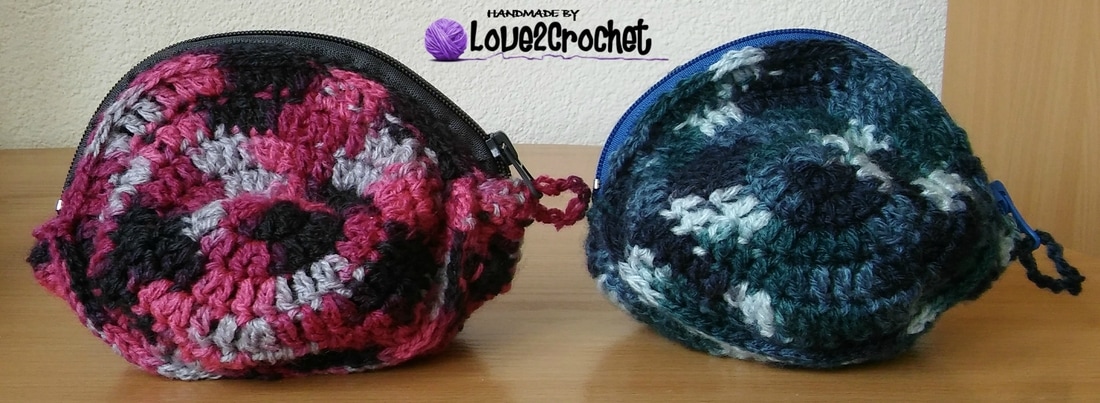
Round wallet/pouch

I wanted to make this round wallet and have looked online for the inspiration. I could not find the exact pattern to my liking, so I designed it myself. It is super simple. The most complicated thing is sewing on the lining:) So, here it is, the patterns and instructions:
Materials:
3.5 mm crochet hook
yarn of your choice
20 cm zipper
needle, scissors
Steps and Procedure:
- this pattern is designed in two circles, and a rectangle piece that is sewn onto the circles to represent the sides (gusset). This makes the wallet bigger and thicker
- ch 2 at the beginning does not count as a stitch
R1: make a Magic ring, ch 2 and make 10 DC inside the ring
R2: ch 2 and make 2 DC in each stitch (20 DC)
R3: ch 2 and make 2 DC in the first stitch, and 1 DC in the next stitch and repeat around (30 DC)
R4: ch 2 and make 2 DC in the first stitch, and 1 DC in the next stitch, and 1 DC in the next stitch, and repeat around (40 DC)
R5: ch 2, and make 2 DC in the first stitch and 1 DC in the next 3 stitches and repeat around (50 DC)
R6: ch 2, and make 2 DC in the first stitch and 1 DC in the next 4 stitches and repeat around (60 DC)
- make another circle following the same instructions
- now you have 2 circles diameters 14 cm
- making a side:
- ch 40, DC in the 3rd stitch from the hook and continue making DC down the chains (38 DC)
- ch 2, turn and make 38 DC
- ch 2, turn and make 38 DC
(the side is now 23 cm long and 4 cm wide)
- cut out the lining and sew it on the inside of both circles and the side rectangle
- slip stitch the side rectangle to the circle pieces
- put the zipper through the hole and sew on the zipper to the sides of the circle.
- ch 10 and attached to the zipper to create the zipper pool.

|

|
|

|
Granny square crochet purse
I found this simple pattern for the crochet granny square a while ago. I have always loved the granny squares, but never knew what to use them in or what project to incorporate them in. So, I stumbled upon a picture of a purse which was actually made out of a cut out afghan cover, and I suddenly had an idea to combine some granny squares and put them into a purse..... This was a long project of calculating and planning, figuring out what colors to use and how many actual squares to make, so here it is... The original post was from Hopeful Honey and here is the link: www.hopefulhoney.com/2016/06/classic-granny-square-free-crochet.html?m=1
Materials:
15 different colored yarn (3 different colors per square+ black and white yarn in round 4 and 5)
black and white yarn
4.00 mm crochet hook
Tapestry needle
bag lining material of your choice
4 D-rings
46 cm zipper
Steps and Procedures:
Body of the Purse:
R1: Make a magic loop using Color 1 (for example - dark blue) yarn. Ch2, 2 dc in magic loop. *Ch2, 3 dc in magic loop. Repeat from the * 3 times. Ch2. Join with a sl st in top of “Ch2”. (12 sts)
R2: Change yarn color to Color 2 (for example - sky blue). Ch2, turn your work. 2 dc in 'ch2' space made in previous round, ch2, 3 dc in same 'ch2' space. *Ch1. 3 dc in next 'ch2' space made in previous round, ch2, 3 dc in same 'ch2' space. Repeat from the * 3 times. Ch1, join with a sl st in top of ch2. (24 sts)
R3: Change yarn color to Color 3 (for example - light blue). Ch2, turn your work. 2 dc in 'ch1' space made in previous rnd. *Ch1. 3 dc in next 'ch2' space made in previous round, ch2, 3 dc in same 'ch2' space. Ch1, 3 dc in 'ch1' space made in previous round. Repeat from the * 3 times. Ch1. 3 dc in next 'ch2' space made in previous round, ch2, 3 dc in same 'ch2' space. Ch1, join with a sl st in top of ch2. (36 sts)
R4: Change yarn color to Color 4 (for example - white). Ch2, turn your work. 2 dc in 'ch1' space made in previous round. *Ch1. 3 dc in next 'ch2' space made in previous round, ch2, 3 dc in same 'ch2' space. Ch1, 3 dc in 'ch1' space made in previous round. Ch1, 3 dc in next 'ch1' space made in previous round. Repeat from the * 3 times. Ch1. 3 dc in next 'ch2' space made in previous round, ch2, 3 dc in same 'ch2' space. Ch1, 3 dc in next 'ch1' space made in previous round. Ch1, join with a sl st in top of ch2. (48 sts)
R5: Change yarn color to Color 5 (for example - black). Ch2, turn your work. 2 dc in 'ch1' space made in previous round. Ch1, 3 dc in next 'ch1' space. *Ch1. 3 dc in next 'ch2' space made in previous round, ch2, 3 dc in same 'ch2' space. Ch1, 3 dc in 'ch1' space made in previous round. Ch1, 3 dc in 'ch1' space made in previous round. Ch1, 3 dc in next 'ch1' space made in previous round. Repeat from the * 3 times. Ch1. 3 dc in next 'ch2' space made in previous round, ch2, 3 dc in same 'ch2' space. Ch1, 3 dc in next 'ch1' space made in previous roujnd. Ch1, join with a sl st in top of ch2. (60 sts)
Fasten off, weave in loose ends.
I have made 19 squares and have organized them in 4 groups - 2 side edges (2 squares each), bottom (3 squares), 2 sides (3x2 squares) which is a total of 19 squares. I sc the squares in each group together. Before I sc them together to form a purse I lined each group with the material to give it more body, volume and an actual lining. Then, I sc the parts together to make a purse. Now when the body was made I needed to make the handles.
Handles:
- using black yarn, make a MR and ch 1
- make 5 SC inside the MR, sl st to the 1st SC
- make 4 SC in a row
- continue making SC in continuous rows (4 SC in a row) until the handles reach the right length (mine were 80 cm long)
- make 2 handles
So, now I needed to attach the handles to the body of the purse. I gathered 4 D-rings and I sewed the D-rings to both ends of handles (2 D-ring per handle). Now, I wanted a nice, clean attachment to attach the handles to the purse so I decided to crochet a "plate" that I would pass trough the handle's D-rings and sew onto the body of the purse:
- using black yarn, ch 3, sc in the 2nd stitch and make 1 SC more
- 2 SC, ch 1 and turn
- 2 SC in each stitch, ch 1 and turn (4 SC)
- make 4 SC for 7 rows
- make 2 SC tog (2 sc)
- sc around the "plate"
- make 4 "plates"
Once the "plates" were made, I passed each "plate" through each D-ring and sewed it to the body of the purse (the edge). Once the handles were attached, I sewed in the zipper. Now that the purse is done - take it out for a spin and show it off:)
And here is how my purse turned out and here are some pics of the assembling the purse....
Frog backpack
(original post from 2014)
My nephew had a birthday recently and I wanted to make him something cool that a toddler would like, enjoy, and love to wear. I saw a pattern for this adorable frog backpack and knew I had found what I was looking for. The pattern is wonderfully done, just make sure you follow it exactly as it is written!
Here is the link to the pattern (it is a pdf format):
www.yarnspirations.com/patterns/frog-backpack.html
And here is how mine turned out. My little nephew said he does not like green, so I made him a blue frog - it is just as cute as green or any other color:)
... Following up on the Frog Backpack post..... a year after the Blue Frog Backpack was made, I made another frog for my niece who is starting Preschool class (2015). This time I made the Pink Frog.... I am adding more pics to the existing gallery.....
"Lady Bug" crochet backpack
The Frog backpack I have made a few years back, has been a huge success with my sister's kids, so my nephew has commissioned a new backpack. This time he wanted the Lady Bug. I knew that the Red Heart has so many wonderful free patterns, so I found a super easy one. I have followed their instructions and a pattern, and the only change I have made is that I have used double strands of yarn, and a 7.00 mm crochet hook (as opposed to the 4.00 mm in the original pattern). It turned out great. It was bigger than the original, but it is exactly what I wanted. It fits a 7-10 year old perfectly. This is the original pattern:
www.redheart.com/free-patterns/lady-bug-backpack
This is how my Lady Bug backpack turned out. I also glued the googly eyes onto the flap buttons.
www.redheart.com/free-patterns/lady-bug-backpack
This is how my Lady Bug backpack turned out. I also glued the googly eyes onto the flap buttons.

|

|

|
"Panda" crochet backpack

I have made this Panda backpack for my niece for Christmas. I have used the pattern from Crochet For You blog, and I followed their pattern. The only difference is that the original pattern calls for 5.5 mm crochet hook, but I have used the double strands of yarn and a 7.00 mm crochet hook. Therefore, the Panda turned out a bit bigger than the original, but that is exactly what I wanted.
Here is the link to the original pattern: www.crochetforyoublog.com/2018/08/crochet-panda-backpack/
The pattern does not have the pattern for the straps, but I have used the following pattern and have made my own straps.
- using double strands of black yarn and a 7.00 mm crochet hook
LOWER STRAPS:
Right Strap:
1: With back side facing and a backpack turned upside down, join with a slip st to the 3rd SC of Row 3. SC in the same stitch, and SC in the next 3 st, turn – 4 sc.
2-6: Ch 1, SC in next 4 sts; turn.
7: Ch 4, skip 2 sts, slip st in next st (ch-4 loop made). Fasten off.
Left Strap:
1: With back side facing and a backpack turned upside down, join with a slip st to the 41st SC of Row 3. SC in the same stitch, and SC in the next 3 st, turn – 4 sc.
2-6: Ch 1, SC in next 4 sts; turn.
7: Ch 4, skip 2 sts, slip st in next st (ch-4 loop made). Fasten off.
UPPER STRAPS:
1: With back side facing, join with a slip st to the middle of the top edge of the backpack, SC in the same stitch, SC in the next 7 sts; turn – 8 sc.
2: Ch 1, sc in each st across; turn. Do not fasten off.
Divide for straps:
Right strap:
3-55: Ch 1, sc in next 4 sts; turn – 4 sc.
56: Ch 1, sc in next 2 sts, place marker, sc in next 2 sts; turn.
57-68: ch1, sc in next 4 st, turn - 4 sc.
69: Ch 1, sc in next st, ch 2, skip next 2 sts, sc in last st; turn – 2 sc, 1 ch-2 sp (button-hole made)
70: Ch 1, sc in next st, 2 sc in ch-2 space, sc in last st; turn – 4 sc.
71-75: Ch 1, sc across; turn.
76: Ch 1, sc in next st, ch 2, skip next 2 sts, sc in last st; turn – 2 sc, 1 ch-2 sp (button-hole made)
77: Ch 1, sc in next st, 2 sc in ch-2 space, sc in last st; turn – 4 sc.
78-82: Ch 1, sc across; turn.
83: Ch 1, sc2tog twice; turn – 2 sc.
84: Ch 1, sc2tog. Fasten off.
Left strap:
3: With right side facing, join the black yarn with a slip st in the 5th st of Row 2, sc in same st, sc in next 3 sts; turn – 4 sc.
4-84: Ch 1, repeat Rows 4 – 84 as for right strap.
I also decided to make my own Drawstring:
- with double strands of black yarn and 6.00 mm crochet hook
- ch 101, SC in each stitch down the chain line (100 SC), sl st to the 1st SC made
I also glued the googly eyes onto the black patches of the eyes.

|

|

|
Crochet Water Bottle Holder 3

I needed to make another crocheted Water Bottle Holder for my display. I looked everywhere and found many great patterns, but I decided to create my own. Again, the colors I used are blue and yellow (to celebrate my School's spirit), but you can, of course, use any color you desire.....
Materials:
yarn
scissors
needle
crochet hook 4.00 mm
Steps and Procedure:
1. Make a magic circle, ch 1 and make 8 HDC inside the magic circle
2. ch 1, 2HDC in each stitcch around (16 HDC)
2. ch 1, HDC in ch 1 stitch, 2 HDC in next stitch, 1 HDC in next stitch, 2 HDC in next stitch - repeat all the way around (1HDC+2HDC) (24 HDC)
3. ch 1, HDC in ch 1 stitch, 1 HDC in next stitch, 2 HDC in the next stitch - repeat all the way around (1HDC+1HDC+2 HDC) (32 HDC)
4. ch 1, HDC in ch 1 stitch, 1 HDC in next stitch, 1 HDC in next stitch, 2 HDC in the next stitch - repeat all the way around (1HDC+1HDC+1HDC+2 HDC) (40 HDC)
5. ch 1, HDC in the back loop of every stitch around
6. ch 3, skip 1 stitch, HDC in next stitch, ch 1, skip 1 stitch, HDC in next stitch (19 HDC)
7. ch 3, 4 HDC in every other ch 1 space (from the skipped stitch from the previous row), ch 1 - repeat all the way around for 15 rows (or more rows depending on your preference) (4 HDC=shell) (9 shells in a row)
Making a handle:
- ch 121, turn, SC in the 2nd stitch from the hook.
- SC down the row of chains to have a total of 120 SC
- when you get to the end change the color, ch 1 and turn and SC all the way back to the beginning
- make 3 SC in the last stitch around and SC across
- sew it onto the water bottle holder
Embellishments:
Before I sewed on the handle, I did a a row of SC on top of my last row of HDC on the water bottle holder. (51 SC) I also did a row of SC over the row of HDC on the back loops (step 5). I sewed on the paw print applique.
This is how mine turned out. It is really easy and a super quick project. I hope the instructions were relatively clear.
Crochet Water Bottle Holder 2
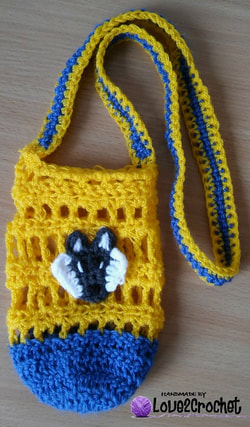
Water bottle holders are a must in a school setting! I though this might be another great item for me to make and promote the School's spirit!
I used blue and yellow yarn, but you can use any color you'd like.....I also added and sewed in the wolf applique.....
Materials:
two different color yarn
yarn
4.00 mm crochet hook
Making a body of the water bottle holder:
Reminder: beginning chains made in this project DO NOT count as a stitch!
(using color 1 yarn)
- make a magic circle
- ch 2, make 12 DC in the magic circle
- ch 2, make 2 DC in each stitch around (24 DC)
- ch 2, make 1 DC in the next stitch, then 2 DC in the next stitch all around (36 DC)
- ch 2, make 1 DC in each stitch around in the back loop (36 DC)
- ch 2, make 1 DC in each stitch around (36 DC)
- fasten off
(using color 2 yarn)
- ch 4, skip one stitch, make 1 DC in the next stitch, ch 1 (18 DC) around, slip stitch in the ch 3
- ch 2, make 2 HDC in each space (36 HDC)
- ch 5, skip one stitch, make 1 TRC in the next stitch (18 TRC) around, ch 1, slip stitch in the ch 4
- ch 2, make 2 DC in each space around (36 DC)
- ch 5, skip the next stitch, make 1 TRC in the next stitch, ch 1 (18 TRC), slip stitch in the ch 4
- ch 2, make 2 HDC in each space around (36 HDC)
- ch 4, skip one stitch, make 1 DC in the next stitch around, ch 1 (18 DC), slip stitch in the ch 3
- ch 2, make 2 HDC in each space around (36 HDC)
- ch 1, skip one stitch, make 1 SC in each of the next five stitched around
- ch 3, skip one stitch, make 1 HDC, ch 1 around (15 HDC)
- ch 1, make 2 SC in each space around (30 SC)
- fasten off
Making a handle:
- ch 121, turn, SC down the row of chains to have a total of 120 SC
- when you get to the end change the color, ch 1 and turn and SC all the way back to the beginning
- make 3 SC in the last stitch around and SC across
- sew it onto the water bottle holder
Embellishments:
I sewed on the wolf face applique.
Crochet Water Bottle Holder 1

I made this cute water bottle holder recently for my friend's little girl. She wanted the combination of green and pink, and here name's initial on the water bottle as well. This is a quick and easy project, it took me about an hour to finish it.
These are the instructions:
Materials:
green yarn
pink yarn
4.00 mm crochet hook
Procedure:
- chain 2 DOES NOT count as a stitch
- always slip stitch in ch 2
1. Make a magic circle, ch 2, make 8 HDC
2. ch 2, 2 HDC in each stitch (16 HDC in this row)
3. ch 2, 1 HDC in next stitch, 2 HDC in next stitch (1 HDC-2HDC) = (24 HDC in this row)
4. ch 2, 1 HDC + 1 HDC + 2 HDC around (1HDC-1HDC-2HDC) = (32 HDC in this row)
5. ch 2, HDC in each stitch around in the back loop of each stitch = (32 HDC in this row)
6. ch 2, HDC in each stitch around (make 15 rows, 32 HDC in each row)
7. making a handle: make a SC in next 4 stitches, ch 1, turn (116 rows of SC)
8. count 12 stitches from the start of the handle (across the rim of the water bottle holder) and attach the handle on the opposite side making sure you have 12 stitches between the handles.
9. using a different color yarn single crochet around the edges of the handle and of the top of the water bottle.
10. single crochet around the back loops of the base of the water bottle holder
"Mr. Snaps" crochet pencil case

I have found this awesome, truly awesome pattern online the other day when I was searching for a crocheted gift to make to my little nephew for Christmas. I found this amazing website, that has loads of free patterns, so I picked this one - Mr. Snaps, the adorable Crocodile pencil case. I knew my little nephew will love to take it to school and show it off:)
The pattern is not mine, so I am attaching the link to the website it is from.
www.topcrochetpatterns.com/free-crochet-patterns/crochet-crocodile-pencil-case
The instructions are amazingly done, super easy to follow and make. Just make sure you have some googly eyes and a zipper for the teeth. Thank you to the designer Irene Strange for the free pattern! Happy crocheting y'all. And here are a few pics of my Mr. Snaps. I am so proud of how he turned out:)

|

|

Crochet "unicorn" pencil case

This was one of the cutest crocheted projects I have ever made. Just making it filled my soul with ease, and my heart with sunshine. It probably has to do something with the pastel yarn colors that I love so much, and with the very fact that I was making a Unicorn! Awwwww! And what girl (young or old) does not hold a special place in her heart for Unicorns! (I know, I know, I am still a child at heart, what can I do!) Anyways, the original pattern is by LadyDustBunny, and all credit for this creation goes to her. Thank you Gabrielle!
Here is my version, that I have changed a bit to fit my needs.....
Materials:
4.00 mm and 5.00 mm crochet hook
pink, white, light green, light blue, black yarn
zipper
needle, scissors
glue gun
stitch marker
Steps and Procedures:
- with double strands of pink yarn, and 5.00 mm crochet hook
Chain 31, SC in 2nd ch from the hook and down the chain line (30)
(Do not ch, do not turn).
Work the other side of the chain going back to the end of the chain, and make 30 SC. (By doing this, you’ll end up with a round of 60 SC).
- place a stitch marker
R2-7: SC around, do not join (60)
- change to double strands of white yarn
R7-17: sc around, do not join (60)
- change to 3 strands of rainbow yarn (1 strand each of pink, light blue, light green)
R18-20: sc around, do not join (60)
- cut off the yarn and sew in the ends
Horn (make 2)
- with 4.00 mm and yellow yarn
Chain 6
R1: sc in 2nd ch from hook and in each across (5)
R2-3: ch 1, turn, sc across (5)
R4: ch 1, turn, sc2tog, sc, sc2tog (3)
R5: ch 1, turn, sc across (3)
R6: ch 1, turn, sc2tog, sc (2)
R7: ch 1, turn, sc across (2)
R8: ch 1, turn, sc2tog (1)
R9: ch 1, turn, sc (1)
- make 2 horns
- SC around the edge of the horn, connecting 2 horns together
- make sure you make 2 SC in each corner of the horn
- cut off the yarn and finish off
Ears (make 2)
- with 5.00 mm, and double strands of white yarn
Chain 5
R1: sc in 2nd ch from hook, sc across (4)
R2: ch 1, turn, sc across (4)
R3: ch 1, turn, sc, sc2tog, sc (3)
R4: ch 1, turn, sc, sc2tog (2)
R5: ch 1, turn, sc2tog (1)
Finish off
- repeat the same pattern for the ears this time with the pink yarn creating the inside of the ears (with 4.00 mm crochet hook and single strand of yarn)
- take the white ear and the pink inside of the ear, SC around around the white ear with the white yarn, making sure you make 3 SC in every corner
Braid
- take 6 strands (2 pink, 2 light blue, 2 light green)
- make a slip stitch to the bottom side edge of the pencil case edge
- ch 16, and make 15 SC down the chain line
- sl st to the top side edge of the pencil case
Assembly:
- glue the zipper to the opening of the pencil case
- embroider the eyes and the nostrils to the face
- sew on the ears and the horn

|

|

|

|

