|
|
|
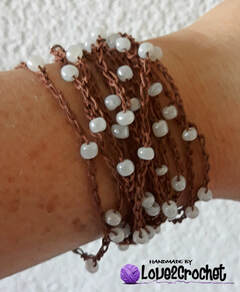
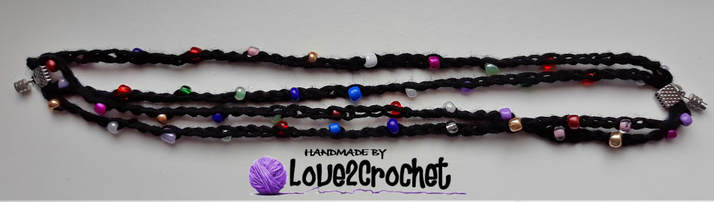
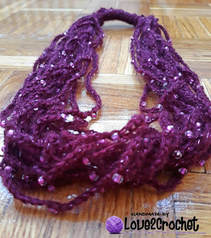
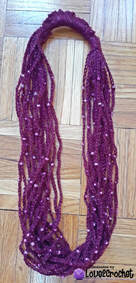
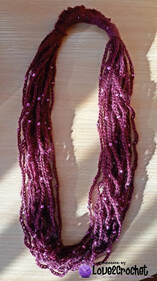
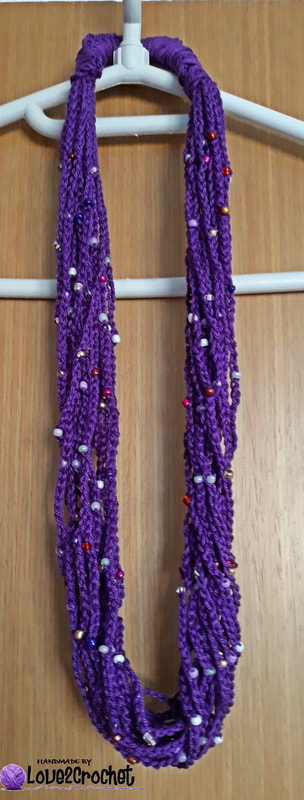
Get ready for the easiest ever crochet chain necklace and bracelet combo set! This was such a cute, fast and easy project that I really want to make a few more to satisfy my "crochet daily therapy needs". This is such a versatile and quick project, a definite must-make. Here are the details.....
Materials:
1.30 mm crochet hook
crochet thread of your choice (I have used size 10)
120 small beads
Steps and Procedure:
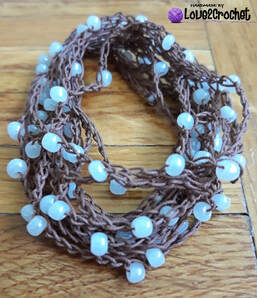
1. BRACELET:
- thread the 80 small beads onto the thread
- ch 6, slide the bead, secure the bead with the ch 1 and make another ch 6
- continue to slide the bead, secure the bead with ch 1 and make additional ch 6
- after you have incorporated all of your 80 small beads onto the thread and have ch 6 between each bead, sl st into the 1st ch made at the beginning of the project
- cut the yarn and secure the thread so that it does not get unraveled
Materials:
1.30 mm crochet hook
crochet thread of your choice (I have used size 10)
120 small beads
Steps and Procedure:
1. BRACELET:
- thread the 80 small beads onto the thread
- ch 6, slide the bead, secure the bead with the ch 1 and make another ch 6
- continue to slide the bead, secure the bead with ch 1 and make additional ch 6
- after you have incorporated all of your 80 small beads onto the thread and have ch 6 between each bead, sl st into the 1st ch made at the beginning of the project
- cut the yarn and secure the thread so that it does not get unraveled
|
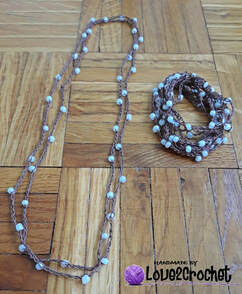
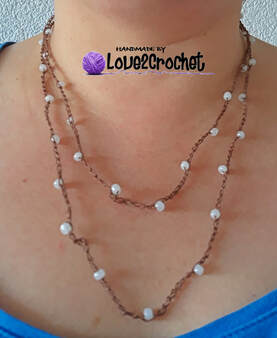
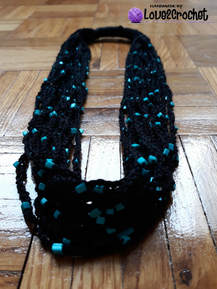
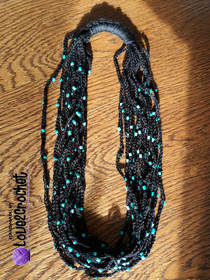
2. NECKLACE
thread the 40 small beads onto the thread - ch 6, slide the bead, secure the bead with the ch 1 and ch 6 - continue to slide the bead, secure the bead with ch 1 and make additional ch 6 - after you have incorporated all of your 40 small beads onto the thread and have ch 6 between each bead, sl st into the 1st ch made at the beginning of the project - cut the yarn and secure the thread so that it does not get unraveled - if you'd like a longer necklace, thread more beads, or wear the necklace as a single strand without looping it around your neck twice |
|
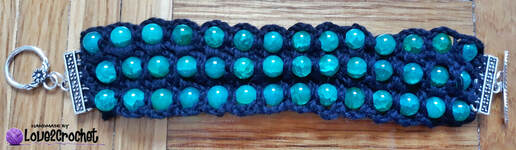
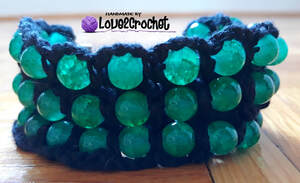
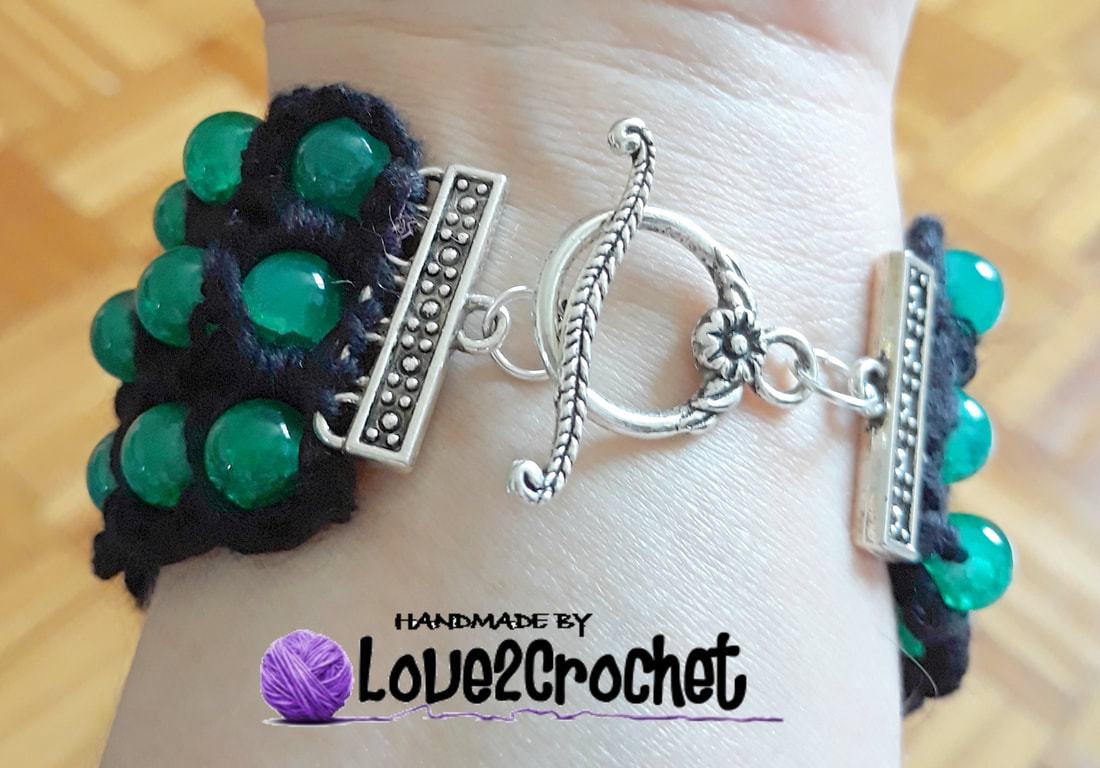
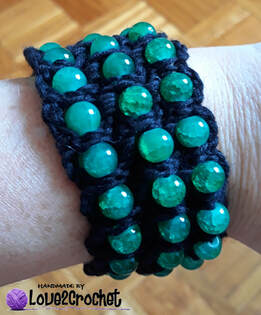
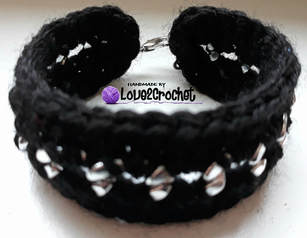
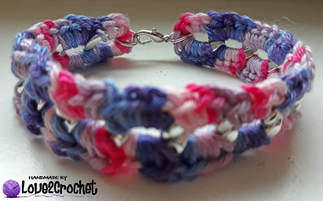
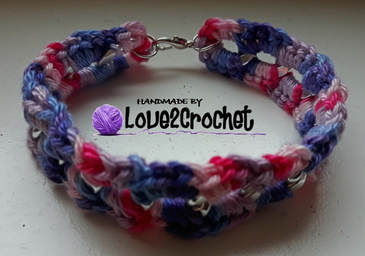
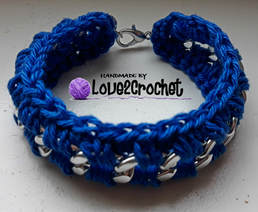
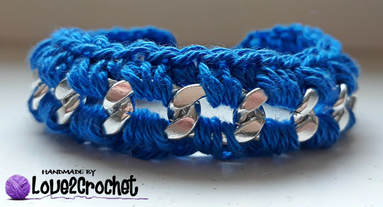
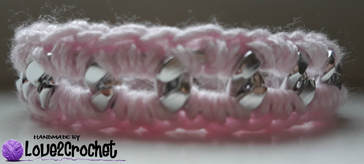
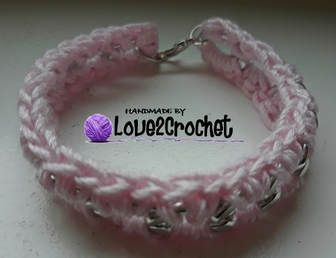
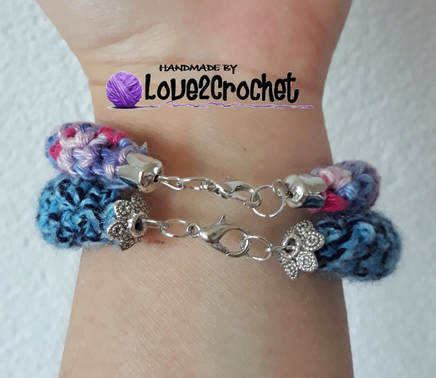
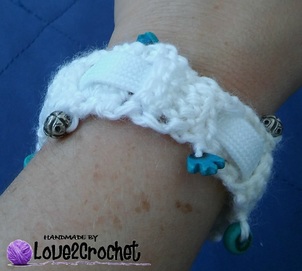
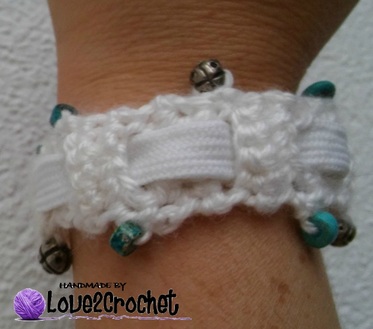
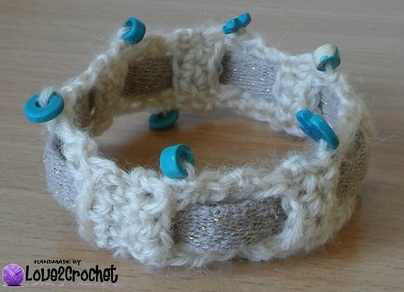
beaded cuff bracelet
This was a simple cuff bracelet to make. I looked everywhere for the pattern, but could not find any free tutorials, but did find this tutorial which I have used as a basis for this cuff bracelet. The tutorial is in Italian, but it is easy to figure out just by looking at it: www.youtube.com/watch?v=YAgjOGVl9bg
So, here it the pattern....
Materials:
2.00 crochet hook
42 beads
yarn of your choice
clasps and jewelry loops for the ends of the bracelet
needle, scissors
Steps and Procedures:
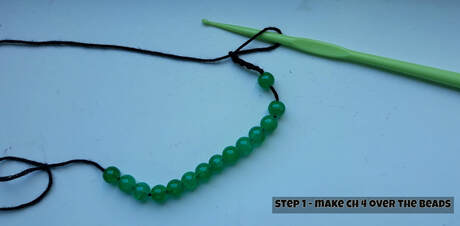
1. string the 14 beads onto the yarn (make sure it fits around your wrist, I needed 14 beads, you might need more or less)
- tie a slip knot at the short end of the yarn and ch 4 after the last bead strung
So, here it the pattern....
Materials:
2.00 crochet hook
42 beads
yarn of your choice
clasps and jewelry loops for the ends of the bracelet
needle, scissors
Steps and Procedures:
1. string the 14 beads onto the yarn (make sure it fits around your wrist, I needed 14 beads, you might need more or less)
- tie a slip knot at the short end of the yarn and ch 4 after the last bead strung
2. pull up the bead and move the ch4 over the bead, making a SC onto the short yarn (making a ch loop over the half of the bead)
3. ch 3, pull up the bead, make a SC onto the short yarn, and continue until you have incorporated all beads
4. ch 4, turn the bracelet around and make 1 SC in the SC from the previous side
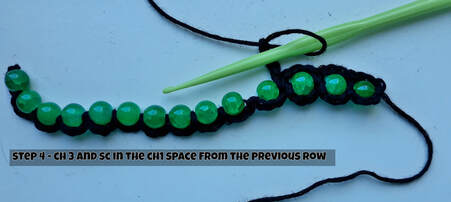
3. ch 3, pull up the bead, make a SC onto the short yarn, and continue until you have incorporated all beads
4. ch 4, turn the bracelet around and make 1 SC in the SC from the previous side
- continue making ch 3 and SC until you have incorporated all beads, sl st in the first ch made, fasten off
- make 2 more bracelets with 14 beads
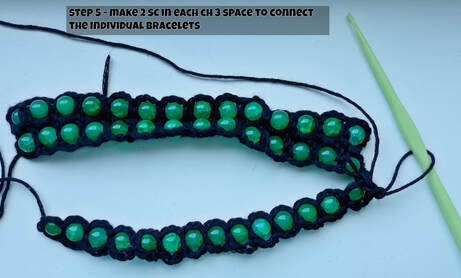
5. to connect the bracelets make 2 SC in each ch 3 space of 2 consecutive bracelets
6. connect the 3rd bracelet in the same manner (2 SC in each ch3 space)
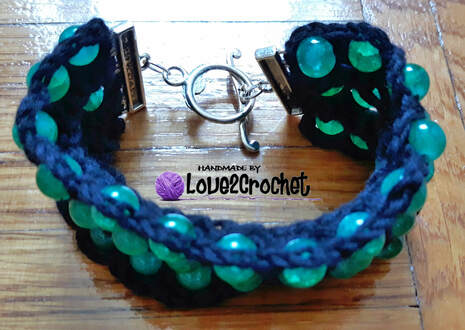
7. add the clasps and jewelry loops at each end of the bracelet
- make 2 more bracelets with 14 beads
5. to connect the bracelets make 2 SC in each ch 3 space of 2 consecutive bracelets
6. connect the 3rd bracelet in the same manner (2 SC in each ch3 space)
7. add the clasps and jewelry loops at each end of the bracelet
And here is the finished product...... It turned out really nice, I will make another one soon with different colored yarn and different beads.
|
|
|
|
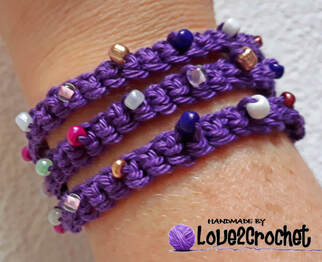
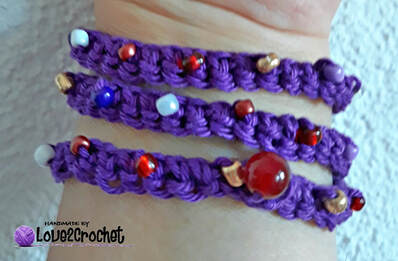
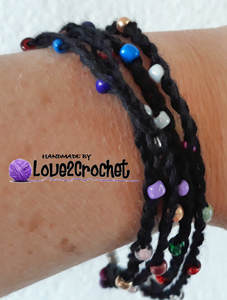
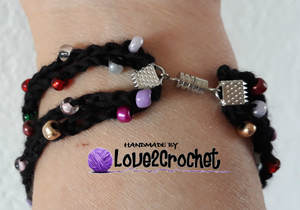
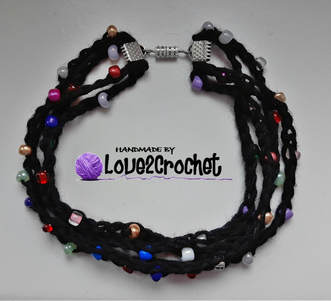
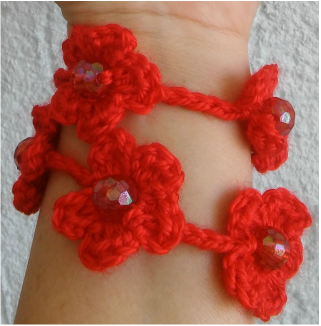
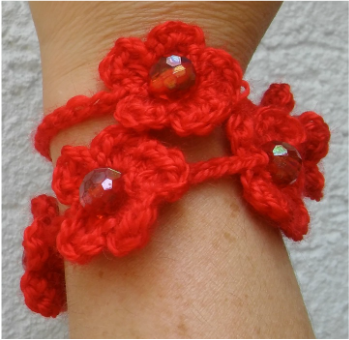
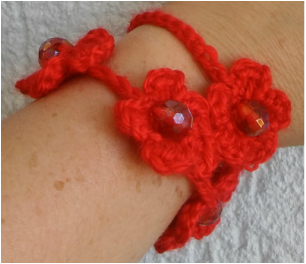
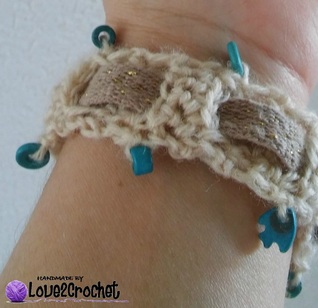
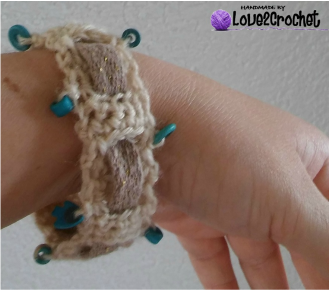
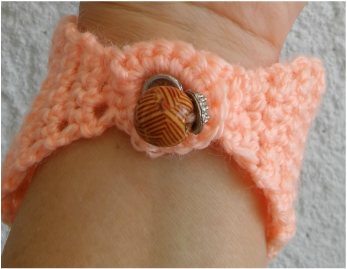
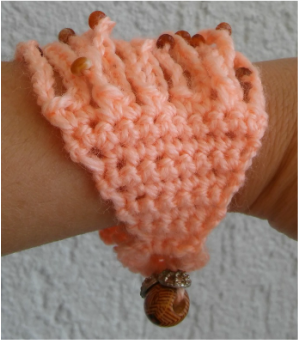
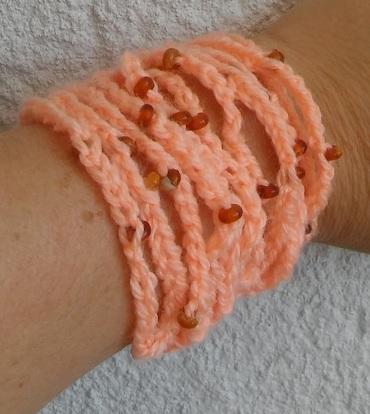
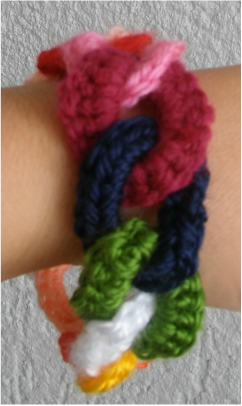
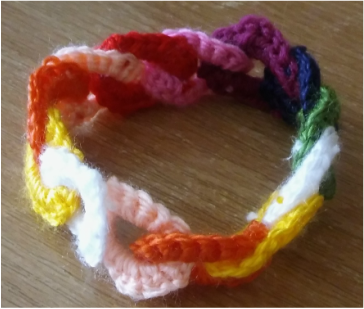
simple chained beaded bracelet
This was literally the easiest beaded bracelet I have ever made. It took me 15 min, it is super beginner friendly. I have decided to make the triple-length (so that it can fir the wrist three times), but you can decide to make it longer or shorter. Here is the pattern.....
Materials:
2.00 mm crochet hook
yarn of your choice
40 small beads and 1 big bead
needle, scissors
Steps and Procedures:
Thread 40 small beads onto the yarn, and 1 big bead for the end
- ch 120 (make sure it fits around your wrist 3 times comfortably)
- chain additional 5 chains (to fit the big bead), sl st to the 5th chain from the hook
- bring the small bead down the yarn line and make 1 SC
- make 1 SC in the next 2 chains
- continue sliding the bead and making 3 SC down the chain line
- when you get to the end, and have made 120 SC and have incorporated all 40 small beads onto the chain line, slide down the big bead and make another SC into the last SC made
- fasten off
- pull the big bead through the ch5 loop and wrap it around your wrist 3 times
|
|
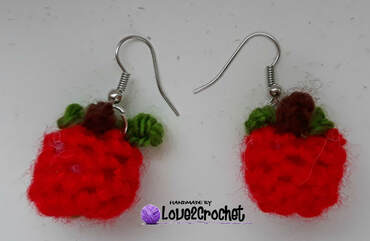
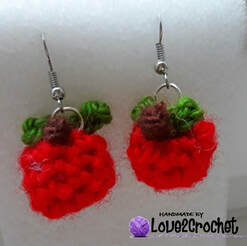
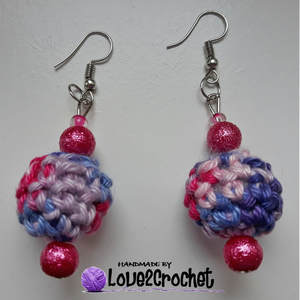
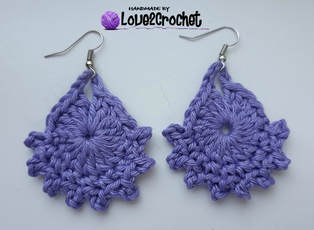
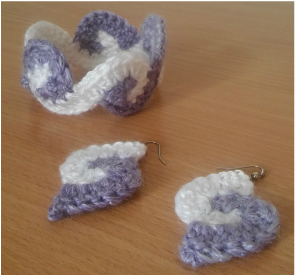
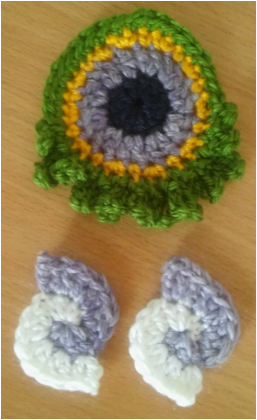
"3D" apple earrings
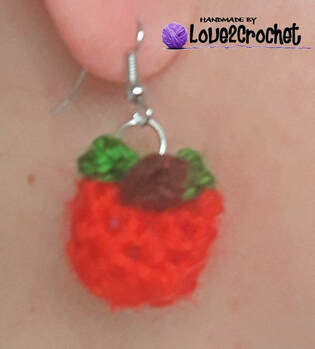
I love 3D crochet earrings! And being a teacher myself, I am very partial to apple earrings/jewelry:) So, I decided to make these cute 3D apple earrings. I used worsted weight yarn, but I would recommend using the embroidery thread, as it will make the project neater and less "fuzzy". So, here are the instructions and steps......
Materials:
red, brown, green yarn
1.75 mm crochet hook
scissors, needle
earrings hooks and earrings loops
Steps and Procedure:
- with red yarn and 1.75 mm hook
1. Make a Magic ring and make 4 SC inside the ring (4sc)
2. Make 2 Inc in each sc around (8 sc)
3-5. Make a SC in every stitch around (8 sc)
6. Make Dec around (4 sc)
- making a stalk:
- with brown yarn and 1.75 mm crochet hook
- ch 3
- Sl st 2 (starting from 2nd ch from hook)
- fasten off
- sew the stalk to the center of the apple
- making the leaves
- with green yarn and 1.75 mm crochet hook
- ch 3
- Sl st 1 in 2nd ch from hook, sc 1, Ch3, sl st in 2nd chain, sc, sl st 1 to center
- fasten off
- sew the leaves to the center of the apple, close to the stalk
|
|
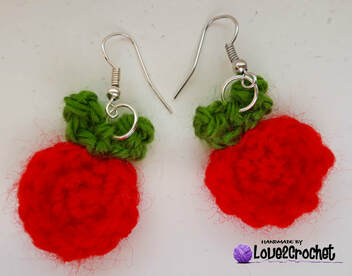
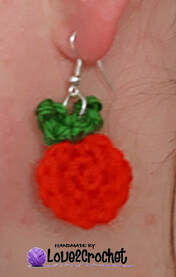
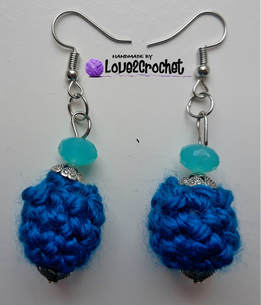
tiny apple earrings
This was such a quick project! I made these tiny Apple earrings under 10 minutes, including adding the metal loop rings and earring hooks.
These are super tiny earring, each measuring 2 cm. So, here are the instructions.....
Materials:
1.75 mm crochet hook
green, red yarn
scissors, needle
jewelry making supplies, earring hoops, loop rings
stitch marker
Steps and Procedures:
- with 1.75 mm crochet hook and red yarn
1. Make a Magic Ring, and 4 SC
2. Make an INC in every stitch around (8 SC)
3. Make the following stitches: 1 HDC+1 SC - sl st - 1 SC+1 HDC - 1 HDC - 2 SC - SC - sl st - 2 SC
- fasten off and sew in the ends of the red yarn
- with 1.75 mm crochet hook and green yarn
- insert hook into the sl st at the top of the apple to make a leaf
- *ch 3, make a sl st into the 2nd chain from the hook, make 1 SC into the next st, make a sl st into the joining stitch*
- repeat again (**) to make another leaf
- fasten off and sew in the ends of the green yarn
- attach the loop ring and an earring hook between the green leaves, and voila - your tiny apple earring is ready:)
|
|
a "10-minute metal chain"
bracelets collection
|
|
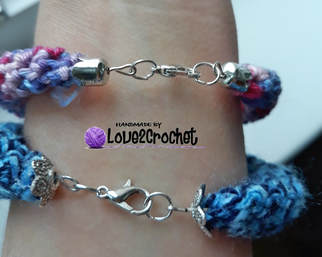
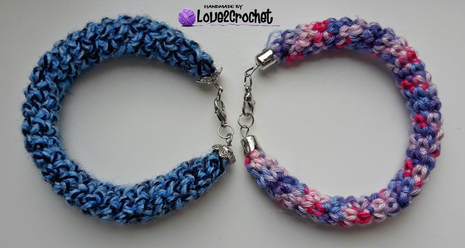
I have had this thick metal chain that I wanted to use to make a crochet bracelet and lately I have found some time to do so. These are super easy bracelets to make. I have made different variations with different yarn colors. Here are the instructions for the "Metal Power" bracelet:
Materials:
2.00 mm crochet hook
chain (19 cm long)
yarn of your choice
jewelry making materials (lobster clasp, jump rings)
Steps and Procedure:
1. Measure the diameter of your wrist and cut the metal chain a bit longer (mine was 19 cm)
Round 1:
2. Using a 2.00 mm crochet hook and a yarn of your choice (I used black), make a ch 1 to connect the yarn to the metal chain
3. Make 5 SC in 1st metal chain, and 2 SC in each metal chain down the line (I had a total of 16 chains which fit my wrist)
4. Make 5 SC in the last metal chain, turn the chain the other side and continue crocheting (starting with the other side of the 2nd chain)
5. Continue to make 2 SC in each chain until you get to the other side of the 1st metal chain you started with, sl st to the 1st SC made and ch 1
(you should have 5 SC in the 1st and the last chain, and 4 SC in all the other metal chains in between)
Round 2:
6. 1 SC in first SC (you made in the previous row) and in every SC all the way around until you reach the first metal chain you started with
7. Sl st to the 1st SC made, cut the yarn and sew in the ends
8 Attach the jump rings on both ends of the bracelet, and a lobster clasp on one end of the bracelet
|
|
Here is the 2nd bracelet I have made in my collection of "10-minute metal chain bracelets". This one was made with the purple mix yarn and the metal chain. Here are the instructions for the "Purple Bliss" bracelet:
Materials:
2.00 mm crochet hook
chain (19 cm long)
yarn of your choice
jewelry making materials (lobster clasp, jump rings)
Steps and Procedure:
1. Measure the diameter of your wrist and cut the metal chain a bit longer (mine was 19 cm)
2. Using a 2.00 mm crochet hook and a yarn of your choice (I used purple mix), make a ch 1 to connect the yarn to the metal chain
3. Make 8 SC in the 1st metal chain
4. Make 4 SC in all the subsequent metal chains until you reach the last chain
5. Make 8 SC in the last metal chain
6. Turn the metal chain around and work on the "empty" side of the metal chain making 4 SC in each metal chain
(you should have 8 SC in every metal chain when you finish)
7. Sl st to the 1st SC made, cut the yarn and sew in the ends
8 Attach the jump rings on both ends of the bracelet, and a lobster clasp on one end of the bracelet
|
|
This the 3rd bracelet I have made in my collection of "10-minute metal chain bracelets". This one was made with the blue yarn and the metal chain. Here are the instructions for the "Blue Heaven" bracelet:
Materials:
2.00 mm crochet hook
chain (19 cm long)
yarn of your choice
jewelry making materials (lobster clasp, jump rings)
Steps and Procedure:
1. Measure the diameter of your wrist and cut the metal chain a bit longer (mine was 19 cm)
2. Using a 2.00 mm crochet hook and a yarn of your choice (I used blue), make a ch 1 to connect the yarn to the metal chain
Round 1:
3. Make 1 SC in the 1st metal chain and ch 1
4. Continue making 1 SC+ch 1 all the way down the metal chain
5. When you get to the last chain, make 1 SC and ch 2
6. Turn the metal chain around and continue making 1 SC+ch1 all the way down the other side of the metal chain,
Round 2:
7. When you get to the 1st metal chain you started with, SC inside the metal chain and make an additional 1 SC inside the ch1 space
8. Continue this same pattern (SC+SC in ch1 space) until the last metal chain on that side
9. When you get to the last metal chain, make 1 SC and 2 SC in the ch2 space
10. Turn the metal chain around, and continue making SC+SC in ch1 space all the way around until you reach the 1st metal chain you started with.
11. Sl st to the 1st SC made, cut the yarn and sew in the ends
12. Attach the jump rings on both ends of the bracelet, and a lobster clasp on one end of the bracelet
|
|
This is the 4th bracelet I have made in my collection of "10-minute metal chain bracelets". This one was made with the pink yarn and the metal chain. Here are the instructions for the "Serenity" bracelet:
Materials:
2.00 mm crochet hook
chain (19 cm long)
yarn of your choice
jewelry making materials (lobster clasp, jump rings)
Steps and Procedure:
1. Measure the diameter of your wrist and cut the metal chain a bit longer (mine was 19 cm)
2. Using a 2.00 mm crochet hook and a yarn of your choice (I used pink), make a ch 1 to connect the yarn to the metal chain
Round 1:
3. Make 6 SC in the 1st metal chain
4. Make 2 SC in all the other metal chains until you reach the last one
5. Make 6 SC in the last metal chain, and turn the metal chain around crocheting on the other (empty) side of the chain
6. Make 2 SC in all metal chains down the metal chain line
(you should have 6 SC in both ending metal chains, and 4 SC in all the other metal chains between)
7. Sl st to the 1st SC made, cut the yarn and sew in the ends
8. Attach the jump rings on both ends of the bracelet, and a lobster clasp on one end of the bracelet
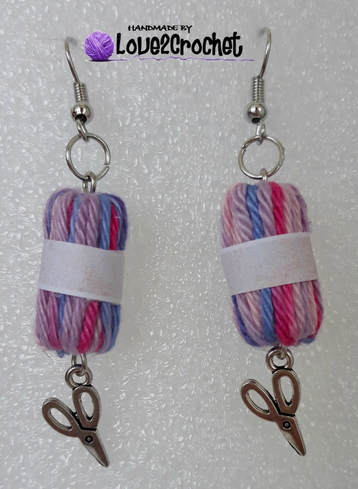
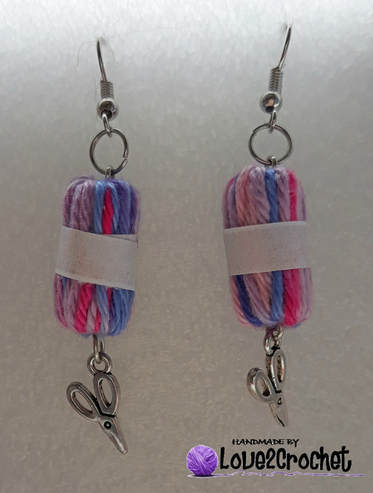
mini "skein of yarn" earrings
I recently bought the most adorable tiny scissors pendent and I knew I had to incorporate it into crochet earrings. I found this awesome, super easy tutorial, that is not even crochet at all: www.youtube.com/watch?v=7H9MTZe8WUU
Here are the written instructions.....
Materials:
drinking straw (any size) cut into 1.5 cm size tubes
needle, scissors
yarn of your choice
pendent (optional)
a small amount of tape
small amount of decorative paper (0.50 cm width) for the label
small amount of glue
jewelry making supplies (eye pin, earring hook, jump rings, nose pliers)
Steps and Procedure:
- take the straw and cut into tubes 1.5 cm size (you will need 2 for 2 earrings)
- take the yarn of your choice and tape the very end of it to the small tube you just cut
- take the needle with a threaded yarn of your choice and continuously wrap it around the straw by going through the tube (covering the sides of the tube thoroughly)
- once you have covered around the tube evenly, cut off the yarn to finish
- cut the 0.50 cm width long strip of decorative paper to make the yarn label
- wrap the strip of paper around the tube to make a label, and use the small amount of glue to glue the sides of the paper together
- take the eye pin and put it through the tube
- attach the pendent to the bottom of the eye pin
- using the nose pliers make a loop at the top of the eye pin
- attach the jump ring to the top of the eye pin and attach the earring hoop
And voila - you are all set:)
|
|
|
|
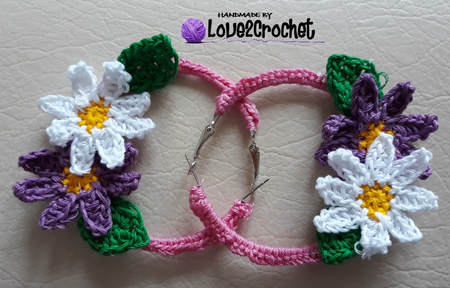
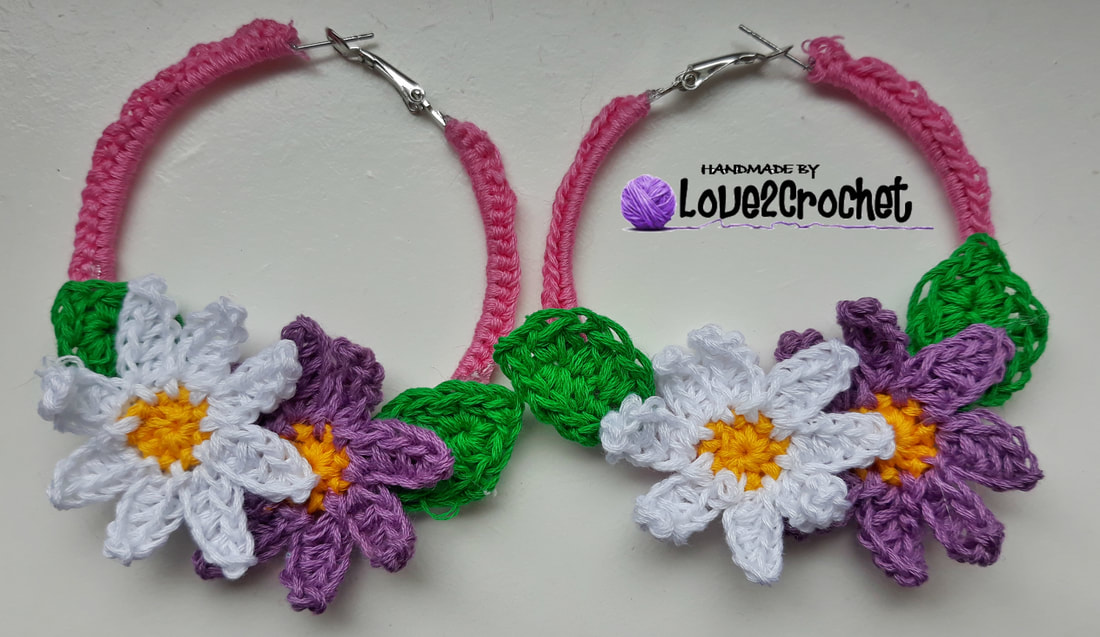
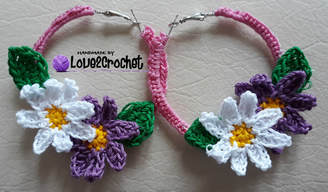
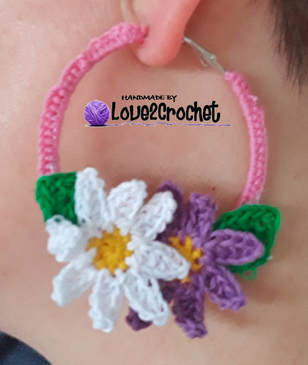
Here is another creation from my "Flower Hoop Earrings" collection. I found a pic of these earrings but could not find the crochet pattern, so I made my own. It turned out really nice, and I will be making other flower designs in the future. This time it is a Daisy:)
Materials:
hoop earrings (mine were 6 cm in diameter)
green, white, yellow, pink, purple embroidery yarn
1.30 mm crochet hook
hot glue gun
Steps and Procedure:
- Using the pink yarn make a slip stitch around the hoop and crochet 75 SC around the hoop
- use a dab of glue to secure the ends
Daisy flower patter:
- with yellow (center)
1. Make a magic circle and make 8 SC inside the circle
2. sl st to the fist SC and fasten off
- withe white/purple (flower petals)
connect the white/purple yarn to the yellow center with the sl st
1. ch 5
2. SC in the 2nd chain and make 1 HDC in the remaining 3 chains
3. at the bottom of the completed chain sl st into the next SC of the flower center
4. Repeat (steps 1, 2 and 3) until you have made 8 petals
5. Cut off the yarn and sew in the ends
- with green (leaf)
ch 5
1. SC in the 2nd ch, HDC in the next, DC in next, (2 HDC, ch 2, SC in the 2nd chain, 2 HDC) in the last stitch
2. working on the opposite end of the leaf - DC in the 2nd stitch, HDC in the next and end with SC in the last stitch
3. sl st to the 1st SC made, fasten off and sew in the ends
- use the hot glue gun to attach the flower parts to the hoop
- let it dry well and wear it proudly:)
|
|
|
|

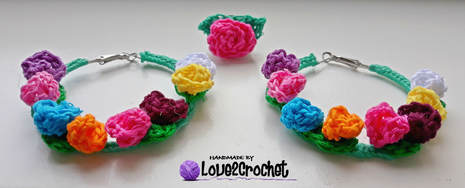
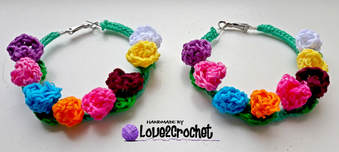
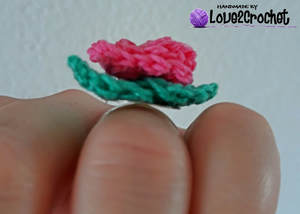
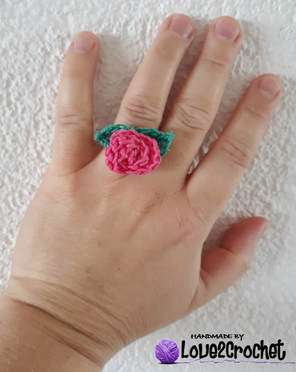
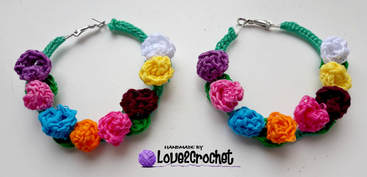
Here is another creation from my "Flower Hoop Earrings" collection. I found a picture of these earrings online, but could not find the crochet pattern, so I made my own. It turned out really nice, and I will be making other flower designs in the future. This time it is a Rose:)
Materials:
hoop earrings (mine were 6 cm in diameter)
adjustable ring base with the flat top
light green, dark green, white, yellow, pink, purple, auburn, blue, orange embroidery yarn
1.30 mm crochet hook
scissors, needle
liquid silicone
Steps and Procedure:
Hoop:
- Using the light green yarn make a slip stitch around the hoop and crochet 70 SC around the hoop
- use a dab of glue to secure the ends
Flowers:
Small Roses:
- ch 7
(1 sl st, 1 SC, 1 sl st) in 2nd chain
(1 SC, 1 DC) in the 3rd chain
(1 DC, 1 SC) in the 4th chain
(1 SC, 1 DC) in the 5th chain
3 TRC in the 6th chain
(1 DC, 1 SC) in the last chain
- roll up the rose petals into shape
- using the remaining yarn, sew it into shape and fasten off
(I made 16 roses - 8 roses for each hoop)
Small Leaf:
- ch 4
SC in the 2nd chain from the hook
DC in the 3rd chain
(1 HDC-ch 2-sl st into the ch2- 1 HDC) all in the last chain
- crochet on the opposite side of the foundation chain:
DC in the next st
SC in the last ch
sl st into the 1st SC made
- fasten off
(I made 8 leaves - 4 leaves for each hook, but I could have made more and positioned them differently on the hoop)
Ring:
I bought an adjustable ring with the flat top at a craft store and I crocheted a bigger rose and 2 bigger leaves. I then used a liquid silicone (bought at a craft store) to glue the leaves and the rose on the ring. Here is the pattern for the big rose and big leaves that I used for the ring:
Rose:
- ch 15
(1sl st, 1SC, 1sl st) in 2nd chain from hook
(1 SC, 1 DC) in 3rd ch
(1 DC, 1 SC) in 4th ch
(1 SC, 1 DC) in 5th ch
(1 DC, 1 DC) in 6th ch
(1 SC, 1 DC) in 7th ch
3 TR in 8th ch
(1 DC, 1 SC) in 9th ch
(1 SC, 1 DC) in 10th ch
3 TR in 11th ch
(1 DC, 1 SC) in 12th ch
(1 SC, 1 DC) in 13th ch
3 TR in 14th ch
(1 DC, 1 SC) in last ch
Fasten off and roll up your rose petals into shape, use remaining yarn to fix your rose into position and fasten off.
Leaves:
- ch 6
1 SC in 2nd ch from hook
1 HDC in next ch
1 DC in next ch
1 HDC in next ch
1 SC in last ch
ch 2 and sl st into the ch 2
- Crocheting back into your chains again in the opposite direction, work 1 SC in 1st ch (same st as last st), 1 HDC in next st, 1 DC in next st, 1 HDC in next st, 1 SC in last st
- I made 2 leaves and glued them to the ring base, then I glued on the rose. Here are a few pics. I am very proud of how it turned out. I have already gotten a lot of positive comments and compliments on my earrings from the people I meet on the street.
|
|
|
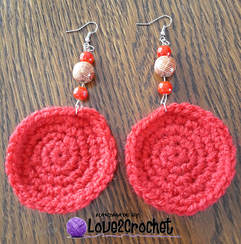
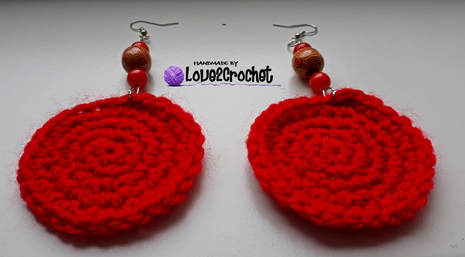
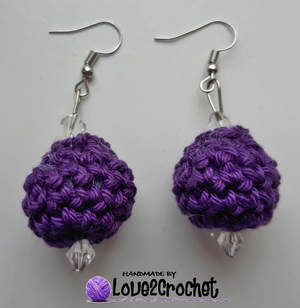
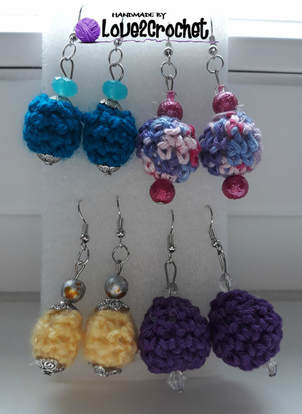
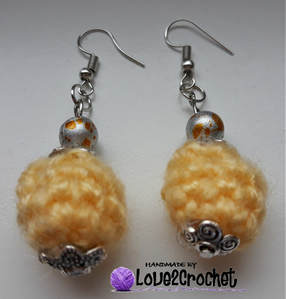
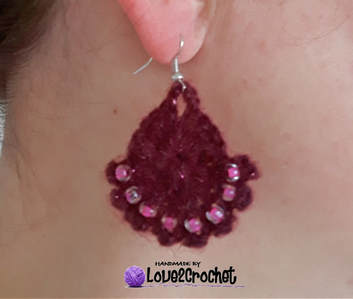
"10 minute" crochet earrings
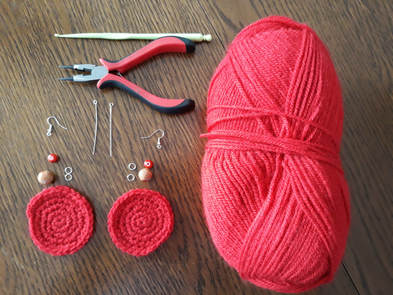
This is the easiest crochet earrings project. It really takes no longer than 10 min. The only thing you need crocheted is a simple circle. Your imagination is the limit after that - what beads to add, what colors to use. Here is the pattern:
Materials:
yarn of your choice (I chose red yarn)
2.00 mm crochet hook
scissors, needle
jewelry making materials (clasps, eye ball pins, jump rings, nose pliers, earring hooks)
Step and Procedure:
- crocheting a circle:
1. Make a magic circle and make 6 SC inside the circle
2. Make 2 SC (INCREASE) in each stitch around (12 SC)
3. Make a 1 SC in 1st stitch and 2 SC (INCREASE) in the 2nd stitch (repeat around) (18 SC)
- In order for the circle to be more even and less hexagonal from this point I changed the order of INC vs SC
4. Make an INC in the 1st stitch and 1 SC in the 2nd and 3rd stitch - ( INC-SC-SC - repeat around) (24 SC)
5. Make a SC in the 1st, 2nd, 3rd stitch - (SC-SC-SC-INC - repeat around) (30 SC)
- And you are done with the circle part of an earring (you can make your earring even bigger just continue with the INC patterns)
- assembling the earring:
- Take a jump ring and put it through the top of the circle you just made
- Take an eye ball pin and put it through the beads. Using the nose pliers make a loop at the top of the eye ball pin
- Put the bottom of the eye ball pin (with the beads) through the jump ring (on top of the circle)
- Open another jump ring and put it through the top of the eye ball pin (with the beads), and put an earring hook through the same jump ring (see the pics for visual explanation)

|
|

|
|
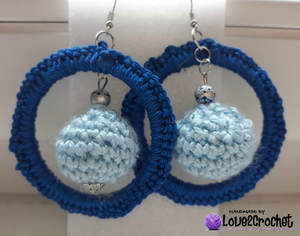
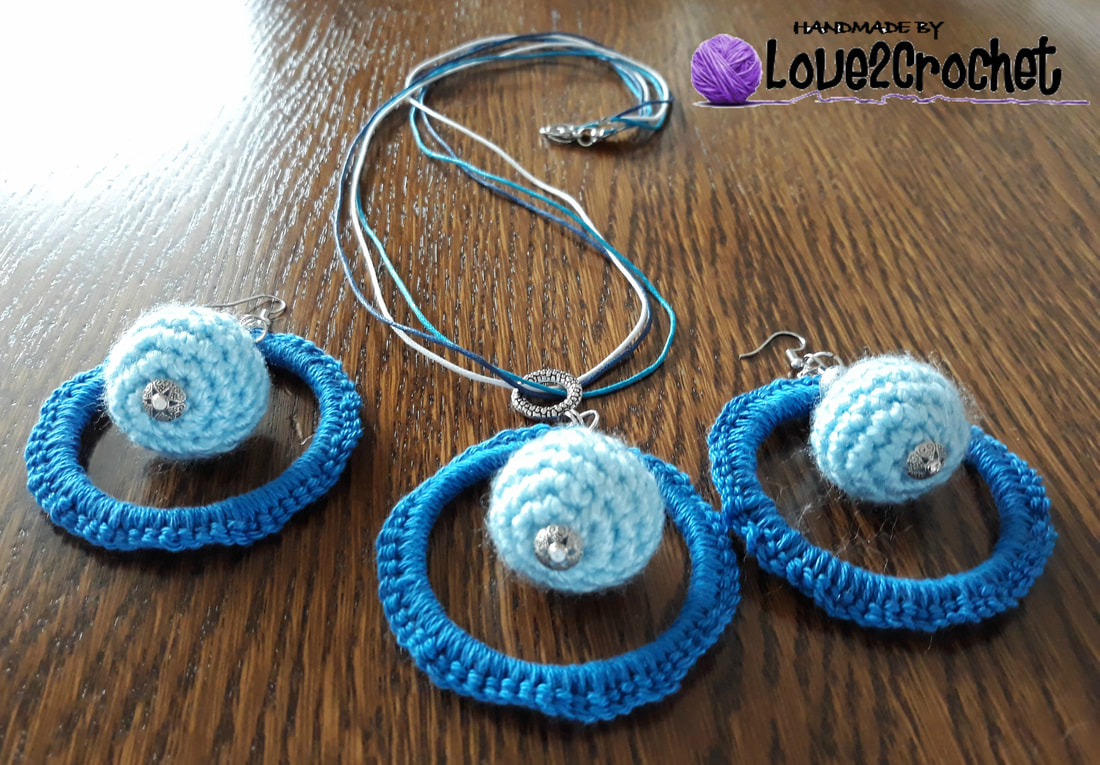
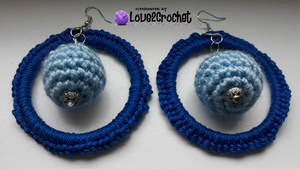
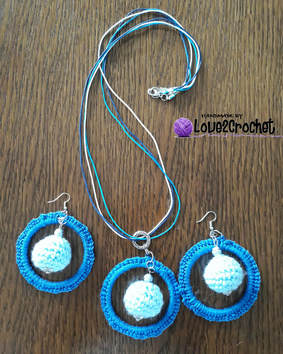
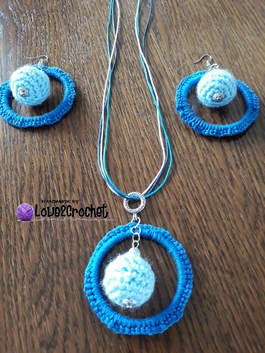
"B&H" earrings and necklace pendant
In my latest obsession with making earrings, I decided to make these super cute and easy earrings and the necklace to go awe long. I call this project B&H earrings and necklace pendant because it actually looks like a "Ball & a Hoop" It was a super fun project to do during the summer rains days like been having lately. So, here it is pattern.
Materials:
yarn of your choice (I chose dark blue, light blue color yarn)
1.30 and 1.75 mm crochet hook
scissors, needle
jewelry making materials (clasps, eye pins, jump rings, lobster clasps, nose pliers, earring hooks)
round frames (5.5 cm in diameter)
Steps and Procedure:
1. Earrings:
Hoop: - with your yarn of choice and using 1.30 mm crochet hook, SC around the hoop entirelly
Ball: - with your yarn of choice, and using 1.75 mm crochet hook
1. Make a Magic Ring and 6 SC inside the ring
2. Make 6 INC (12 SC)
3. Make a 1 SC and make an INC (repeat around) (18 SC)
4. Make 18 SC
5. Make 18 SC
6. Make a 1 SC an make a DEC (repeat around) (12 SC)
- stuff the ball with the stuffing material
7. Make 6 DEC (6 SC)
- sew in the ends to cover the hole at the top
- Put the eye pin through the bottom of the crocheted ball you just made
- use the bead cap on the bottom of your crocheted ball
- put the bead on top of the ball
- use the nose pliers to make a loop at the top of your earring. Use the same nose pliers to open the jump ring and put them through the loop you just made on the top of the eye pin. (I put 2 small jump rings and 1 big jump ring)
- Finally, attach the big jump ring to the hoop. Add the earring hook and you are done:)
Necklace:
- Using the same procedure make a pendent.
- Add an additional jump ring to the top of the pendent so that the necklace can go through it.
- I took some thin leather strips (3) and attached them together at their ends with the "flat chord crimp end clasps", add another set of jump rings and a lobster clasp and you are good to go:) Here are a few pics of how my "HB earrings/necklace" set turned out.
|
|
|
|
|

|
simple cord bracelet
Another quick and easy project to make for the summer. This also took me 30 min and it is super fun to make and sell/give away/wear. The original idea is from wilmade.com/bracelet/ Thank you Wilma!
Materials:
yarn of your choice
1.75 mm crochet hook
scissors, needle
1 lobster clasp, 2 eye pins, 2 cord end caps
Steps and Procedure:
1. Make and Magic circle and make 4 SC in the magic circle (4 SC)
2. Make 1 SC in each stitch (4 SC)
3. *1 SC in the 1st stitch - inc in the 2nd stitch* Repeat the 2nd time (6 SC)
4. Make 1 SC in each stitch around (6 SC)
5. Repeat step 4 until the cord is long enough. Take into account that you will attach caps and clasps at both ends, so the bracelet will be longer. (Mine was 16 cm long before I started to decrease)
6. When you get to the end you should start decreasing - *1 SC in the 1st stitch, dec in the 2nd stitch* Repeat for the 2nd tim (4 SC)
7. Attach the end caps (I put a bit of hot glue to secure it in place), attach the eye pins on both ends and attach the lobster clap.
8. Wear it proudly! :)
|
|

|
|
quick Beaded bracelet
This is the easiest crochet beaded bracelet to make. It literally took me 20 min, so it is perfect for a quick gift or if you just want to make yourself a summery bracelet. You could make it as a wrap on bracelet, but they tend to get tangled, so put the clasps on. I might try to make a necklace, all you have to do is make a longer chain. So here it is....
Materials:
yarn of your choice
1.75 mm crochet hook
44 beads
scissors, needle, flat chord crimp end clasps, barrel claps
Steps and Procedure:
1.String on all 44 beads
2. Make a slip knot, and ch 3, * slide a bead on and ch 4 * repeat (*sliding a bead and ch 4*) - 44 times
3. After you run out of beads - ch 3 and slip stitch to the 1st chain made to make a circle.
- Now, you can leave it as it is and just wrap it around your wrist 4 times, but I have decided to double it and put the "flat chord crimp end clasps" at both ends and attach the barrel claps to open and close the bracelet.
|
|
|
"balls and beads" earrings
I have purchased a few sets of materials used by the jewelry makers and wanted to incorporate them with my crochet jewelry. It is amazing what accessories and beads you can incorporate into your earrings once you start using these items. So, here is the 1st set of earrings I made using the jewelry making materials....
Materials:
yarn of your choice
1.75 mm crochet hook
scissors
jewelry making materials (eye pins, bead caps, jump rings, lobster clasps, nose pliers, side cutter, scissors)
beads of your choice
Steps and procedure:
I used this video as a reference and as an idea, Check it out.
www.youtube.com/watch?v=SginfCLZ9gk
1. using 1.75 mm crochet hook make a magic ring
2. inside the magic ring make 6 SC, close the ring
3. make 2 SC into each stitch - increase (12 SC)
4. Make 1 SC into each stitch (12 SC)
5. Make 1 SC into each stitch (12 SC)
- stuff the ball with the stuffing material
6. Crochet 2SCtog (decrease) (6 SC)
- cut the string off and using the needle, sew in the hole
- Now it is up to you how you want to decorate your earrings, but you should invest in the jewelry making materials in order to make it look professional and neat.
- This is what I did: Put the eye pin through the crocheted ball you just made - you can use the bead cap/beads on the bottom/top of your crocheted ball if you desire. Once you have your desired design, you should use the nose pliers to make a loop at the top of your earring. Use the same nose pliers to open the jump ring and put them through the loop you just made on the top of the eye pin. Before closing the jump ring put on the earring hook and close the jump ring with the nose pliers. (Check out the video posted on the top for reference. Thank you Annoo Crochet Designs)
|
|
|
|
|
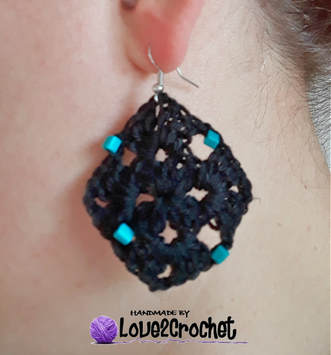
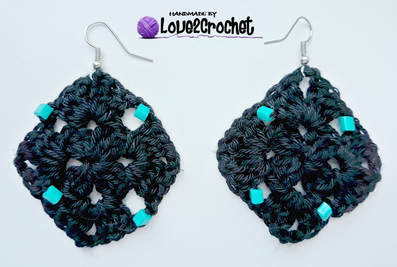
"Granny square" earrings
Crochet granny squares are really popular in all kinds of crochet projects. I have decided to incorporate one in my earrings design. So, here it is, the pattern....
Materials:
1.75 mm crochet hook
8 beads
thread or yarn of your choice
scissors, needle
earwires
Steps and Procedures:
- string 4 beads on your thread
1. Make a magic loop.
2. Ch2, 2 dc in magic loop. *Ch2, 3 dc in magic loop. Repeat from the * 3 times. Ch2. Join with a sl st in top of “Ch2”. (12 sts)
3. Ch1, turn your work, string a bead, ch 1. 2 dc in 'ch2' space made in previous round, ch2, 3 dc in same 'ch2' space. *Ch1, string a bead, ch 1. 3 dc in next 'ch2' space made in previous round, ch2, 3 dc in same 'ch2' space. Repeat from the * 3 times. Ch1, join with a sl st in top of ch 1 at the beginning. (24 sts and 4 beads)
- weave in the ends
- attach the earwires
|
|
"Dandelion Sunrise" earrings
In the original pattern these crochet earrings are called "Dandelion Sunrise", so I have kept the same name. This is the link to the original pattern: web.archive.org/web/20160717131846/http:/dandelionsunrise.blogspot.com/2013/08/crochet-earrings-pattern.html
In my creation, I have of course, changed it to fit my needs. So, here it is...
Materials:
1.75 mm crochet hook
yarn (thread) of your choice
scissors, needle
earwires
Steps and Procedure:
1. Make a magic circle.
2. Ch 2, make 11 HDC into the circle. Join with SL ST into the top of the beginning of ch 2.
3. CH 4 (counts as first HDC + CH 2). *Skip one HDC. HDC into the next one. CH 2.* Repeat between ** 4 more times. Join with a SL ST into the third chain of the beginning CH 4. You will have six CH 2 spaces in this row.
4. *(SC, HDC, 2 DC, HDC, SC) into first CH 2 space of previous row.* Repeat 5 more times.
5. *SL ST from back to front of the first post created in row 3. CH 5.* Repeat 5 more times. Join with a SL ST into the first chain of the row.
6. *(SC, HDC, 2 DC, HDC, SC) into first CH 5 space of previous row.* Repeat 5 more times. SL ST into the first SC of row.
- Fasten off and weave in the ends
- Attach earwires
|

|
dainty Earrings
The pattern for these Crochet Dainty Earrings is all over the web. I have found this great website with the free pattern:
www.jpfun.com/patterns/jewelry/f107008_daintyearrings.shtml
Of course, I have changed and tweaked it a bit to make it my own. I have made two different earrings from this basic pattern - one with the beads, and the other one without the beads. So here is the basic pattern:
Materials:
1.75 mm crochet hook
thin yarn (thread) of your choice
scissors
earwires
16 small beads (8 per earring)
Steps and Procedures:
- string 8 beads on your thread (optional)
1. Make a Magic Ring
2. Ch3, 13dc in ring. Ch4. 4dc in ring. Join with a slip stitch to top of ch3.
3. Ch3, slst in 3rd ch from hook (Picot made) insert a bead. Sc in next st. *Picot - insert a bead - Sc in next stitch. (Repeat from * - 7 more times) Ch1.
- Fasten off. Weave in the ends.
- Attach an earring to earwires in the ch4 area from step #2.
|
|
|
|
|
|
|
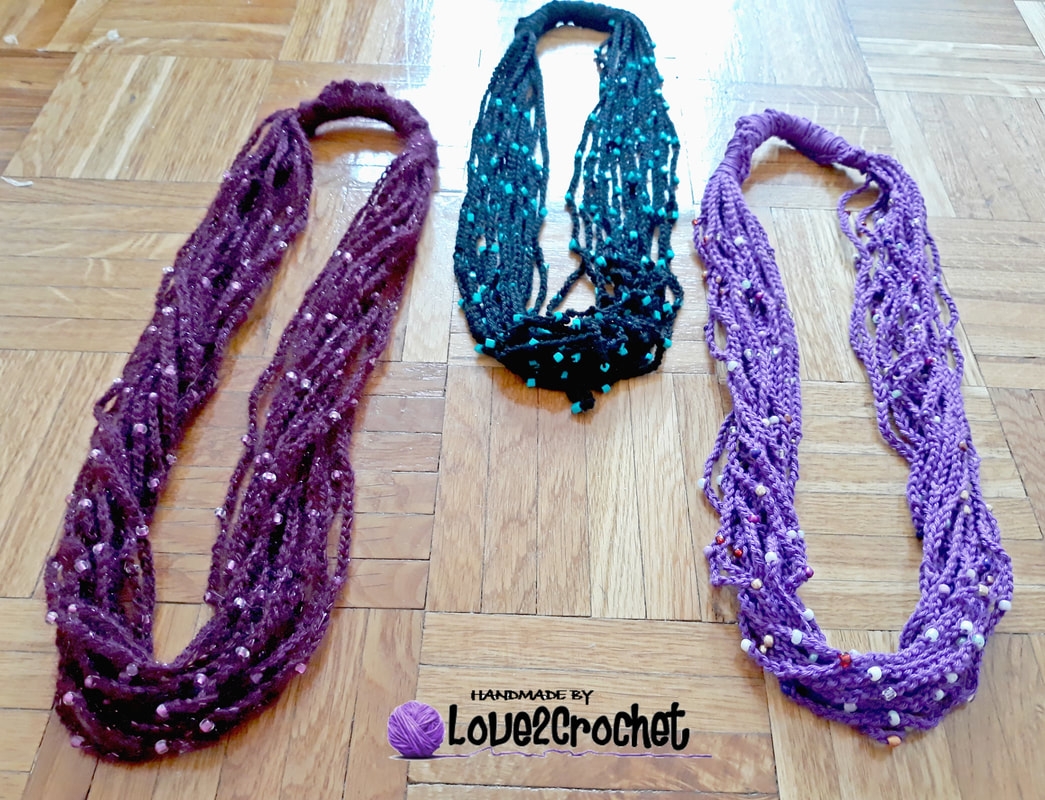
Here we are again.... I have been making a whole lot of necklaces lately. So, I have found this great pattern on Youtube, with a complete tutorial and guidelines. I have followed the instructions and the necklace turned out beautifully. I am so very proud of it and I am definitely planning to make more in many more colors.
Materials:
240 small beads
2.00 mm crochet hook (or a 1.75 mm if you are using a thinner yarn)
yarn of your choice (preferably thinner)
needle, scissors
Steps and Instructions:
- Thread 240 beads onto yarn. The entire necklace is made in one long chain, then wrapped around 16 times before joining into a multi-strand necklace and securing with single crochet.
- R1: ch 40, (ch 8, slip 1 bead close up to loop on hook, ch1 - bead st made, do this 16 more times with 16 beads total)
- R2: after you have the 16th bead on start all over again with ch40 and another set of ch8+bead for 16 beads total
- R3- 15: Repeat R2
- finish with ch40.
Assembly:
Wrap chain around your hand so that the ch 40 spaces all line up together in your palm. Sc around all ch 40 chains. Work 50 sc around same space to make it tighter. Fasten off. Weave in loose ends.
Thank you Kristin Omdahl for the free pattern. Here is the link to the original pattern:
www.kristinomdahl.com/whats-new/2016/11/15/crystal-chain-crochet-necklace-free-pattern
Here is the link to the Youtube tutorial:
www.youtube.com/watch?v=wHLoIhB_Ke0
And here are a few pics of my necklaces... I made a auburn one with pinkish beads, and I liked it so much that I had to make another one - this time it was black one with the turquoise beads. They turned out lovely:)
|

|
|

|
|

|
|
|
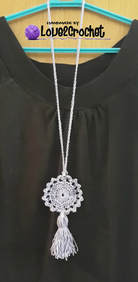
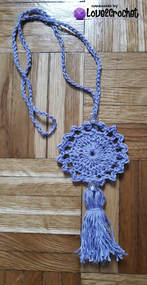
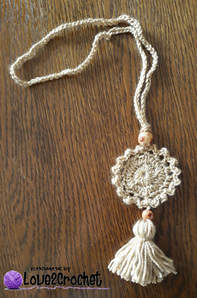
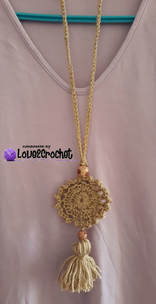
crochet pendant necklace
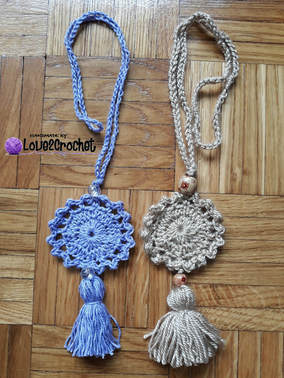
I came across this great pattern on youtube the other day and I just had to make it. The tutorial is in Spanish, but it is easy to follow. I will write the pattern here with complete instructions. I have again, made it my own, and have used a different size crochet hook to make it a bit smaller. Here is the original link: www.youtube.com/watch?v=7qPSMmx7vG0
And here is the pattern in English:
Materials:
- yarn of your choice
- 2 beads
- scissors, yarn needle
- 3.00 mm crochet hook
Steps and Procedures:
1. Make a Magic Ring, ch 2 and make 24 HDC inside the ring, sl stitch to ch 2
2. ch 2, make 1 HDC in the first stitch, make 1 HDC in the second stitch, make 2 HDC (increase) in the third stitch and repeat around - (1 HDC+1 HDC+2 HDC), sl st to ch 2 (You should have 32 HDC in this round)
3. (ch 3, skip a stitch, make 1 SC in the next st) repeat around
4. in each ch-3 space make: (1 sl st-1HDC-1 sl st) and repeat in each ch-3 space
5. crochet a long chain (I made 140 ch) and pull the bead through making sure that the hole of the bead is thick enough for the doubled chain to go through, weave in the ends
6. Make a tassel and attach it through the bottom of the pendant, making sure that you pull another bead through the top of the tassel at the edge of the pendant.
7. If you want your pendent to be sturdy and stiff I would put it in the starch solution for stiffening the crochet items.
I made 2 necklaces, one in purple and other in beige.
For any or more clarification watch the video of the original pattern.
|
|
|

|

|
|
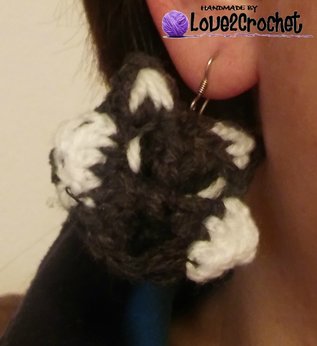
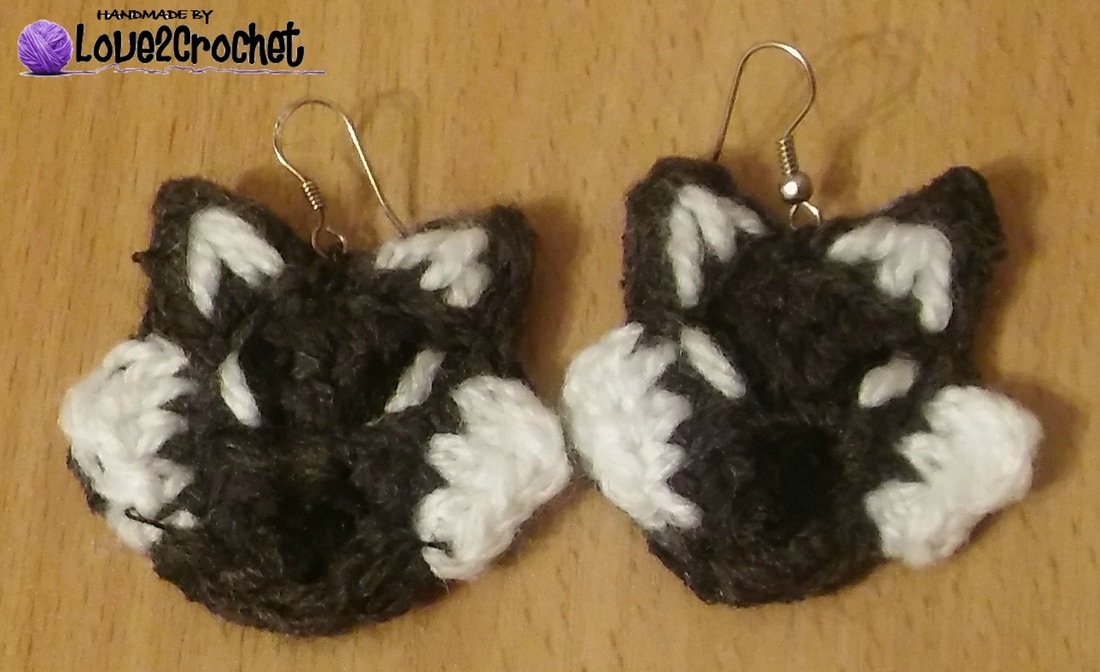
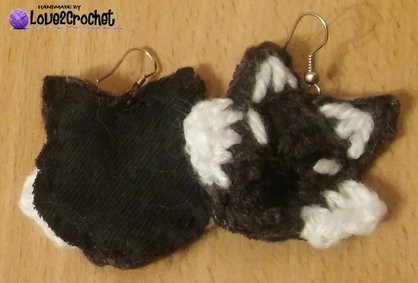
Wolf Earrings
I have had a request to make some earrins for my crochet craft fair. I have many earrings that are just some decorative jewelry, but I wanted to make some earrings that were somehow a representation of my school. So, I decided to make wolf earrings (since my school's mascot is a wolf). These earrings are a smaller version of the wolf emblem I have made to decorate my other school affiliated items (hats/scarves/watter bottles/mug cozies.....). I have made them as small as I could - 4 cm long and 4 cm wide. Super cute and easy to make. So, here it is - the pattern.....
Materials:
2.5 mm crochet hook
Grey, white, black yarn
needle and thread
black thin fabric for the back of the earring
Procedure:
- using a 2.5 mm crochet hook and a grey yarn
- ch 2
R1 - make 2 SC in the first chain, ch 1 and turn (2 SC)
R2, 3 - make 1 SC in each stitch (2 SC total) for 2 rows, ch 1 and turn
R4 - make 2 SC in each stitch (4 SC), ch 1 and turn
R5 - make 1 SC in each stitch (4 SC), c
- SC around the edges. When you get back to the top right corner, ch 4, SC in the 2nd ctitch, HDC in the next and DC in the last stitch. Skip 2 stitches and join with the slip stitch. Slip stitch in the next stitche and ch 4, SC in the 2nd ctitch, HDC in the next and DC in the last stitch to make the second ear, Slip stitch to the left corner and fasten off.
- using the white yarn
- Attach the white yarn right where you left off (under the left ear). Ch 2, DC, (in the same 1st stitch), HDC in the next stitch, SC, slip stitch to join (in the 3rd stitch), fasten off. Do the same thing on the other side but work the stitches in the backwards order (sliop stitch, ch 1 and SC - HDC - Dc, ch 2), slip stitch and fasten off.
- using the black yarn and the tapesty needle embroider the eyes, nose and the white on the ears.
- I have also used a thin fabric and have sewn it onto the back of the earrings for a cleaner look. I have also added the earring wire for dangle earrings and have sewed the wolf earring to it.
And here is my finished product.....
|

|
|
|
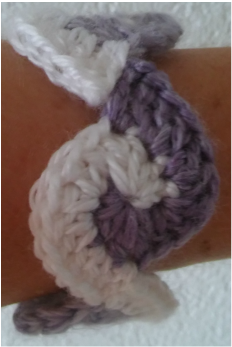
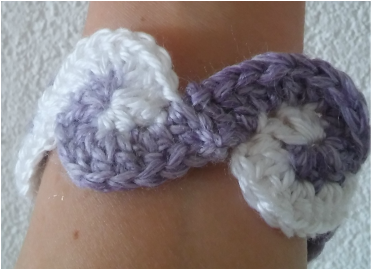
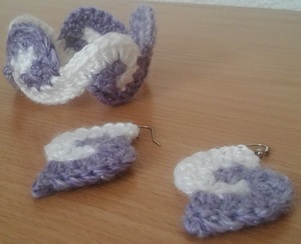
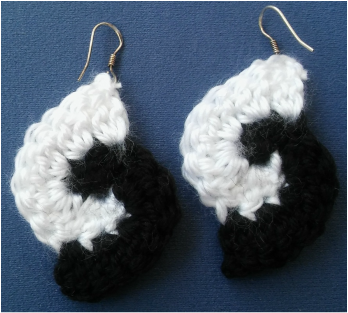
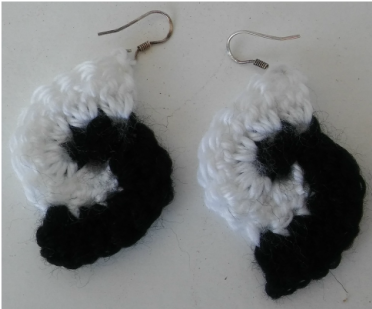
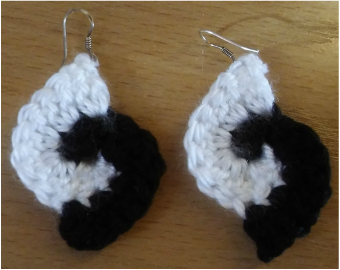
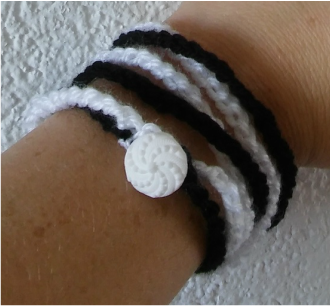
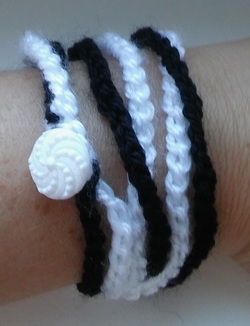
Crochet Earrings and Bracelet Set
Now that my crocheting skills are more advanced, after nearly a year of crocheting (sporadically), I am pleased to say that I can now move on to the "bigger and better" crocheting projects. One of the tutorials that recently caught my eye is this one from Oana's crochet channel. She made these lovely crocheted jewelry and I simply could not pass the opportunity to try it out.
Simple to follow and super easy to make:) Thank you Oana!
www.youtube.com/watch?v=z9uvXjNSPnA
I made some black and white earrings and a set of purple and white earrings and a bracelet. Check it out. I am rather proud of myself how it turned out:)
Simple to follow and super easy to make:) Thank you Oana!
www.youtube.com/watch?v=z9uvXjNSPnA
I made some black and white earrings and a set of purple and white earrings and a bracelet. Check it out. I am rather proud of myself how it turned out:)
|
|
|
|
|
|
|
Crochet Earrings Galore
In my effort to get better at crocheting I branched out into making jewelry earrings. I can honestly say that the making crocheted jewelry is very satisfying. These are small projects that you can complete in 30 min or less. I found these tutorials very easy to follow and super quick to complete! Yay! :)
I have used the 4.00 mm crochet hook for all of these, and a medium worsted yarn. I am sure that if you use a smaller hook they would look even nicer, but I just don't have any smaller than 4.00 :(
(Note to self: Must acquire a smaller crochet hook!)
The links are as follows:
Pinkish flowers earrings pattern (sew 6 of them together to make a bracelet):
www.petalstopicots.com/2013/07/crochet-flower-bracelet/
Black and White Earrings (video tutorial):
www.youtube.com/watch?v=z9uvXjNSPnA
Peacock Earrings:
www.nyanpon.com/2012/12/simple-peacock-earrings.html
Dainty Blue Earrings:
www.jpfun.com/patterns/free/jewelry/f107008_daintyearrings.shtml
Red Flower Earrings
happinesscrafty.blogspot.ba/2014/09/crochet-flower-earrings-free-pattern.html
|
|
|
Crochet Flower Bracelet
I was always mesmerized by the hand made jewelry and always wished that there were more craft supply stores in my town. So, in the absence of the craft store one must be creative. So there I was putting apart some of my old bracelets and earrings for colorful beads and decorations. Oh, what a site that was, like a kid in a candy store:)
Now that I have put apart the old bracelets all I needed was to make the new ones, right.... And I did indeed!
The link to this flower bracelet tutorial and pattern is as follows:
Beaded flower crochet bracelet (originally for the necklace but it works as a bracelet):
craftedfromstories.weebly.com/craft-blog/how-to-crochet-a-flower-necklace
|
|
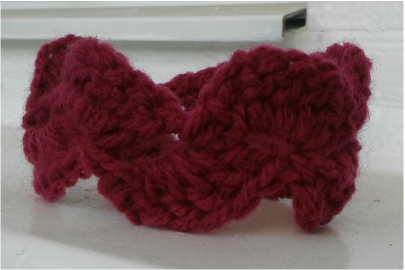
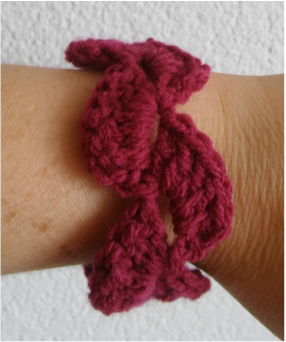
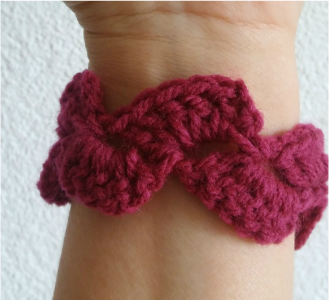
Crochet Kaldred Bracelet
For my new crocheted bracelet pattern I chose this Kaldred Bracelet. I found the free tutorial and the
pattern on this website:
www.fourth-edition.co.uk/?p=3447
The instructions are in English and Danish, and the terminology used is in the UK and the US terms, so it will fit everyone's needs. I used a bit thicker yarn and a 4.00 mm crochet hook. It will look totally different if you use a thinner yarn, but I think it looks great this way too. This is how mine turned out:
|
|
Summer Crochet Bracelet
Chain bracelet are super easy to make. My newest product is this ridiculously easy summer crochet bracelet. In the pattern it is embellished with the beads, but I chose to do my very simple. It literary took me 10 min to make it! :) it is perfect for the last minute gifts for the girls, or" a bit older girls" that are still young at heart, such as myself.
The pattern is as follows:
windrosefiberstudio.blogspot.ba/2011/04/summer-cotton-crocheted-bracelet-free.html
The pattern is as follows:
windrosefiberstudio.blogspot.ba/2011/04/summer-cotton-crocheted-bracelet-free.html

Crochet Chain Bracelet
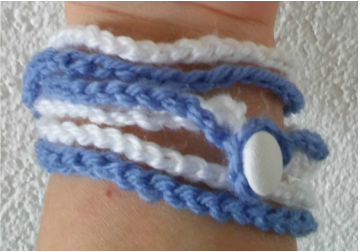
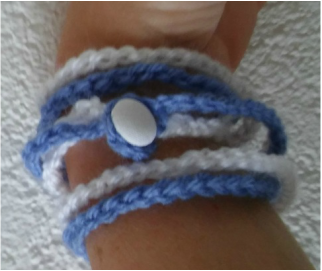
I looooove making chain bracelets!:) They are such easy and quick project. They are wonderful to do with the kids as small and fun projects. Give this one a try. I am putting a few pictures so you can see how mine turned out. I think I'll keep this one for myself, I like it that much:) I added a fancy button as a decoration.
The pattern is from "Knot Your Nana's Crochet" and it is super easy to follow along:
www.knotyournanascrochet.com/2013/01/crochet-chain-bracelet.html
The pattern is from "Knot Your Nana's Crochet" and it is super easy to follow along:
www.knotyournanascrochet.com/2013/01/crochet-chain-bracelet.html
|
|
|
|
Crochet Beaded Bracelet
This is one of the prettiest crochet bracelet patterns I found on line. It involves using beads, so again, I smashed one of my old beaded bracelets and scavenged for pretty beads with the words: "Precious, My Precious" resonating in my mind.....
The pattern calls for a leather strap, but I had some other form of ribbon and I used it - amazing!
I made two one beige and one white, both decorated with the blue beads:)
The pattern is fome "Crochetology by Fatima" and I loooooove it!:) Thank you Fatima!
www.crochetology.net/2015/05/beaded-bracelet-with-leather-weave.html
|
|
|
|
|
|
|
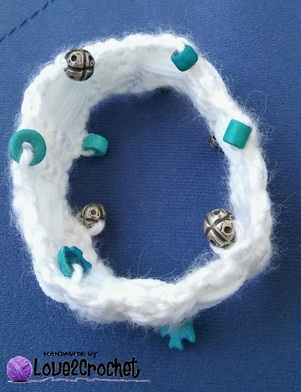
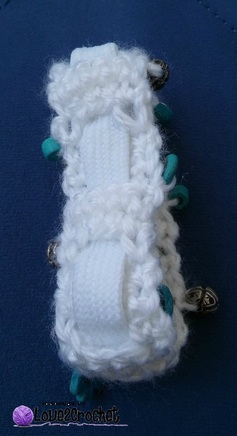
Crochet Beaded Chain Bracelet
This bracelet is more of a cuff bracelet. I loved straining the beads on it, and seeing it become a masterpiece in front of my eyes. What a great pattern. Thank you "Make My Day Creative"!
This is the pattern:
makemydaycreative.com/2012/07/17/pattern-for-beaded-crochet-bracelet/
This is the pattern:
makemydaycreative.com/2012/07/17/pattern-for-beaded-crochet-bracelet/
|
|
Crochet Chain Bracelet
I love this bracelet! I will soon make the necklace! With such easy pattern and simple crochet work, the limits to your imagination are endless - put beads, mix and match the colors. I love it!
The pattern is:
chabepatterns.com/free-patterns-patrones-gratis/jewelry-joyeria/crochet-chain-necklace-collar-de-cadena-tejida/
The pattern is:
chabepatterns.com/free-patterns-patrones-gratis/jewelry-joyeria/crochet-chain-necklace-collar-de-cadena-tejida/
|

|

|
|
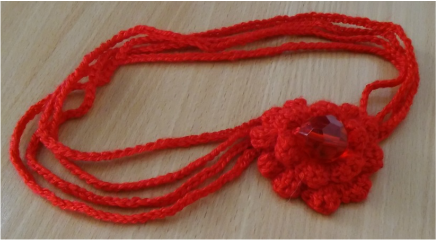
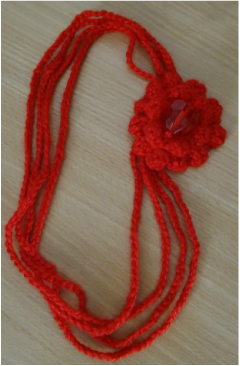
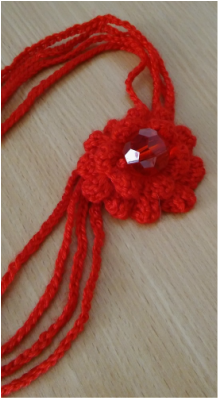
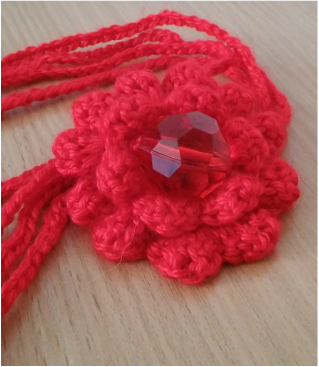
Crochet Flower Chain Necklace
For my first necklace project I have chosen this easy chain necklace. The hardest thing about it was making a flower, and that only took about 10-15 min. I have chosen to make this double petal flower, and have put a bead in the middle. It seems like the bead I put was a bit heavy, although it looks great in the middle of that flower. When I make the next flower chain necklace I will "ix nay" on the "heavy bead-ay".......
The pattern for both the necklace and the flower is here:
www.lovecityblog.com/2011/05/get-hooked-5-crochet-flowers.html#.V4TAhNJ95dg
The pattern for both the necklace and the flower is here:
www.lovecityblog.com/2011/05/get-hooked-5-crochet-flowers.html#.V4TAhNJ95dg
|
|
|
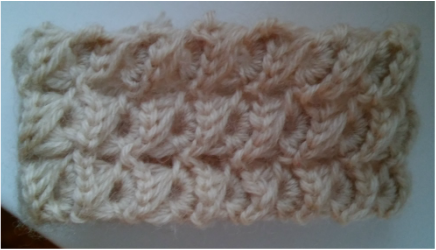
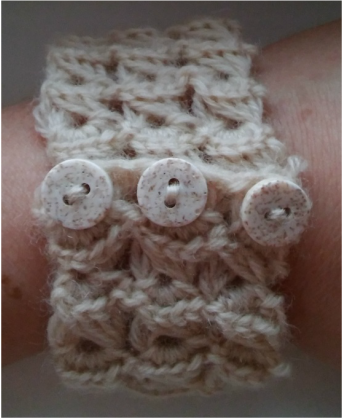
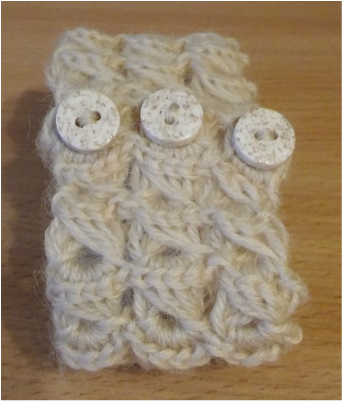
"Broomstick Lace Stitch" Crocheted Bracelet
This next bracelet project I decided to do was a bit challenging. It took me about an hour of "hard manual labor" to complete this one. Being a beginner crocheter I have to admit that this was a bit more on a difficult side.
For this project I used the 4.00 mm hook, light worsted yard and a 10.00 mm knitting needle. Yes, you read it correctly, a knitting needle - the bigger, the better! You need this needle in order to make the lovely loops that are shown in this bracelet. I could have used a bigger one if I had one. I'll definitely be making this bracelet again, and although it seems challenging - do not give up. It is worth it! Next time, I'll use a bigger needle and a different, more prominent color of yarn. It is worth the effort! I also put three buttons and join the two sides together.
I found the pattern on this site:
thewhoot.com.au/whoot-news/crafty-corner/diy-crochet-bracelet
|
|
|
|
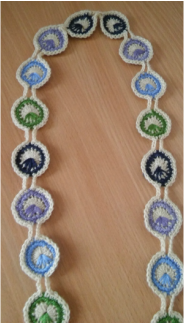
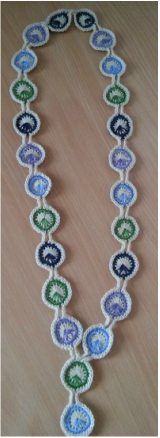
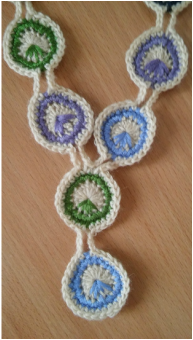
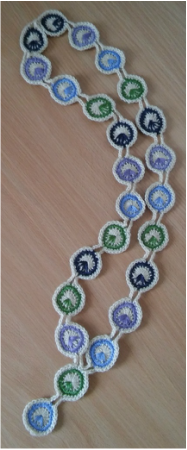
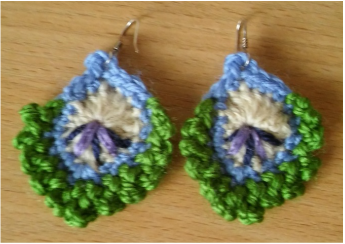
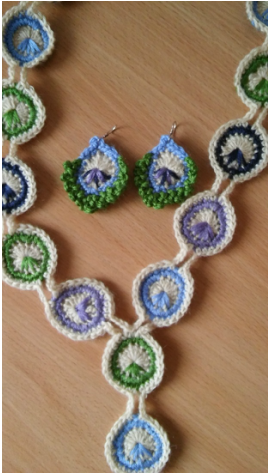
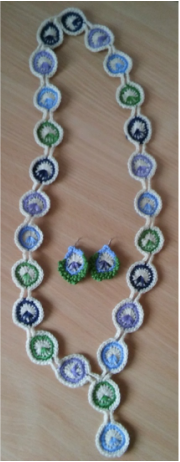
Peacock Eye Necklace
This is the second necklace I made. This one was a bit more challenging, although the pattern is pretty easy to follow and simple to complete. The challenging bit was creating and embroidering the 24 "peacock eyes" and putting them into the necklace. I used the 2.50 mm crochet hook and a medium worsted yarn. It turned out wonderfully. This will make a great birthday gift for my best friend's birthday coming up. I will add the earrings with the same/similar pattern to go along. Stay tuned for that post.....
I found the link on this awesome website. Thank you Christa Veenstra, the designer of The CurioCraftsRoom!
thecuriocraftsroom.blogspot.ba/2016/01/free-crochet-pattern-peacock-eye.html?m=1
And this is how my necklace turned out!
I found the link on this awesome website. Thank you Christa Veenstra, the designer of The CurioCraftsRoom!
thecuriocraftsroom.blogspot.ba/2016/01/free-crochet-pattern-peacock-eye.html?m=1
And this is how my necklace turned out!
|
|
|
|
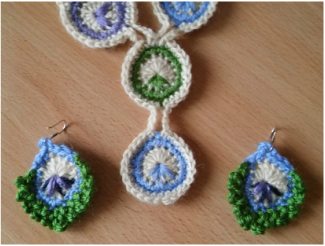
French Mini Peacock Feather Earrings
I found the pattern for these lovely French Mini Peacock Feather earrings on:
thecuriocraftsroom.blogspot.ba/2015/09/french-mini-peacock-feather-free-pattern.html
Thank you Christa Veenstra, the designer of The CurioCraftsRoom! I have used her pattern before when I made the Peacock Eye Necklace. Awesome creations and designs!
These earrings are made to go with the necklace, but do not necessarily have to. The pattern does not call for the embroidered lines in the middle, but I have put them there to match the necklace. I thought that the finished project looked lovely. See for yourselves!.....
|
|
|
|
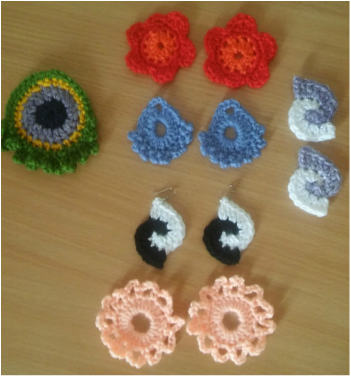
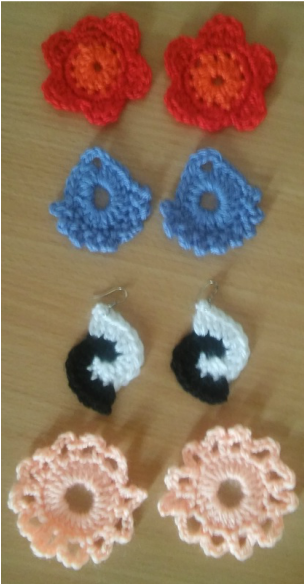
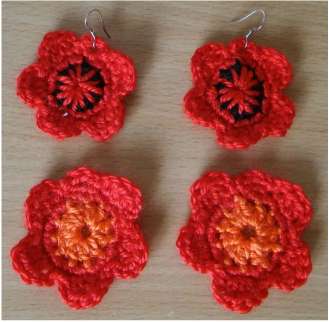
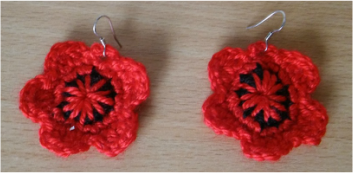
Crochet Flower Jewelry Revisited
I have recently revisited the crochet Flower Earrings I found on the Happiness Crafty. Thank you Eftychia for the awesome pattern!
happinesscrafty.blogspot.ba/2014/09/crochet-flower-earrings-free-pattern.html
I have decided to revisit the pattern and make a new set of earrings. I have already made a set and have posted it on this blog. This time, I decided to use the smaller crochet hook (2.50 mm) and they turned out significantly smaller (no surprise there!). I like smaller earrings. I think I will be revisiting all of the earrings patterns I have posted on this blog and will use the smaller crochet instead of the 4.00 mm which I usually use for majority of my projects.
The bigger earrings you see here are done with the 4.00 mm crochet hook, and the smaller ones are done with the 2.50 mm and my recent completed project....
|
|

