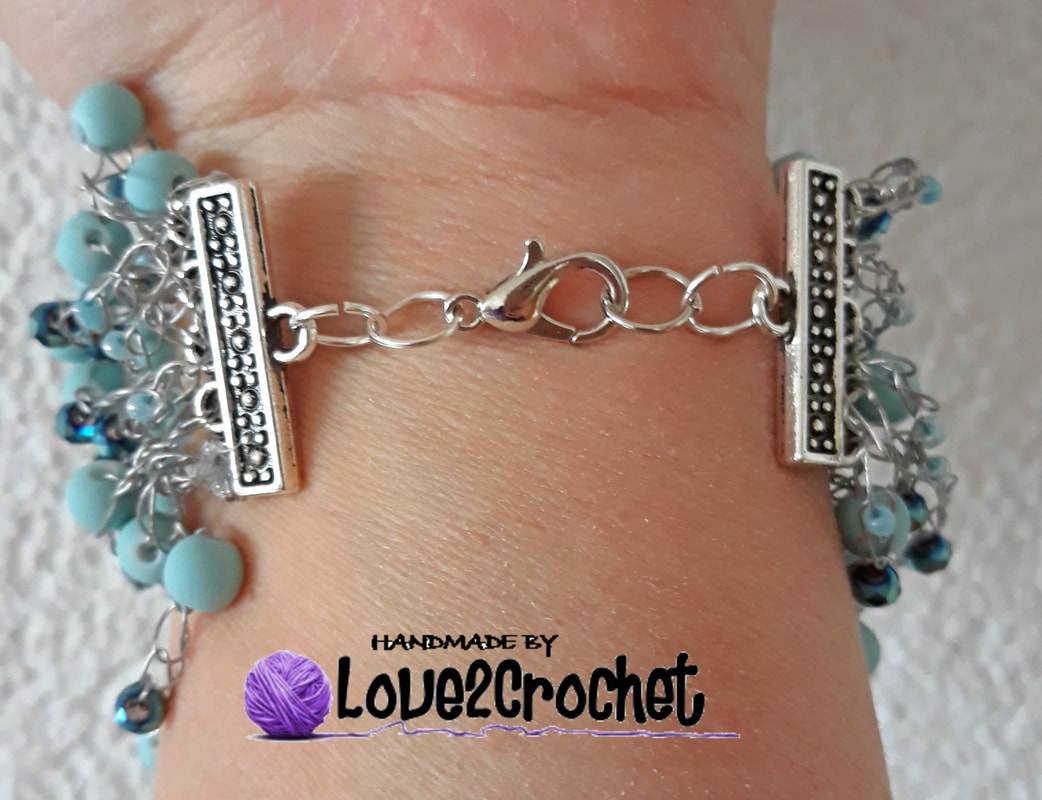
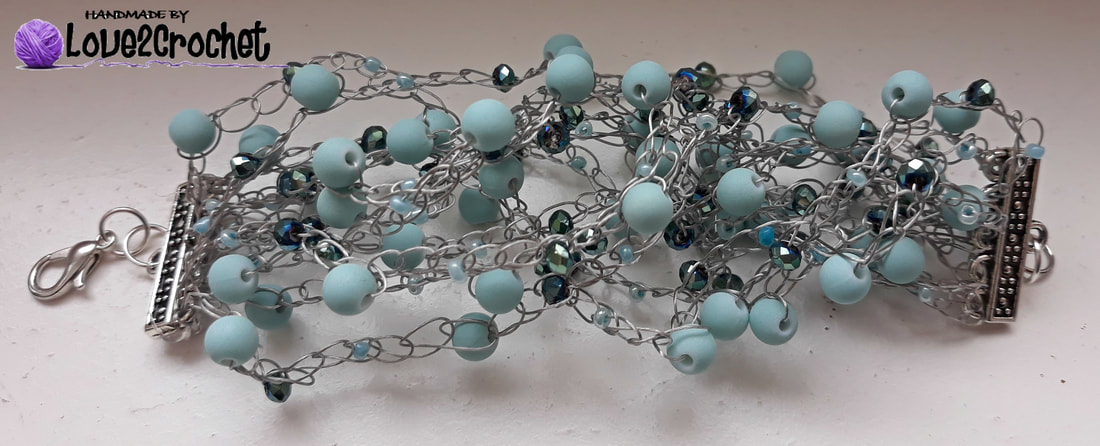
wire crochet beaded bracelet

I have seen this wire crochet beaded bracelet online before, but I never got around to making it before. Today, I had a bit of time and decided to give it a go. This is initially an easy project and a bracelet to make, but being that I did it with a wire rather than yarn, it is bit more difficult to work the simple stitches around the beads. So, here is the pattern and the instructions....
Materials:
1.30 mm crochet hook
0.38 mm gauge wire
assortment of beads (I used 120)
glue gun
wire cutters, round nose pliers
clasps, jump rings, lobster clasps, multi-strand necklace end
Steps and Procedure:
1. using 0.38 mm wire, string all of your beads on the wire (I used 120 beads of 3 different sizes)
2. using the 1.30 mm crochet hook and the same technique as yarn crochet, make a sl st and pull the wire tightly around your hook, leaving a long tail (*)
3. attach the long tail (*) to the 1st hoop of your multi-strand end, and tie it tightly (I used a small amount of hot glue so it does not unravel in the process or over time)
4. ch 3
5. string one bead on, and ch 3
6. continue with the same process (bead+ch3) until you have 12 beads on and a ch 3 between every bead, end with a ch 3
7. pull the wire through the 1st hoop of the multi-strand end on the other side, and ch 3
8. continue with the same process (bead+ch3) until you have 12 beads on and a ch 3 between every bead
- at this time you should have 2 strands of 12+ch3 beads, and you should pull it through the 1st hoop of the multi-strand end (the one you started with). Than, pull the wire through the 2nd multi-strand necklace end (on the same side) and continue with the process (bead+ch3)
9. Repeat the steps 6-8 until you have used up all of the 120 beads, and until you have 2 strands of 12 beads and all of the hoops of your multi-strand ends have been used (I have used the multi-strand end with 5 hoops), so I had 10 strands of 12 beads
- keep in mind that the wire is not the same as the yarn, and that it does not coil well, and it is not that easily manipulated as the wire.
10. After you have made your 10th strand pull the wire through the 5th hoop of your multi-strand end and tie it tightly and secure with a bit of hot glue.
11. use the jump rings on both ends and one lobster clasp
- I have been experimenting with making my own wire jewelry lately, so I have added this lovely bracelet to my ring-earrings collections with the same beads.
|


|
wire crochet bracelet

I have been crocheting for quite some time. I consider myself to be an experienced crocheter who has been displaying my craft on many craft fair, and selling my creations to many satisfied customers. I wanted to try crocheting with wire, since I saw that it is truly a trend among crocheters and jewelry makers. I will tell you that it definitely was a new experience. First of all, the wire is not as easy to handle as yarn, it rolls and twists around and there were knots all over my wire when I first started. But, the product is so beautiful, and I would have never been able to create such beautiful and sturdy creations with yarn and beads.
If you are looking for my advice, here are a few pointers:
1. Do not hold the wire the way you hold the yarn, since it will twist and possibly break.
2. Invest in good wire cutters
3. I suggest you use the cord ends to end the projects with wire
4. I found it more difficult then working with the yarn, but definitely worth a try
5. If the wire unravels it will not be easy to pic up "thread" you lost, so go slowly and count your stitches.
So, here it the pattern for my first wire crochet bracelet that I made this morning:) I also found this youtube link very useful in creating my bracelet: www.youtube.com/watch?v=hhR8E1PBBq4
Materials:
4.00 mm crochet hook
0.38 mm wire
assortment of beads (all different sizes)
wire cutters, round nose pliers
clasps, jump rings, lobster clasps, cord end buckles
Steps and Procedure:
1. string all of your beads on the wire (I used 70 beads)
2. using the 4.00 mm crochet hook and the same technique as yarn crochet, leave a long tail and make a sl st and pull the wire tightly around your hook (you may want to twist the tail around the slip stitch to secure it in place)
3. ch 3
4. string one bead on, ch 1 to secure the bead and make another ch 1
5. continue with the bead+ch 2 until you have 14 beads on
6. ch 3 and leave a long tail before you use the wire cutters to cut the wire
7. make 5 strands of 14 beads
8. combine all 5 wire ends on one end of the bracelet and using the cord end of your choice clasp all 5 wire ends together securing them tightly.
9. braid all 5 strands of your bracelet together not too tightly but securely so it does not unravel
10. combine all 5 wire ends on that other end of the bracelet and using the cord end of your choice clasp all 5 wire ends together securing them tightly.
11. put the jump rings on both ends and a lobster clasp on one to finish your bracelet.
12. as you twist the wire braids the bracelet will surely shrink, so make sure it still fits you, or braid loosly.
This is what my very first wire bracelet looks like. I am very proud of it:)


|

|

|

Wire crochet ring
www.youtube.com/watch?v=oRBFdlhHqCMI have been impressed about how beautiful and easy these wire crochet projects are. So, to accompany the wire crocheted beaded bracelet I decided to make a ring using the same materials as for the bracelet. I made my ring a bit thicker and wider, but you do not have to - the size and width of the ring is at your discretion, as is the number of beads used. I had some left over beads from the bracelet so I decided to use a few for this project.
Materials:
2.00 mm crochet hook
0.38 mm wire (26 gauge)
assortment of beads (all different sizes)
wire cutters, round nose pliers, needle
Steps and Procedure:
1. just like in crochet with yarn - make a slip stitch and ch 15
2. turn the chain around and SC down the ch (14 SC)
3. continue making SC and ch1 at the end of the row until the width of the ring is to your satisfaction (I made 6 rows)
4. cut the yarn and sew the shorter ends of the ring together making a circle (ring)
5. sew some random beads onto the ring
6. make sure you cut the wire and tuck it in really well so it does not scratch you
- if you'd like to you can apply some liquid silicone to the end of the wire ends and tuck them in, it will not come apart
- I have used these youtube tutorials as a reference, they are really helpful:
www.youtube.com/watch?v=oRBFdlhHqCM
www.youtube.com/watch?time_continue=9&v=tSwFDTEgt20


|

|
wire crochet necklace

I wanted to complete this "necklace-bracelet-ring wire jewelry set" since I started crocheting with wire a month ago. I used the same colored beads as in the previous project and the same method as for making the bracelet. Here is the pattern:
Materials:
4.00 mm crochet hook
0.38 mm wire
assortment of beads (all different sizes)
wire cutters, round nose pliers
clasps, jump rings, lobster clasps, cord end buckles
Steps and Procedure:
1. string all of your beads on the wire (I used 120 beads of all different sizes and colors)
2. using the 4.00 mm crochet hook and the same technique as yarn crochet, leave a long tail and make a sl st and pull the wire tightly around your hook (you may want to twist the tail around the sl st to secure it in place)
3. ch 10
4. string one bead on, ch 1 to secure the bead and make another ch 1
5. continue with the bead+ch 2 until you have 40 beads on
6. ch 10 and leave a long tail before you use the wire cutters to cut the wire
7. make 3 strands of 40 beads
8. combine the wire ends of all your 3 strands on one end of the necklace and using the "crimp bead" crimp all 3 wire ends together securing them tightly
9. braid all 3 strands of your necklace together not too tightly but securely so it does not unravel
10. combine all 3 wire ends on the other end of the necklace and using the "crimp bead" clasp all 3 wire ends together securing them tightly.
11. put the jump ring on both ends and a lobster clasp on one to finish your necklace
12. as you twist the wire braids the necklace will surely shrink, so make sure it still fits you, or braid loosely.
This is what my very first wire necklace looks like. I am very proud of it:)

|

|

