|

|

In my search for fun and unusual dog/pet toys I found this easy rattle. This is originally a baby toy, but I thought, why wouldn't a dog like it as well and toss it around and chew on it..... Maybe....I know my dog likes toys like these. So, I decided to make this as a baby gift for my friends new baby dog:) The original pattern is from: trolleungen.blogspot.com/2015/08/elefant-rangle.html
Materials:
worsted weight yarn: magenta, white and a bit of black yarn
2.50 mm crochet hook
needle, scissors
Polyester fiberfill
a big jingle bell for a rattle
hot glue gun (optional)
stitch marker
Steps and Procedure:
1. Making the Head:
The elephant is crocheted in the round, so use a stitch marker
- with 4.00 mm crochet hook and magenta warn
R1: Make a Magic Ring and 6 SC inside the magic ring (6)
R2: inc in every st (12)
R3: *1 sc, inc* (18)
R4: *2 sc, inc* (24)
R5: *3 sc, inc* (30)
R6: *4 sc, inc* (36)
R7: *5 sc, inc* (42)
R8: *6 sc, inc* (48)
R9-20: 48 sc (48)
2. Making the Body/Handle:
- you will now start making the body (the rattle handle)
R21: 18 sc
- fold the work in hand and continue crocheting in a smaller round, leaving the rest of the st unworked
R22: sc in each st (18)
R23-52: 18 sc (18)
- finish off with a sl st.
- cut a long yarn tail for sewing
- stuff the body with the stuffing
3. Making the Ears: Make 2
R1: 6 sc in a magic ring (6)
R2: inc in every st (12)
R3: *1 sc, inc* (18)
R4: *2 sc, inc* (24)
R5: inc in the next 3 st, 21 sc (27)
R6: 1 sc, inc in the next 3 st, 23 sc (30)
R7: 3 sc, inc in the next 3 st, 24 sc (33)
R8: 5 sc, inc, 27 sc (34)
R9: 6 sc, inc, 27 sc (35)
R10: 8 sc, inc, 15 sc, dec, 9 sc (35)
R11: 8 sc, inc in the next 3 st, 15 sc, dec, 7 sc (37)
R12: 8 sc, dec 3 times, 15 sc, dec, 6 sc (33)
R13: 8 sc, dec 3 times, 19 sc (30)
R14: 7 sc, dec 3 times, 11sc, dec, 4 sc (26)
R15: 6 sc, dec 2 times, 10 sc, dec, 4 sc (23)
R16: 4 sc, dec 3 times, 7 sc, dec 2 times, 2 sc (18)
R17: 6 sc, fold the ear flat and crochet the edge shut with 9 sc (9)
- Cut a long yarn tail for sewing
- you do not need to stuff the ears, but you can if you want to, I did not
4. Making the Tusks: Make 2
- with 4.00 mm crochet hook and white yarn
R1: 5 sc in a magic ring (5)
R2: 5 sc (5)
R3: 5 sc (5)
R4: 1 sc, inc, 3 sc (6)
R5: 2 sc, inc, 3 sc (7)
R6: 3 sc, inc, 3 sc (8)
- Finish off with a sl st
- Cut a long yarn tail for sewing
- stuff the tusks with a bit of stuffing
5. Assembling:
- Stuff the head with fiber filling and do not forget to add the rattle.
- Stuff the tusks with the filling
- Sew the 12 (6 on one side, 6 on the other side) middle stitches of the head together (the "stomach" of the elephant).
- Stuff the body/handle with fiber filling
- Sew the end of the trunk (18 sc) and the opening of the body (18 sc) together
- Use the glue gun to glue the tusks onto the head
- Sew the ears onto the head
- Embroider the eyes onto the head.

|

|

|
|

My best friend got a puppy a few days ago. And of course, the very first thing I set down to do is make a few crochet dog toys for the new member of her family. My own dog loves the toys I made him, and this new puppy just might as well.
So, I found this great Tug-Of-War dog toy pattern and changed it a bit to my preferences. The dog I will give this to is a tiny dog, so if you are planning to make this for a big dog with a "big, strong" jaw, I suggest doubling up the yarn and making the handle thicker..... So, here we go, here is my pattern. This is the original pattern with the original idea: beacrafter.com/crochet-dog-toy/
Materials:
4.00 mm crochet hook
Worsted weight yarn: black and some scrap yarn
needle, scissors
Steps and Procedure:
1. Making a Handle:
- using 4.00 mm crochet hook and black worsted weight yarn
R1: chain 18, HDC into 3rd ch from hook, SC down the chain line (16 HDC)
R2: ch2, turn, 16 HDC across but in the "Back Loops Only"
R3-35: ch2, turn, BLO HDC 16 across
- fasten off, fold along the long side and sl st along the edges
- bring the two short edges together and sew the ends
2. Making the Rope:
- Gather the scrap yarn, cut some strands of your desirable length (around 1.5 m of each color)
- Attach to the handle with a cow hitch knot
- Divide your strands of yarn into 3 parts then make a braid
- Tie a knot at the end
|

|
My Bichon loves to play with his toys, so I have decided to make him this Fish Rattle. I have put a jingle bell inside the body, so it rattles and he really enjoys playing with it. The pattern states the use of the 2.00 mm crochet hook, but since I've used the worsted weight yarn, I decided to use the 2.50 mm crochet hook. It turned out super cute, and I made it in an hour, so it is a super fast project.
The pattern is created by Anne Bank Nielsen, and it is super easy to follow. I found the pattern on her Ravelry store and on Coolcreativity website, and here are the links:
www.ravelry.com/patterns/library/fish-rattle
coolcreativity.com/crochet/soft-fish-rattle-toy-free-crochet-pattern/
And here is how my little fishy turned out:)

|

|
dog sweater - revisited
Now that we have a new family member in our home (a little 6-month-old Bichon Frise) I have decided that it is about time for me to make him a sweater since I have been making everything and anything for everyone and anyone I know. I mean, really, I need to think of my baby as well(!) I have decided to revisit the old dog sweater pattern that I have been already writing about in my previous posts. So, here are the changes - I seem to like the changes I have made and I think I will be making more of the sweaters for my "fur ball".....
(Sweater Measures: neck diameter 32 cm-front length 28 cm, back length 36 cm, around the belly 42 cm)
Materials:
6.00 mm Crochet Hook
double strands of white/blue yarn
scissors, needle
Steps and Procedures:
- Body of the sweater
- note that chain 2 at the beginning of round DOES NOT counts as a stitch
- color 1: Ch 42. Sl st to the first chain to create a circle
- work in rounds from now on:
- R1: Ch 2, DC into every stitch. Sl st to the top of the ch 3. (42)
- R2-4: Ch 2, into the 1st stitch place Front Post Double Crochet, into the next st place Back Post Double Crochet (repeat alternating FPDC and BPDC until the last st - finish with BPDC. Sl st to the top of the ch 2. (42 st)
- change to color 2:
- R5-8: ch 2, Dc into every stitch around, Sl st to the top of the ch 2. (42)
- R9: Ch 2, DC into the next 6 sts, into the next st increase by placing 2 DC. (repeat DC 6-2DC pattern around) You wil end with an increase of 2 DC’s. Sl st to the top of the ch 2. (48)
- R10: Ch 2, 1 Dc all the way around. Sl st to the top of the ch 3. (48)
- R11 (Armholes): Ch 2, Dc into the next 3 sts (your chain 2 does not count as a stitch), Ch 10, and Sk 9 sts, DC to join into the 9th st. Dc into the next 27 sts. Ch 10, Sk 9 sts again. DC to join into the 9th st, and DC into the last Dc. Sl st to the top of the ch 2. (52)
- R12: Ch 2, Dc into every stitch. When you come to the “Chain Bridge” where the ch 10 is, work into the actual stitches placing 1 DC in every chain. Making sure to DC into the DC to join Dc too, keep DC until the end. Sl st to the top of the ch 2. (52)
- R13-20: ch 2, DC around. Sl st to the top of the ch 2.
- change to color 1
- R21: Attach your yarn to the 10th stitch from the chain 2 to the left. Ch 2, DC into the same stitch, DC into the next 40 sts for a total of 41 sts (you want an odd number), leaving the remaining stitches unworked
- R22, 23: chain 2, turn your work and make 41 DC
- change to color 2
- R24: ch 2, DC into the next stitch until you get to the other side. (41)
- R25,26, 27: Ch 2, make FPDC into the 1st st, make BPDC in the next st (alternate FPDC and BPDC all the way down (41) WITH A DC. (43)
- change to color 1:
- chain 1 in a corner, and make 3 SC in each corner, and continue to place 1 SC around the whole sweater. When you reach the other side and where you started, sl st to the first SC, and fasten off.
Armholes:
Flip your work upside down with the neckline facing downwards. Starting from the corner to the right where the first skipped chain is where the “chain bridge” starts, you are going to reattach your yarn color (the color you chose for the dogs neck & the bottom ribbing)
- R1: Ch 2, DC into the next 24 stitches (These stitches maybe a little hard for you to identify but you can always put them where is available, working along the other side and turning your work as you are going. Your last DC will be the stitch BEFORE the chain 2. (Make sure it is an EVEN number of stitches and that you ALWAYS land on a FPDC). Sl st to the top of the chain 2. (24)
- R2, 3: Ch 2, FPDC over the 1st st, BPDC in the next st (repeat around). Sl st to the top of the chain 2.
- R4: Ch 1, SC into the same stitch, and SC around the whole arm hole, Sl st to the 1st SC, and finish off. (24)


Bouncy cAT TOY

Now that we have adopted a stray cat who sometimes comes and stays with us I have been obsessed with making cat toys. This one is the most recent one that I just finished a few minutes ago. It is a super easy pattern from Lion Brand Yarn. (click for the original link)
The pattern is super easy to follow, they instruct to use 3 different colors of yarn, but I decided to make it one color only. Here is the pattern.
I made two toys in different colors. The pink one is slightly longer - 50 cm, and the blue one is 40 cm long.
Materials:
6.00 mm crochet hook
double strands of yarn (I used pinkish and bluish colors)
a bell
scissors, needle
stuffing material
- Making a Holder:
(using double strands of yarn of your choice) ch 41.
R1: Sc in 2nd ch from hook and in each ch across (39 SC)
- in last ch, work 2 more sc (3 SC total in last ch)
- working along opposite side of foundation ch, sc in each ch (38 SC)
- work 2 sc in last ch, slip stitch to first st
- DO NOT fasten off -
- Making a Squiggle:
- continue to ch 31 (if you want a longer squiggle ch 41 like I did in the pink one)
R1: 3 sc in 2nd ch from hook and in each ch to end and fasten off.
- Making a Ball:
- Make a Magic Ring and work 6 SC in the Ring.
Place a stitch marker in first st for beg of rnd; move marker up as each rnd is completed.
R2: Work 2 sc in each st around - 12 SC.
R3: *2 sc in next st, sc in next st, rep from * around - 18 SC.
R4: *2 sc in next st, sc in each of next 2 sts, rep from * around - 24 SC.
R5 - 9: Sc in each sc around. Begin stuffing firmly, insert bell into stuffing.
R10: *Sc2tog, sc in each of next 2 sts, rep from * around - 18 SC
R11: *Sc2tog, sc in next st, rep from * around - 12 SC.
R12: Sc2tog around (make 8 decreases)
- fasten off and sew the ball to the squiggle.
This is a really quick project. As you already know, I like to change the pattern a bit, so I did not fasten off after making a hanger and have continued chaining to make a squiggle. It literary took me 20 minutes to make this toy. It is well worth the time and effort. I have posted a pic and a video of Kitty playing with her new toy. She is clearly enjoying it and having fun:))
|
|

|
cat bed

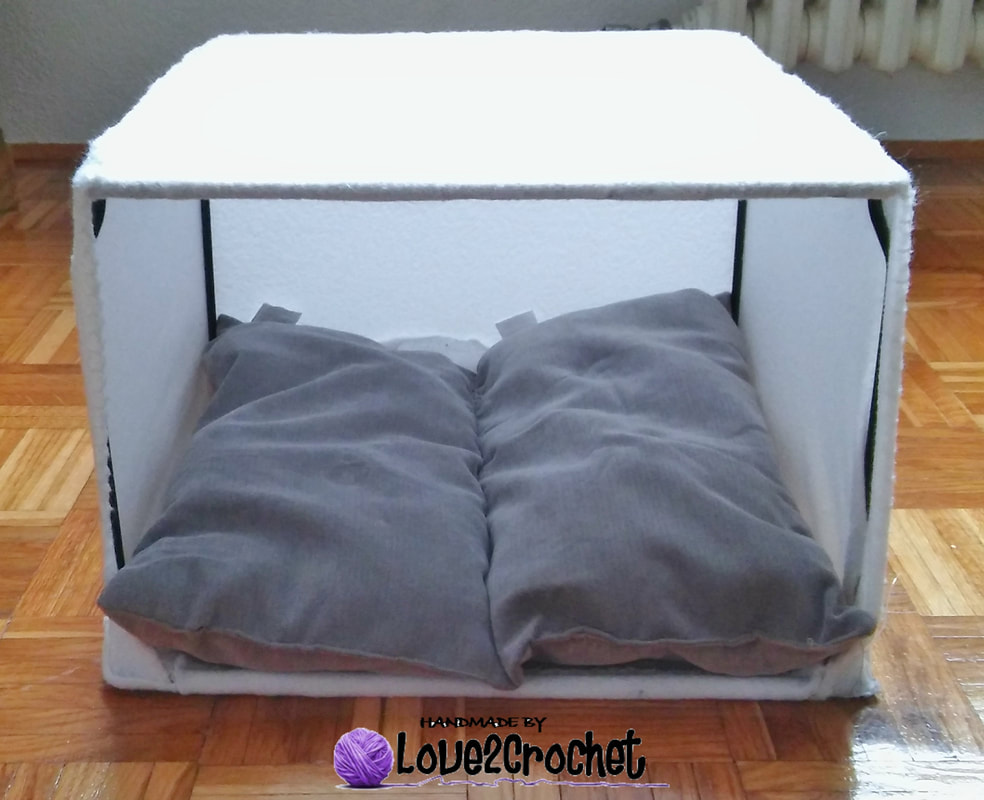
My Bunny Piccolina is not very happy that we have a stray cat who comes and visits us sometimes. She is a stray that my hubby sometimes feeds and lets her spend some time in the house. The bunny and the cat do not get along very well, and do not have a great deal of interaction with each other (that is, one being a hunter and the other one the pray animal). Nevertheless, I have decided to make the kitty a house so she can feel and be more comfortable in our home. But, this blog is not really about my home life, it is about crochet, so here we go...
I have looked over a great deal of patterns and pics of crochet pet houses and I did not like any of them. I had this metal construction at home for a while. A simple metal frame that I wanted to find use for and crochet something on it. The length of this frame is 37 cm, the width is 33 cm and the height is 27 cm. I wanted to make something to put over the frame to make a house for my Bunny, but bunnies are not really for houses made of cloth, they enjoy more cardboard boxes that they could destroy and chew through.
Some time ago I have made a purse/bag using crochet granny squares, so I decided to use the same pattern here. So here it follows:
Materials:
5 different colored yarn (3 different colors per square + black and white yarn in rounds 4 and 5)
4.00 mm crochet hook
Tapestry needle, scissors
Steps and Procedures:
Making a square:
R1: Make a magic loop using Color 1 (for example - dark blue) yarn. Ch2, 2 dc in magic loop. *Ch2, 3 dc in magic loop. Repeat from the * 3 times. Ch2. Join with a sl st in top of “Ch2”. (12 sts)
R2: Change yarn color to Color 2 (for example - sky blue). Ch2, turn your work. 2 dc in 'ch2' space made in previous round, ch2, 3 dc in same 'ch2' space. *Ch1. 3 dc in next 'ch2' space made in previous round, ch2, 3 dc in same 'ch2' space. Repeat from the * 3 times. Ch1, join with a sl st in top of ch2. (24 sts)
R3: Change yarn color to Color 3 (for example - light blue). Ch2, turn your work. 2 dc in 'ch1' space made in previous rnd. *Ch1. 3 dc in next 'ch2' space made in previous round, ch2, 3 dc in same 'ch2' space. Ch1, 3 dc in 'ch1' space made in previous round. Repeat from the * 3 times. Ch1. 3 dc in next 'ch2' space made in previous round, ch2, 3 dc in same 'ch2' space. Ch1, join with a sl st in top of ch2. (36 sts)
R4: Change yarn color to Color 4 (for example - white). Ch2, turn your work. 2 dc in 'ch1' space made in previous round. *Ch1. 3 dc in next 'ch2' space made in previous round, ch2, 3 dc in same 'ch2' space. Ch1, 3 dc in 'ch1' space made in previous round. Ch1, 3 dc in next 'ch1' space made in previous round. Repeat from the * 3 times. Ch1. 3 dc in next 'ch2' space made in previous round, ch2, 3 dc in same 'ch2' space. Ch1, 3 dc in next 'ch1' space made in previous round. Ch1, join with a sl st in top of ch2. (48 sts)
R5: Change yarn color to Color 5 (for example - black). Ch2, turn your work. 2 dc in 'ch1' space made in previous round. Ch1, 3 dc in next 'ch1' space. *Ch1. 3 dc in next 'ch2' space made in previous round, ch2, 3 dc in same 'ch2' space. Ch1, 3 dc in 'ch1' space made in previous round. Ch1, 3 dc in 'ch1' space made in previous round. Ch1, 3 dc in next 'ch1' space made in previous round. Repeat from the * 3 times. Ch1. 3 dc in next 'ch2' space made in previous round, ch2, 3 dc in same 'ch2' space. Ch1, 3 dc in next 'ch1' space made in previous roujnd. Ch1, join with a sl st in top of ch2. (60 sts) Fasten off, weave in loose ends.
- I have made 27 squares and have organized them in 4 groups - 3 side edges (6 squares each=18 squares), and 1 top (9 squares). I sc the squares in each group together. I decided not to make the bottom since I wanted to be able to take it off easily to wash and to be able to put it on without any hassle.
My hubby, ever so nicely, lined the frame with an old white blanket and used the hot glue gun to attach it to the frame. After I made 1 SC to connect all the granny squares together I decided to made a few rows of DC to connect them all and make the entrance. I have made few rows of DC decreases to make it look like a hole that the kitty would like sitting in it and looking at the world around her from the safety of her new house. So, here are a few pics of the construction itself and of the finished project with some pillows inside for comfort. And of course, there is the Kitty inside her new house - looking all happy and content!:))

|

|
|

|

|

|

|
|
|

|

|
dog sweater

My friend has a miniature Maltese dog and I have been wanting to make a coat for her. It is cold, snowy Winter time in my part of the world, and I know little Leah will appreciate this coat when she goes out on her little walks.
There are many patterns on the web and I chose to do this one. This should fit a small dog, it measures 36 cm around the neck and 41 cm around the bust, the length of the coat is 35 cm (down the back) and 28 cm (down the front, belly line).
The pattern is a youtube tutorial and it is so easy to follow. I love this so much, I will definitely be making another one for Leah.
This is the link to the original pattern:
www.youtube.com/watch?v=0SbL8K2EB5s
You know me, I just had to change it a bit to fit my needs. I made 2 sweaters, one with 4.00 mm hook and another with 5.00 mm crochet hook. I used double stranded yarn and the colors made it look completely different than the sweater on the video. But, the pattern is awesome, and thank you Markie Garcia for the pattern. I used 4.00 mm crochet hook for the pink sweater, and the 5.00 mm hook for the blue sweater. The blue one, of course, turned out slightly bigger but not by much at all.
Here is my version:
Materials:
4.0 mm Crochet Hook (5.00 mm hook)
pink, white and magenta yarn (light and dark blue, turquoise yarn)
scissors
yarn needle (For weaving in ends)
Steps and Procedures:
Body of the sweater
- note that chain 3 at the beginning of round counts as a double crochet
- Using Magenta (or turquoise) color: Ch 42. Sl st to the first chain to create a circle
- will be working in rounds from now on:
- R1: Ch 3, Dc into every stitch. Sl st to the top of the ch 3. (42)
- R2: Ch 3, into the next stitch place Front Post Double Crochet *DC into the next stitch, into the next stitch after, place a FPDC* repeat this all the way around. You will end with a FPDC. Sl st to the top of the ch 3. (42)
- R3-4: Repeat the same as in R2. After round 4, sl st and chain 1 and fasten off
- R5: Using double strands of yarn (pink and white/or combo of light and dark blue) Ch 3, Dc into every stitch around, Sl st to the top of the ch 3. (42)
- R6-8: Repeat Round 5.
- R9: Ch 3, DC into the next 5 sts, into the next st increase by placing 2 DC.**Dc into the next 6 sts, 2 DC** Repeat this all the way around. You wil end with an increase of 2 DC’s. Sl st to the top of the ch 3. (48)
- R10: Ch 3, 1 Dc all the way around. Sl st to the top of the ch 3. (48)
- R11(Armholes): Ch 3, Dc into the next 2 sts (your chain 3 is your 1st stitch, when you DC into the next 2 sts you should have 3 dc’s total), Ch up 10, and Sk 8 sts, DC to join into the 8th st. Dc into the next 27 sts. Ch up 10, Sk 8 sts again. DC to join into the 8th st, and DC into the last Dc. Sl st to the top of the ch 3. (54)
- R12: Ch 3, Dc into every stitch. When you come to the “Chain Bridge” where the ch 10 is, work into the actual stitches placing 1 DC. Making sure to DC into the DC to join Dc too, Keep DC until the end. Sl st to the top of the ch 3. (54)
- R13-20: ch 3, dc around. Sl st to the top of the ch 3.
- R21: Using magenta (or turquoise) color - Attach your yarn to the 10th stitch from the chain 3 to the left...YOUR CHAIN 3 WILL NOT COUNT FOR 3 ROWS. Ch 3, DC into the same stitch as the ch 3, DC into the next 42 sts for a total of 43 sts (you want an odd number), leaving the remaining stitches unworked, chain 3, turn your work and DC into the very first stitch, and DC all the way to the other side, when you reach the other side, REPEAT this until row 3. When you finish row 3, f/o.
- R24: Using double strands of yarn (white and pink, or combo of light and dark blue) ch 3 (counts as a DC), DC into the next stitch until you get to the other side. (43)
- R25: Ch 3 (this counts as your FIRST DC),Into the next st, FPDC. After that DC into the next st, *FPDC INTO THE NEXT ST, DC INTO THE NEXT)* REPEAT THIS UNTIL THE END. YOU WILL END WITH A DC. (43)
- R26: Ch 3, Back Post Double Crochet into the next stitch, Dc into the next st. *BPDC, and then DC into the next stitch* Repeat this until the end. ALWAYS END ON A DC. (43)
- R27: Repeat Row 25 (FPDC + DC) (43)
- Using magenta (or turquoise) color: chain 1 in a corner, and SC 2-3 times in each corner, and continue to place 1 SC around the whole sweater. When you reach the other side and where you started, sl st to the first SC, and F/O.
Armholes:
Flip your work upside down with the neckline facing downwards. Starting from the corner to the right where the first skipped chain is where the “chain bridge” starts, you are going to reattach your yarn color (the color you chose for the dogs neck & the bottom ribbing, so mine was magenta/turquoise).
- R1: Ch 3 (this will count as your first DC), DC into the next 23 stitches (These stitches maybe a little hard for you to identify but you can always put them where is available, working along the other side and turning your work as you are going. Your last DC will be the stitch
BEFORE the chain 3. (The number isn’t too important, just make sure it is a EVEN number and that you ALWAYS land on a FPDC). Sl st to the top of the chain 3. (24)
- R2: Ch 3 (this is your first DC so do nothing into this stitch), into the next DC place a FPDC over the stitch, after you will DC into the next stitch. **FPDC,then DC afterwards** Repeat the FPDC+DC pattern around. You will end with a FPDC! Sl st to the top of the chain 3.
- R3: Repeat Round 3. (FPDC + DC pattern around)
- R4: Ch 1, SC into the same stitch, and SC around the whole arm hole, Sl st to the 1st SC, and finish OFF. (24)

|

|

|

|

|

|

|
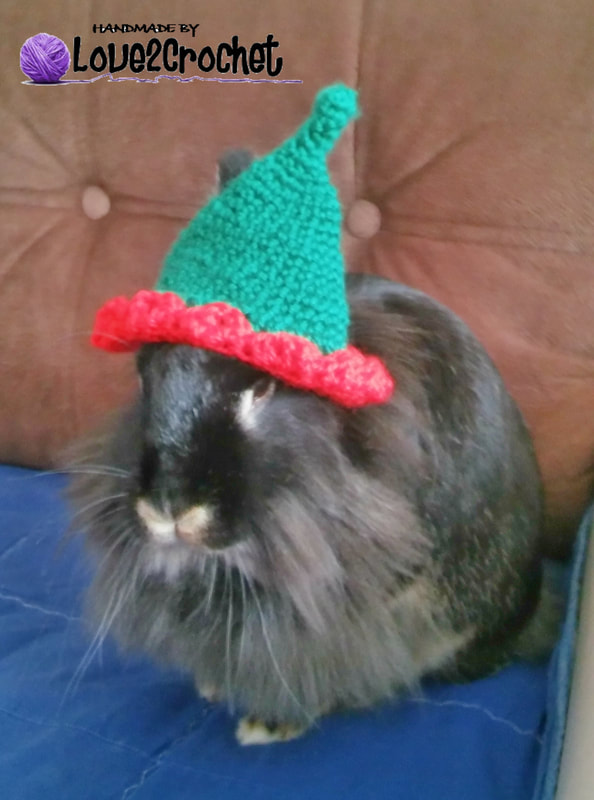
Bunny "elf" hat

I have wanted to make another hat for my Bun-Bun, but never got around to do it. So, being on Winter Break is an ideal time for me to crochet this marvelous Bunny Elf Hat right in time for this Winter's season!
The original pattern is from:
craftypeachybunny.wordpress.com/2016/12/05/elf-hat-for-bunny-rabbit-free-pattern/
I followed the pattern for the rabbit with straight ears, and here is the whole pattern:
Materials:
4.00 mm crochet hook
green, red yarn
jingle bell (optional)
Steps and Procedures:
- with dark green yarn
- using a marker
R1: magic ring 6 sc (6)
R2-6: SC around (6)
R7: SC-INC x3 (9)
R8: sc around (9)
R9: inc around (18)
R10-13: sc around (18)
R14: (sc – inc) x9 (27)
R15-17: sc around (27)
R18: (2 sc – inc) x9 (36)
R19: Sc around (36)
R20: [ch 12] – join at 13th stitch then 24 sc (36)
R21: sc around (including the chain) (36)
R22: ch 1 – 36 dc (36)
- with red yarn
R23: Front Loop Only 36 sc (36)
R24: ch 1 – 36 dc (36)
R25: [sl st- (hdc-trb)- (trb-hdc)]x 12 (12 scalloped shaped edge)
Fasten off and weave ends
Fold at row 23 to shape the hat.
Optional: attached a small jingle bell at the top of the hat
- I first attached the jingle bell and took a few pics. Then I tried the hat on my Piccolina, but she hated the fact that it made noise. So I took the jingle bell off, after which she did not mind posing for a few shots. Just look at that adorable face:))))

|

|

|

|
|

|

|
bone dog toy
I found a great pattern for yet another crochet pet toy. This time it is a bone - I initially made it for my friend's puppy, but have also made one for my little bun-bun Piccollina.
This is the link to the original pattern: limegreenlady.wordpress.com/2014/01/27/23/
The pattern is written in UK terms, and I have changed it a bit to fit my needs and have re-written it in US terms.
Materials:
2.5 mm crochet hook
worsted wight yarn of your choice
cotton for filling
needle
scissors
Steps and Procedures:
- this pattern is done in continuous rounds, no sl st, so USE A MARKER (I use a simple paper clip to show the 1st stitch in the row)
R1: SC 6 in magic ring
R2: 2 SC in each st (12)
R3: *2 SC in 1 st, SC 1* 6 times (18)
R4: *2 SC in 1 st, SC 2* 6 times (24)
R5-8: SC 24
R9: *decrease 1, SC 2* 6 times (18)
- tie off and weave in the ends
- Make another ‘cup’ as above, but do not cut the yarn
- Holding the two sections side by side, join the two sections in the middle to make the '8’ shape
- Make 1 SC in the next 8 stitches going through both 'cups' (all around both 'cups' you should have 28 SC in total in this row)
R10: make the following - 4 SC - 2 decreases - 4 SC - 2 decreases - 4 SC - 4 decreases (20 SC total in this round)
- Stuff the 'cups' at this point.
R11-27: SC 20 (add more Rounds here for a longer bone)
R28: *SC 4, 2 SC in next st, 2 SC in next st, SC 4* 2 times
- SC 6 st, chain 6. Skip 12 st, work a SC into 13th st. This is where the piece splits into 2 sections for the end of the bone. Your next st is now considered beginning of next Rnd.
R29: *2 SC in 1 st, SC 2* 6 times (24)
R30-33: SC 24
R34: *DEC 1, SC 2* 6 times (18)
Stuff bone so far.
R35: *DEC 1, SC 1* 6 times (12)
R36: DEC 1- 6 times (6)
- Tie off and weave in the ends of this 'cup'
- Reattach yarn at open end where last section is to be made, and work from R29.
- To finish, weave in all loose ends.
So, here it is, the version of the pattern in the US terms. And here are some pics, and of course my Piccollina, chilling next to her bone.
I swear, she forgets she is a Bunny - WOOF, WOOF!:))


|

|
"Mouse" cat toy

A friend bought a cat recently and I wanted to make a gift for her new baby. So, I found this great pattern:
nicelycreatedforyou.blogspot.ba/2012/04/free-crochet-pattern-mousie-with-catnip.html?m=1
I changed it a bit so suit my needs, so here is my pattern for the crochet mouse toy. Although it was intended for a cat, my Bunny also had a chance to test it and play with it:)
Materials:
Crochet hook (size 2.5mm)
Worsted weight yarn - gray, black, and white (for the eyes)
Stitch marker (a scrap piece of contrasting color yarn will do)
Stuffing material (I used cotton)
Tapestry needle
Scissors
Hot Glue Gun
Googly eyes
Steps and Procedures:
BODY:
Worked in rounds, place a stitch marker to mark the beginning of each round.
Rnd 1: Make a magic ring, and work 4 sc in the ring.
Rnd 2: Work 2 sc in each sc around. (8 sc)
Rnd 3: (Sc in first sc, 2 sc in next sc) 4 times around. (12 sc)
Rnd 4: Sc even around. (12 sc)
Rnd 5: (Sc in next 3 sc, 2 sc in next sc) 3 times around. (15 sc)
Rnd 6 and 7: Sc even around. (15 sc)
Rnd 8: (Sc in next 4 sc, 2 sc in next sc) 3 times around. (18 sc)
Rnd 9: Work 2 sc in each of the next 6 sc (12 sc) and then sc in each of the next 12 sc (12 sc), totalling 24 sc in this rnd. This is the start of the 'hump' of the body.
Rnd 10 to 20: Sc even around. (24 sc)
- Stuff cotton.
Rnd 21: Decrease - (Sc in next sc, sc2tog) 8 times around. (16 sc)
- Stuff more cotton if necessary.
Rnd 22: (Sc2tog) 8 times around. (8 sc)
Rnd 23: Sc2tog around and pull to close hole. Do not cut off yarn yet. Continue to ch 26 for the tail. Slip stitch back into the entire chain. Now cut the yarn leaving about 6 inches for sewing. Thread this tail yarn onto a tapestry needle and weave in end, securing the tail in place.
EARS (make 2)
- Worked in rows, not rounds, so you do not need to use the stitch marker.
Row 1: Ch 2. Work 3 sc in second ch from hook. (3 sc) Chain 1 and turn.
Row 2: Sc in first sc, 2 sc in next sc, sc in last sc. (4 sc) Chain 1 and turn.
Row 3: Sc in first sc, 2 sc in each of the next 2 sc, sc in last sc. (6 sc)
Fasten off yarn and cut, leaving about 8 inches of yarn for sewing.
ASSEMBLY:
- The 'hump' of the mouse body should be facing up.
- Sew the ears onto the top of the head, somewhere on rnd 7 or 8 of the body.
- Sew on the eyes, or use the hot glue gun to glue the googly eyes on the face.
- Sew on the whiskers.
I made two mice - one with the googly eyes for the cat and one with the whiskers and the googly eyes for my Bunny. This is a super quick, easy project. I am sure your pets with have a blast.

|

|

|

|
easy "TP" pet toy

This post is originally entitled - Crochet Cat Toy, but since I have no cats I have made this for my bunny. Her favorite toy is a big, colorful beach ball and she loves to chase it around and nudge it with her little nose and run around it in the circle (go figure:). I tried to bring in some variety in her daily entertainment and have made this simple crochet toy for her to play with. To be honest, the ball remains her favorite even after trying on this new item (hahahahaha;)))
Anyways, the original pattern is from: dabblesandbabbles.com/crochet-cat-toy/ and here is my version:
Materials:
Medium weight yarn
4.00 mm Crochet hook
Toilet paper tube (I used a 9 cm long tube)
Bell
Needle and thread
Scissors
Steps and Procedures:
Ch = chain, sl st = slip stitch, dc = double crochet (All U.S. terminology)
- Ch 20, join with sl st to ch 1 to form a ring (keeping tension firm but not tight – you want both ends to be a little tighter so they hug around the toilet paper tube). Make sure to not to twist the chain.
- Ch 2 and DC in first chain, then dc in each remaining stitch in round (20 DC total). Sl st in last stitch in round to join.
- Repeat for 8 rounds
- Finish off last round with 1(sl st) in each stitch and join.
- Ch 40 then make 2 dc in the 3rd chain from the hook.
- Make 3 dc in each chain until you get back to the start of the chain. Sl st to join. Fasten off and weave in ends.
- Sew bell on end of curlicue
- Fit over toilet paper roll
- Give it to your cat/bunny/dog for a trial round and see how they like it:)
* I ended up making two toys - my Bun Bun got a yellow one, but I also made the pinkish one with the 2 strands of different colored yarn, but I used a 3.5 mm crochet hook to make it thicker:)*

|

|


small dog harness

I love animals! To be completely honest - sometimes even more than people. I used to have a dog, a miniature Maltese who died a few years ago at the age of 13. My Shaggy lived a good, long life and no dog could replace him or his place in my heart....
Now, a friend of mine got a mini Maltese and that immediately struck a soft spot in my heart, so I wanted to make something for the little darling. Knowing how valuable dog harnesses are, especially for little dogs, I made this simple harness that secures the belly and is not too tight on the puppy's body...
The pattern is from Pixie Heart Strings, and is on this link:
pixieheartstrings.blogspot.ba/2015/04/a-crocheted-dog-harness-for-your-tiny.html?m=1
I have unfortunately made the harness a bit too big for this tiny bundle of joy, but I am sure the harness will be put to good use. I sewed on the crocheted flower and leaves on top and attached the metal rings on the edges for the leash to be clipped through...
The pattern I used for the flower (simple rose) is fully explained here:
www.skiptomylou.org/free-easy-rose-crochet-pattern/
And here is the leaf pattern:
Ch 10. Sc in 2nd ch from hook, hdc in next ch, dc in next ch, htr (see below) in next 3 ch, dc in next ch, hdc in next ch, sc in last ch. Ch 2, sl st in 2nd ch from hook. Working along the other side of the chain, sc in next ch, hdc in next ch, dc in next ch, htr in next 3 ch, dc in next ch, hdc in next ch, sc in last ch. Fasten off leaving a long tail to sew the leaf to the zipper pull.
(Htr (half treble crochet): Yarn over 2 times, insert hook in stitch and draw up a loop (4 loops on hook), yarn over and draw through 2 loops (3 loops on hook), yarn over and draw through 3 loops (1 loop left on hook).
Here is what the finished harness looks like. I had the precious "Bundle of Joy" model it for me (although she is actually trying to take the harness off and chew through it:))

|

|
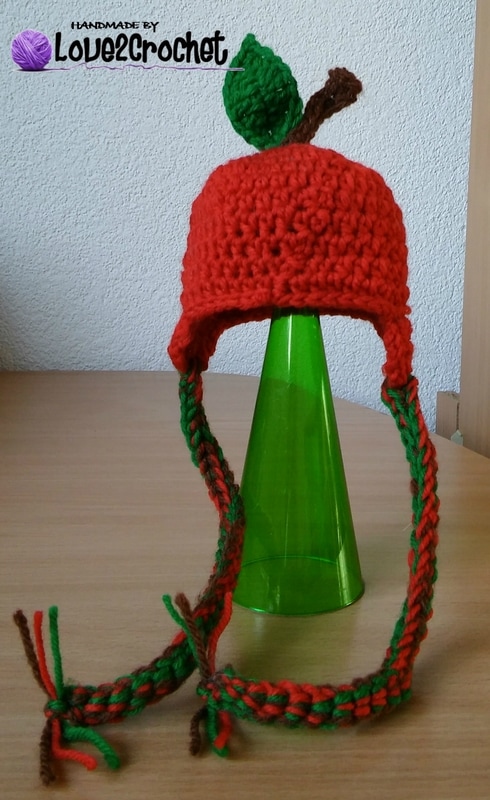
"The apple of my eye"
bunny hat
|
|
|
The creation of this Apple Crochet hat started as a joke and a response to a Facebook video a friend sent me about this adorable little bunny who is wearing a crochet apple hat:) So, me being me, an obsessed and obsessive crocheter, I decided to immediately make a crochet apple hat of my own and try it on my own little bunny Piccolina. She wore and modeled the hat, poor thing, did not really like it, but I managed to take a few pics and videos and post them on Youtube and FB - you can see the videos here:)) Cute!!!!
The pattern is completely from www.micahmakes.com/blog/free-pattern-versatile-earflap-hat-pattern
The original pattern is for a "human" hat bonnet ages from newborn to adult, and it calls for 5.5 mm crochet hook, but I used a 3.5 mm hook and made a tiny hat that fit my bun bun perfectly:) Here are the instructions. Thank you Micahmakes for the pattern and instructions:)
Materials:
3.5 mm crochet hook
red, brown and green yarn
sewing needle
scissors
Steps and Procedures:
1. Hat
R1: 8 Hdc in a magic circle; join. (8)
R2: Ch 2, hdc in same st, 2 hdc in next st and in each st around; join with a sl st in top of ch 2. (16)
R3: Ch 2, hdc in same st, hdc in next st, ✽ 2 hdc in next st, hdc in next st ✽ repeat around; join with a sl st in top of ch 2. (24)
R4: Ch 2, hdc in same st, hdc in next 2 sts, ✽ 2 hdc in next st, hdc in next 2 sts ✽ repeat around; join with a sl st in top of ch 2. (32)
R5: Ch 2, hdc in same st, hdc in next 3 sts, ✽ 2 hdc in next st, hdc in next 3 sts ✽ repeat around; join with a sl st in top of ch 2. (40)
R6: Ch 2, hdc in same st, hdc in next 19 sts, 2 hdc in next st, hdc in next 19 sts; join with a sl st in top of ch 2. (42)
R7-11: Ch 2, hdc in each st around; join with a sl st in top of ch 2. (42) 1st
2. Earflap
Row 1: Ch 1, sl st in 8 sts, ch 1, sc in same st and in next 6 sts; ch 1, turn. (7)
Row 2-3: Sc across; ch 1, turn. (7)
Row 4: Sc2tog, sc in next 3 sts, sc2tog; ch1, turn. (5)
Row 5: Hdc2tog, dc in next st, hdc2tog; fasten off and weave in end.
3. 2nd Earflap
Holding hat upside down with the first earflap on the left, count to the right 19 sts. Attach yarn, sc in the same st and in next 6 sts. Continue with rows 2-5 for the first earflap.
4. Edging
Attach same color yarn in any st at the back of the hat. Sc in same st and in each st around working evenly around each earflap. Join with a sl st in the first sc; fasten off and weave in end. Attach any color yarn you choose in any st at the back of the hat. Sc in same st and in each st around. Join with a sl st in the first sc; fasten off and weave in end.
5. Stem Ch 12. Dc in 3rd ch from hook, hdc in next ch, sc in next 2 ch, sl st in next 6 ch. Fasten off leaving a long tail to sew the stem to the hat.
6. Leaf Ch 10. Sc in 2nd ch from hook, hdc in next ch, dc in next ch, htr (see below) in next 3 ch, dc in next ch, hdc in next ch, sc in last ch. Ch 2, sl st in 2nd ch from hook. Working along the other side of the chain, sc in next ch, hdc in next ch, dc in next ch, htr in next 3 ch, dc in next ch, hdc in next ch, sc in last ch. Fasten off leaving a long tail to sew the leaf to the hat.
(Htr (half treble crochet): Yarn over 2 times, insert hook in stitch and draw up a loop (4 loops on hook), yarn over and draw through 2 loops (3 loops on hook), yarn over and draw through 3 loops (1 loop left on hook).
- I used the green, red and a brown yarn (1 strands of each together) to create braids. I have chained 28, slip stitched to the bottom of each earflap and slip stitched down the chain...

|
|

|

|

|

|

