baby "bunny" pacifier holder
My friend is having a baby so I thought that I might make a pacifier holder to compliment the Teething Ring and the Blanket. Here is the pattern for you to follow, enjoy, and make. Have fun!
Materials:
White, mint, grey worsted weight yarn
2.5 mm crochet hook
Pacifier holder wooden clip
Beads/decorations of your choice to be strung on the pacifier holder
Scissors, needle, stitch marker
Stuffing material
Steps and Procedure:
1. Head:
- Make a Magic Ring
1. 5 SC in the Magic Ring
2. SC INC in every stitch (10 SC)
3. 1 SC in first stich – INC in next st (repeat around) (15 SC)
4. 1 SC in next 2 st – INC in next st (repeat around) (20 SC)
5-7. SC in every stitch around (20 SC)
8. 1 SC in next 2 st – DEC in next st (repeat around) (15 SC)
9. 1 SC in next st – DEC in next st (repeat around) (10 SC)
- stuff the head firmly with stuffing material
- cut the yarn, leaving a long tail to attach the head to the teething ring
2. Ears: (make 2)
- Make a Magic Ring
1. 4 SC in the Magic Ring
2. 1 SC in first stich – INC in next st (repeat around) (6 SC)
3. 1 SC in next 2 st – INC in next st (repeat around) (8 SC)
4-9. SC in every stitch around (8 SC)
- cut the yarn, leaving a long tail to attach the ears to the head
- sew the ears onto the head
- embroider the eyes and nose
3. Ruffles (make 2 – grey and mint color)
Ch 10
- 2 SC in the 2nd stitch from the hook
- 3 SC in every chain down the chain line (total of 9 SC)
- cut the yarn, leaving a long tail to attach to the neck later on
4. Balls (make 5: 3 white, 1 grey, 1 mint)
- Make a Magic Ring
1. 4 SC in the Magic Ring
2. SC INC in every stitch (8 SC)
3. 1 SC in first stich – INC in next st (repeat around) (12 SC)
4-5. SC in every stitch around (12 SC)
6. 1 SC in next st – DEC in next st (repeat around) (8 SC)
7. DEC around (4 SC)
5. Pacifier attachment string: (with mint yarn)
- ch 45
- 2 SC into the 1st stitch from the hook making a loop to attach to the actual baby pacifier
- sl st into the next st
- leave a long yarn to string the crochet beads/wooden decorations
Assembly (string through with a sewing needle):
1. white crochet bead
2. 1st wooden decorative bead
3. grey crochet bead
4. 2nd wooden decorative bead
5. Blue crochet bead
6. 3rd wooden decorative bead
7. white crochet bead
8. 4th wooden decorative bead
9. White crochet bead
10. Head
11. 5th wooden decorative bead
12. Clip on
13. Sew the ruffles on the neck (between head and body)
Baby "Bunny" teething ring
My friend is about to have a baby, so I decided to make her a gift. This baby teething ring is so very easy to make, and I promise you will have as much fun making it, as the baby playing with it:)
Materials:
White, mint, grey worsted weight yarn
3.00 mm crochet hook
Scissors, needle, stitch marker
Wooden teething ring (4 cm diameter)
small rattle (to be put inside the head - optional)
Stuffing material
Steps and Procedure:
1. Head:
- Make a Magic Ring
1. 6 SC in the Magic Ring
2. SC INC in every stitch (12 SC)
3. 1 SC in first stich – INC in next st (repeat around) (18 SC)
4. 1 SC in next 2 st – INC in next st (repeat around) (24 SC)
5. 1 SC in next 3 st – INC in next st (repeat around) (30 SC)
6. 1 SC in next 4 st – INC in next st (repeat around) (36 SC)
7-11. SC in every stitch around (36 SC)
12. 1 SC in next 4 st – DEC in next st (repeat around) (30 SC)
13. 1 SC in next 3 st – DEC in next st (repeat around) (24 SC)
14. 1 SC in next 2 st – DEC in next st (repeat around) (18 SC)
15. 1 SC in next st – DEC in next st (repeat around) (12 SC)
- stuff the head firmly with stuffing material
- add the small rattle for rattling noise (optional)
16. 1 SC in nest 2 st – DEC in next st (repeat around) (9 st)
- cut the yarn, leaving a long tail to attach the head to the teething ring
2. Ears: (make 2)
- Make a Magic Ring
1. 6 SC in the Magic Ring
2. 1 SC in first stich – INC in next st (repeat around) (9 SC)
3. 1 SC in next 2 st – INC in next st (repeat around) (12 SC)
4. 1 SC in next 3 st – INC in next st (repeat around) (15 SC)
5-11. SC in every stitch around (15 SC)
- cut the yarn, leaving a long tail to attach the ears to the head
3. Ruffles (make 2 – grey and mint color)
Ch 12
- 4 SC in the 2nd stitch from the hook
- 5 SC in every chain down the chain line (total of 11 SC)
- cut the yarn, leaving a long tail to attach to the neck later on
4. Teething Ring Cover
- ch 22
1. SC down the chain line (21 SC), ch 1, turn
2- 7. SC in every stitch (21 SC), ch 1, turn
- position the cover over the teething ring, and sew the sides together
- make sure it is a snug fit, so it does not slide around the teething ring
Assembly:
1. Sew the cover around the teething ring
2. Sew the ears onto the head
3. Embroider eyes and nose
4. Sew the head onto the teething ring
5. Sew the ruffles on the neck (between the head and teething ring)
Children's "puppy" slippers

I wanted to make a quick project as a gift to my 5-year-old niece. I found this youtube tutorial for these adorable puppy slippers, but the tutorial was made for a 1-2 year old, so it was too small. I still used it as a basis for this project. Here is the link (it is in Spanish, though):
www.youtube.com/watch?v=Am86cYemdWg
Materials:
4.00 mm crochet hook
Beige, brown, magenta yarn
Googly eyes, hot glue gun
Scissors, tapestry needle
Stitch marker
Steps and Procedures:
1. Slipper Sole:
- the whole sole is worked in the round, so use the stitch marker to mark the 1st stitch of the round, do not sl st.
- using beige yarn and 4.00 mm crochet hook
- ch 16.
R1: Make 4 SC in 2nd ch from hook. SC 5 - HDC 3 - DC 5 - DC 7 in the last chain.
- Working on the opposite side of the chain: make DC 5 - HDC 3 – SC 5 (37 sts)
R2: 2 SC in next 4 stitches - SC 14 - 2 SC in the next 5 stitches - SC 14. (46 sts)
R3: SC - *SC, 2 SC in next st* (repeat 3 times) - SC 15 - *SC, 2 SC in next st* (repeat 5 times) - SC 14. (54 sts)
R4: HDC - *HDC 2, 2 HDC in next st* (repeat 3 times) - HDC 15. *HDC 2, 2 HDC in next st* (repeat 5 times) – HDC 14. (62 st)
R5: SC – HDC - DC 12 – HDC – SC 47 (62 sts)
R6: 2 HD - *HDC 3, 2 HDC in next st* (repeat 3 times) - HDC 15 - *HDC 3, 2 HDC in next st* (repeat 5 times) - HDC 13. (70 sts), sl st to 1st stitch made and fasten off.
- make 4 soles and sl st 2 together for a thicker sole
2. Top of slipper:
- with beige yarn and 4.00 crochet hook
- ch 24
- make a row of SC down the chain line (23 SC), ch1 and turn
- SC decrease, 19 SC, SCdec (21 SC), ch1 and turn
- 21 SC, ch 1 and turn
- SCdec, 17 SC, SCdec (19 SC), ch 1 and turn
- 19 SC, ch 1 and turn
- SCdec, 15 SC, SCdec (17 SC), ch 1 and turn
- 17 SC, ch1 and turn
- SCdec, 13 SC, SCdec (15 SC), ch1 and turn
- 15 SC, ch1 and turn
- SCdec, 11 SC, SCdec (13 SC), ch1 and turn
- 13 SC, ch1 and turn
- SCdec, 9 SC, SCdec (11 SC), ch1 and turn
- 11 SC, ch1 and turn
- SCdec, 7 SC, SCdec (9 SC), ch1 and turn
- 9 SC, ch1 and turn
- SCdec, 5 SC, SCdec (7 SC), ch1 and turn
- 7 SC, ch1 and turn
- embroider the nose directly to the face with brown yarn in the shape of the triangle and male a downward line for the mouth
- Make 4 tops of slipper, put two together and make a row of SC down the sides, making sure you make 2 SC in two corners (at the longest edge)
3. Ears:
- using brown yarn, and 4.00 mm crochet hook
- Make a Magic ring, ch 1 and make 6 SC
- make an INC in each st (12 SC)
- make 7 rows of 12 SC
- sew the top edges together to make floppy ears
- sew the ears to the “top of the slipper”
4. Bow:
- using magenta yarn and a 4.00 crochet hook, ch 5.
R1: make 4 DC into the 1st ch made. Ch 4, sl st in the same st. Ch 4, 4 DC into the same st, ch 4, sl st in the same st.
- Cut yarn, but leave a long tail to wrap around the center of the bow
- Wrap the yarn around 10 times to make the center of the bow, cut yarn and weave ends
- use the glue gun to glue to the slipper, next to the ears
- Assembling the slipper:
1. Make 2 soles and sl st them together for a thicker look and feel
2. Make 4 "tops of slipper"
3. Make the facial features on one “top of slipper” (embroider the nose and mouth)
4. Sew the two “tops of slipper” together for a thicker look and feel
5. Sl st the “top of the slipper” to the “sole of the slipper”
6. Use the hot glue gun to glue the eyes on the face, sew on the ears and glue the bow
7. (optional) draw the stripes along the bottom of the slippers with the glue gun, for "no slipping" effect on the wooden floors.

|

|
newborn "Panda bear" set

It is time for yet another "newborn set", this time I made the "Panda Bear" set for a friend and her baby boy. The set consists of a bib, newborn hat and baby slippers. It turned out really cute, and here are the instructions....
Materials:
3.00 mm, 3.50 mm, 5.00 mm Crochet Hooks
black, white yarn
Googly eyes
Yarn Needle, Scissors
Stitch Marker, a button
1. Bib:
- with 3.50 mm crochet hook and white yarn, ch 21, chain 1 and turn
R1: Make 1 HDC in every chain (20), ch 1 and turn
R2: Make 2 HDC in the 1st stitch, make 1 HDC in the next 18 stitches, and end with 2 HDC in the last stitch (22), ch 1 and turn
R3: Make 1 HDC in every stitch (22)
R4: Make 2 HDC in the 1st stitch, make 1 HDC in the next 20 stitches, and end with 2 HDC in the last stitch (24), ch 1 and turn
R5: Make 1 HDC in every stitch (24)
R6: Make 2 HDC in the 1st stitch, make 1 HDC in the next 22 stitches, and end with 2 HDC in the last stitch (26), ch 1 and turn
R7-25: Make 1 HDC in every stitch around (26 HDC), ch 1 and turn
- Making 1st strap:
- Make 1 HDC in the next 8 stitches, ch 1 and turn
- Make a HDC Dec, make 1 HDC in the next 6 stitches, ch 1 and turn (7)
- Make 1 HDC in the next 7 stitches, ch 1 and turn
- Make a HDC Dec, make 1 HDC in the next 5 stitches, ch 1 and turn (6)
- Make 1 HDC in the next 6 stitches, ch 1 and turn
- Make a HDC Dec, make 1 HDC in the next 4 stitches, ch 1 and turn (5)
- Make 1 HDC in the next 5 stitches, ch 1 and turn
- Make a HDC Dec, make 1 HDC in the next 3 stitches, ch 1 and turn (4)
- Make 1 HDC in the next 4 stitches, ch 1 and turn
- Make 19 rows of 4 HDC, ch 1 and turn
- Making a button hole:
- Make 1 HDC in the 1st st, ch 1, (skip 2 stitches), make 1 HDC in the last stitch, ch 1 and turn
- Make 1 HDC in the 1st st, make 2 HDC in the ch 1 space (from the previous row), make 1 HDC in the last stitch, ch 1 and turn
- Make 2 more rows of 4 HDC, ch 1 and turn, fasten off
- Making 2nd strap:
- attach the white yarn to the other side of the body of the bib to make 2nd strap:
- Make 1 HDC in the next 8 stitches, ch 1 and turn
- Make a HDC Dec, make 1 HDC in the next 6 stitches, ch 1 and turn (7)
- Make 1 HDC in the next 7 stitches, ch 1 and turn
- Make a HDC Dec, make 1 HDC in the next 5 stitches, ch 1 and turn (6)
- Make 1 HDC in the next 6 stitches, ch 1 and turn
- Make a HDC Dec, make 1 HDC in the next 4 stitches, ch 1 and turn (5)
- Make 1 HDC in the next 5 stitches, ch 1 and turn
- Make a HDC Dec, make 1 HDC in the next 3 stitches, ch 1 and turn (4)
- Make 1 HDC in the next 4 stitches, ch 1 and turn
- make 4 rows of 4 HDC, ch 1 and turn
- change the yarn to black, and make 1 HDC around the edge of the bib, making 3 HDC in every corner
- sew on the button to the shorter strap and attach the longer strap
Bib embellishments:
* Panda Eye Patches:
- With black yarn and 3.50 mm
R1. Chain 7, SC in second chain from hook and in next 4 st, make 3 SC in last chain.
- SC in each stitch along other side of chain (5 SC), join, chain 2 (13 SC)
R2: 2 DC in first 3 stitches, HDC in next, SC in next, 2 SC in next 3, SC in next rest of stitches (6 st), join to top of first DC.
- Fasten off leaving a long tail to sew onto the bib
* Panda Nose:
- With black yarn and 3.50 mm
R1. Make a Magic ring, chain 2 and make a DC, HDC, 2 SC, HDC, DC, HDC, 2 SC, HDC and join to first DC.
Pull tight and sew onto the bib.
- glue the googly eyes onto the eye patches
- sew the eye patches and the nose onto the bib

2. Panda Bear Hat:
- with 5.00 mm crochet hook and white yarn
R1: make a Magic Circle, and make 10 DC, sl st to the 1st DC, ch 2
R2: Make an Increase in every stitch around (20 DC), sl st, ch 2
R3: Make an INC in the 1st stitch and 1 DC in the 2nd stitch (repeat around) (30 DC), sl st, ch 2
R4: Make an INC in the 1st stitch and 1 DC in the next 2 stitches (repeat around) (40 DC), sl st, ch 2
R5-9: Make 1 DC in every stitch around (40 DC), sl st, ch 2
R10: 2SCtog – 18 SC – 2SCtog – 18 SC (38 SC), fasten off
* Panda Bear ears:
- with 4.00 mm crochet hook and black yarn
1. Make a Magic Ring and make 6 SC
2. Make an INC in each stitch around (12 SC)
3. Make 1 SC in 1st st, make an INC in the 2nd (repeat around) (18 SC)
4. Make 1 SC in each stitch around (18 SC)
5. Make 1 SC in each stitch around but only in the Back Loop (18 BLSC)
* Panda Eye Patches:
- With black yarn and 3.50 mm
R1. Chain 7, SC in second chain from hook and in next 4 st, make 3 SC in last chain.
- SC in each stitch along other side of chain (5 SC), join, chain 2 (13 SC)
R2: 2 DC in first 3 stitches, HDC in next, SC in next, 2 SC in next 3, SC in next rest of stitches (6 st), join to top of first DC.
- Fasten off leaving a long tail to sew onto the bib
* Panda Bear Nose:
- With black yarn and 3.50 mm
1. Make a Magic ring, chain 2 and make a DC, HDC, 2 SC, HDC, DC, HDC, 2 SC, HDC and join to first DC.
Pull tight and sew onto the bib.
- glue the googly eyes onto the eye patches
- sew the eye patches and the nose onto the hat
- sew the ears onto the hat

3. Panda Bear Slippers:
- with 3.50 mm crochet hook and black yarn
- chain 10
R1: Make 2 HDC into the 2nd chain from the hook, make 1 HDC in the next 7 st, make 5 HDC in the last chain on this side, (working on the other side of the chain): make 1 HDC in the next 7 st, make 3 HDC in the last st, sl st, ch 1 (24)
R2: (working in the same st as sl st) make 2 HDC in the first 2 st, HDC 7, 2 HDC in the next 5 st, make 1 HDC into the next 7 st, make 2 HDC in the last 3 st, sl st, ch1 (34)
R3: (work in the same st as sl st), *2 HDC in the 1st st, 1 HDC in the next* (repeat** 2 times), HDC into next 7 st, *2 HDC in the 1st st, 1 HDC in the next* (repeat** 5 times), HDC into 7 st, *2 HDC in the 1st st, 1 HDC in the next* (repeat** 3 times), join with the sl st, ch 1 (44)
R4: make 1 BPHDC all the way around (44), sl st
R5: Make 1 SC all the way around (44), sl st
R6: SC in the next 11 stitches, repeat (HDC dec- HDC in the next 2 stitches) 5 times, HDC Dec in the next st, SC in the next 11 st (38), sl st, ch 1
R7: Sc in the next 12 st, HDC, HDC Dec, Repeat DC Dec 4 times, HDC Dec, HDC, SC in the next 12 st, sl st (32)
R8: SC in the next 11 st, HDC Dec, DC Dec 3 times, HDC Dec, SC in the next 11 st, sl st (27)
* Panda Bear Head: (make 4)
- with 3.00 mm crochet hook and white yarn, and a stitch marker:
1. Make a Magic Ring and 6 HDC inside the ring
2. Make an INC in each stitch around (12 HDC)
3. Make 1 HDC in the 1st st, 2 HDC in the next 4 st, 1 HDC, 1 HDC, 2 HDC in the next 4 st, HDC in the last st
4. Make HDC in the next 2 st, 2 HDC in the next 6 st, make HDC in the next 4 st, 2 HDC in the next 6 st, HDC in the next 2 st
- make 4 heads
* Panda Bear Nose:
- with 3.00 mm crochet hook and black yarn
- make a Magic ring and 4 SC inside the ring
- sl st to the 1st SC and fasten off
* Panda Bear Eye patches:
- with 3.00 mm crochet hook and black yarn
- ch 5, make the following down the chain line: SC, SC, SC, 2 SC in last st
- Working on the other side of the chain make the following: SC, SC, SC, sl st
- make 2 eye patches
- glue the googly eyes onto each eye patch
* Panda Bear ears:
- with 3.00mm crochet hook and black yarn
1. Make a Magic Ring and 3 SC inside the ring
2. Make an INC in each st around (6 SC)
3. Make 1 SC in the 1st st, make an INC in the next st (repeat around) (9 SC)
4. Make 1 SC in each st around (9 SC)
5. Make 1 SC in each st around but in the Back Loop only (9 BLSC)
- Make 4 ears and sl st the two together
- sew the small ears onto the head
- sew the small nose onto 1 of the heads
- sew the eye patches onto 1 of the heads
- sl st the heads together
- sew the heads onto the front of the slipper
- Optional: with black yarn, ch 40 and make a pulling chord and weave it through the edge of the slipper (for a tighter pull around the foot)
- Optional: with white yarn make a small pom pom and sew it onto the back of the slipper

|

|

|
newborn "Bear" set
There seems to be something in the water, since there are babies coming all around me.... Another friend is expecting a baby boy. This time I decided to make a little Bear Set - a bib, slippers and a newborn hat. Here is the pattern.....

Materials:
3.50 mm, 4.00 mm, 5.00 mm Crochet Hooks
black, blue yarn
Googly eyes
Yarn Needle, Scissors
Stitch Marker
Stuffing Material
1. Bear Hat:
- with 5.00 mm crochet hook and blue yarn, and using a stitch marker (DO NOT sl st at the end of each round)
R1: make a Magic Circle, and make 10 DC
R2: Make an Increase in every stitch around (20 DC)
R3: Make an INC in the 1st stitch and 1 DC in the 2nd stitch (repeat around) (30 DC)
R4: Make an INC in the 1st stitch and 1 DC in the next 2 stitches (repeat around) (40 DC)
R5-9: Make 1 DC in every stitch around (40 DC)
R10: Make 1 SC in every stitch around for a neater edge and finish (40 SC), fasten off
Bear ears (for the hat):
- with 4.00 mm crochet hook and blue yarn
1. Make a Magic Ring and make 6 SC
2. Make an INC in each stitch around (12 SC)
3. Make 1 SC in 1st st, make an INC in the 2nd (repeat around) (18 SC)
4. Make 1 SC in each stitch around (18 SC)
5. Make 1 SC in each stitch around but only in the Back Loop (18 BLSC)
Snout (for the hat):
- with 4.00 mm crochet hook and black yarn
1. chain 11, make 1 SC in the 2nd chain from the hook, (making the following down the chain line) – HDC, 6 DC – 2 SC in the last chain
2. working on the other side of the chain: SC – HDC – 6 DC – HDC – SC
3. sl st to the 1st stitch made and fasten off
Eyes (for the hat:
- with 4.00 mm crochet hook and black yarn
1. Make a Magic Ring and 6 SC inside the ring
- fasten off, and leave a long tail for sewing onto the hat
- sew the bears onto the hat
- sew the snout, and the eyes onto the hat
- glue the googly eyes onto the black eye spots

2. Bear Slippers:
Slipper Body:
- with 3.50 mm crochet hook and blue yarn
1. chain 10, make 2 HDC into the 2nd chain from the hook, make 1 HDC in the next 7 st, make 5 DC in the last chain on this side, (working on the other side of the chain): make 1 HDC in the next 7 st, make 3 HDC in the last st, sl st, ch 1 (24)
2. (working in the same st as sl st) make 2 HDC in the first 2 st, HDC 7, 2 HDC in the next 5 st, make 1 HDC into the next 7 st, make 2 HDC in the last 3 st, sl st, ch1 (34)
3. (work in the same st as sl st), *2 HDC in the 1st st, 1 HDC in the next* (repeat** 2 times), HDC into next 7 st, *2 HDC in the 1st st, 1 HDC in the next* (repeat** 5 times), HDC into 7 st, *2 HDC in the 1st st, 1 HDC in the next* (repeat** 3 times), join with the sl st, ch 1 (44)
4: make 1 BPHDC all the way around (44), sl st
5: Make 1 SC all the way around (44), sl st
6: SC in the next 11 stitches, repeat (HDC dec- HDC in the next 2 stitches) 5 times, HDC Dec in the next st, SC in the next 11 st (38), sl st, ch 1
7: Sc in the next 12 st, HDC, HDC Dec, Repeat DC Dec 4 times, HDC Dec, HDC, SC in the next 12 st, sl st (32)
8: SC in the next 11 st, HDC Dec, DC Dec 3 times, HDC Dec, SC in the next 11 st, sl st (27)
Small Bear Head (for the slippers)
- with 3.50 mm crochet hook and blue yarn, and a stitch marker:
1. Make a Magic Ring and 6 HDC inside the ring
2. Make an INC in each stitch around (12 HDC)
3. Make 1 HDC in the 1st st, 2 HDC in the next 4 st, 1 HDC, 1 HDC, 2 HDC in the next 4 st, HDC in the last st
4. Make HDC in the next 2 st, 2 HDC in the next 6 st, make HDC in the next 4 st, 2 HDC in the next 6 st, HDC in the next 2 st
- make 2 heads
Small Bear Snout (for the small head on the slippers):
- with 3.50 mm crochet hook and black yarn
1. ch 6, and make the following down the chain line: SC, HDC, DC, HDC, 2 SC
Working on the other side of the chain make the following: HDC, DC, HDC, SC, sl st
- make 2 snouts
Small Bear ears (for the slippers):
- with 3.50mm crochet hook and blue yarn
1. Make a Magic Ring and 3 SC inside the ring
2. Make an INC in each st around (6 SC)
3. Make 1 SC in the 1st st, make an INC in the next st (repeat around) (9 SC)
4. Make 1 SC in each st around (9 SC)
5. Make 1 SC in each st around but in the Back Loop only (9 BLSC)
- Make 4 ears
- Sew the small ears onto the head
- Sew the small snout onto 1 of the heads
- Sew the heads together, and stuff them lightly
- Sew the stuffed head onto the front of the slipper
- Optional: with blue yarn, ch 40 and make a pulling chord and weave it through the edge of the slipper (for a tighter pull around the foot)
- Optional: with black yarn make a Magic Ring and make 6 HDC inside (for the tail and sew it onto the back of the slippers)

3. Bib:
- with 3.50 mm crochet hook and blue yarn, ch 21, chain 1 and turn
R1: Make 1 HDC in every chain (20), ch 1 and turn
R2: Make 2 HDC in the 1st stitch, make 1 HDC in the next 18 stitches, and end with 2 HDC in the last stitch (22), ch 1 and turn
R3: Make 1 HDC in every stitch (22)
R4: Make 2 HDC in the 1st stitch, make 1 HDC in the next 20 stitches, and end with 2 HDC in the last stitch (24), ch 1 and turn
R5: Make 2 HDC in the 1st stitch, make 1 HDC in the next 22 stitches, and end with 2 HDC in the last stitch (26), ch 1 and turn
R7-29: Make 1 HDC in every stitch around (26 HDC), ch 1 and turn
- Making 1st strap:
- Make 1 HDC in the next 8 stitches, ch 1 and turn
- Make a HDC Dec, make 1 HDC in the next 6 stitches, ch 1 and turn (7)
- Make 1 HDC in the next 7 stitches, ch 1 and turn
- Make a HDC Dec, make 1 HDC in the next 5 stitches, ch 1 and turn (6)
- Make 1 HDC in the next 6 stitches, ch 1 and turn
- Make a HDC Dec, make 1 HDC in the next 4 stitches, ch 1 and turn (5)
- Make 1 HDC in the next 5 stitches, ch 1 and turn
- Make a HDC Dec, make 1 HDC in the next 3 stitches, ch 1 and turn (4)
- Make 1 HDC in the next 4 stitches, ch 1 and turn
- Make 19 rows of 4 HDC, ch 1 and turn
- Making a button hole:
- Make 1 HDC in the 1st st, ch 2, (skip 2 stitches), make 1 HDC in the last stitch, ch 1 and turn
- Make 1 HDC in the 1st st, make 2 HDC in the ch 2 space (from the previous row), make 1 HDC in the last stitch, ch 1 and turn
- Make 2 more rows of 4 HDC, ch 1 and turn, fasten off
- Making 2nd strap:
- attach the blue yarn to the other side of the body of the bib to make 2nd strap:
- Make 1 HDC in the next 8 stitches, ch 1 and turn
- Make a HDC Dec, make 1 HDC in the next 6 stitches, ch 1 and turn (7)
- Make 1 HDC in the next 7 stitches, ch 1 and turn
- Make a HDC Dec, make 1 HDC in the next 5 stitches, ch 1 and turn (6)
- Make 1 HDC in the next 6 stitches, ch 1 and turn
- Make a HDC Dec, make 1 HDC in the next 4 stitches, ch 1 and turn (5)
- Make 1 HDC in the next 5 stitches, ch 1 and turn
- Make a HDC Dec, make 1 HDC in the next 3 stitches, ch 1 and turn (4)
- Make 1 HDC in the next 4 stitches, ch 1 and turn
- make 4 rows of 4 HDC, ch 1 and turn
- change the yarn to black, and make 1 SC around the edge of the bib, making 3 SC in every corner
- sew on the button to the shorter strap and attach the longer strap

|

|
Newborn "Bunny" set
Another friend's wife is having a baby and I wanted to make them something. This time is it s Bunny set - a bib, slippers and a newborn hat. Here are the patterns for all three.....

1. Bunny Slippers:
Materials:
3.5 mm crochet hook
white, blue, pink and black yarn
button
googly eyes
needle, scissors
stitch marker
Steps and Procedures:
- using 3.5 mm crochet hook and a light blue yarn, ch 13
R1: 2 HDC to the second chain from hook, HDC in each the 10 stitches, 5 DC in the last stitch, (working on the other side of the chain) HDC in the next of the 10 stitches, 3 HDC in the last stitch, sl st to the 1st stitch made (30)
R2 : 2 HDC in the same stitch as Sl St, 2 HDC in the next stitch, HDC in the next 7 stitches, DC in each of the next 3 stitches, 2DC in each of the next 5 stitches, DC in each of the next 3 stitches, HDC in each of the next 7 stitches, 2HDC in each of the last 3 stitches, SS to the 1st HDC. (40)
R3 : *HDC in the same stitch as Sl St – 2HDC in the next stitch* repeat 2 times, HDC in each of the next 10 stitches,
*DC in the next stitch, 2DC in the next* repeat 4 times, HDC in each of the 10 stitches, *HDC in the same stitch as Sl St – 2HDC in the next stitch* repeat 3 times (till the end), sl st to the 1st HDC (50)
- Change the color to white:
R4: make 1 BPHDC all the way around (50), sl st
R5: Make 1 SC all the way around (50), sl st
R6: SC in the next 14 stitches, repeat (HDC dec- HDC in the next 2 stitches) 5 times, HDC Dec in the next st, SC in the next 14 st (44), sl st
R7: Sc in the next 15 st, HDC, HDC Dec, Repeat DC Dec 4 times, HDC Dec, HDC, SC in the next 15 st, sl st (38)
R8: SC in the next 12 st, HDC Dec, DC Dec 5 times, HDC Dec, SC in the next 12 st, sl st (31)
Bunny Ears for Slippers:
- with 3.5 mm crochet hook, and white yarn
R1. Ch 4, SC in the 1st and 2nd chain, 3 SC in the last ch, (working on the other side of the chain), make 1 SC in both chains, sl st
R2. 2 SC in the same st, SC in the next st, 2 SC in the next 3 st, SC in the next 2 st, sl st
R3. SC in every stitch around
- sew the ears onto the top of the slipper
- make a bow with the blue yarn and glue it to the front of the ears
- embroider the sleeping eyes and the pink nose
- make a white pom pom and sew onto the back of the slippers
2. Bib:
- with 3.50 mm crochet hook and white yarn, ch 21, chain 1 and turn
R1: Make 1 HDC in every chain (20), ch 1 and turn
R2: Make 2 HDC in the 1st stitch, make 1 HDC in the next 18 stitches, and end with 2 HDC in the last stitch (22), ch 1 and turn
R3: Make 1 HDC in every stitch (22)
R4: Make 2 HDC in the 1st stitch, make 1 HDC in the next 20 stitches, and end with 2 HDC in the last stitch (24), ch 1 and turn
R5: Make 2 HDC in the 1st stitch, make 1 HDC in the next 22 stitches, and end with 2 HDC in the last stitch (26), ch 1 and turn
R7-29: Make 1 HDC in every stitch around (26 HDC), ch 1 and turn
- Making 1st strap:
- Make 1 HDC in the next 8 stitches, ch 1 and turn
- Make a HDC Dec, make 1 HDC in the next 6 stitches, ch 1 and turn (7)
- Make 1 HDC in the next 7 stitches, ch 1 and turn
- Make a HDC Dec, make 1 HDC in the next 5 stitches, ch 1 and turn (6)
- Make 1 HDC in the next 6 stitches, ch 1 and turn
- Make a HDC Dec, make 1 HDC in the next 4 stitches, ch 1 and turn (5)
- Make 1 HDC in the next 5 stitches, ch 1 and turn
- Make a HDC Dec, make 1 HDC in the next 3 stitches, ch 1 and turn (4)
- Make 1 HDC in the next 4 stitches, ch 1 and turn
- Make 19 rows of 4 HDC, ch 1 and turn
- Making a button hole:
- Make 1 HDC in the 1st st, ch 2, (skip 2 stitches),make 1 HDC in the last stitch, ch 1 and turn
- Make 1 HDC in the 1st st, make 2 HDC in the ch 2 space (from the previous row), make 1 HDC in the last stitch, ch 1 and turn
- Make 2 more rows of 4 HDC, ch 1 and turn, fasten off
- Making 2nd strap:
- attach the white yarn to the other side of the body of the bib to make 2nd strap:
- Make 1 HDC in the next 8 stitches, ch 1 and turn
- Make a HDC Dec, make 1 HDC in the next 6 stitches, ch 1 and turn (7)
- Make 1 HDC in the next 7 stitches, ch 1 and turn
- Make a HDC Dec, make 1 HDC in the next 5 stitches, ch 1 and turn (6)
- Make 1 HDC in the next 6 stitches, ch 1 and turn
- Make a HDC Dec, make 1 HDC in the next 4 stitches, ch 1 and turn (5)
- Make 1 HDC in the next 5 stitches, ch 1 and turn
- Make a HDC Dec, make 1 HDC in the next 3 stitches, ch 1 and turn (4)
- Make 1 HDC in the next 4 stitches, ch 1 and turn
- make 4 rows of 4 HDC, ch 1 and turn
- change the yarn to light blue, and make 1 SC around the edge of the bib, making 3 SC in every corner
- sew on the button to the shorter strap and attach the longer strap
3. Bunny Hat:
- with 3.50 mm crochet hook and white yarn, and using a stitch marker (DO NOT sl st at the end of each round)
R1: make a Magic Circle, and make 10 HDC
R2: Make an Increase in every stitch around (20 HDC)
R3: Make an INC in the 1st stitch and 1 DC in the 2nd stitch (repeat around) (30 HDC)
R4: Make an INC in the 1st stitch and 1 DC in the next 2 stitches (repeat around) (40 HDC)
R5-11: Make 1 DC in every stitch around (40 HDC)
R12: Make 1 SC in every stitch around for a neater edge and finish (40 SC), fasten off
- I embroidered the nose and the mouth with light blue yarn, and glued on the googly eyes
Bunny Ears:
-with 4.00 mm crochet hook and white yarn
1. Ch 5, and HDC down the chain line, ch1 and turn (4 HDC)
2. make 2 HDC in the 1st stitch, make 1 HDC in the next 2 stitches, and end with a 2 HDC in the last stitch (6 HDC), ch1 and turn
3-5. Make 2 Rows of 6 HDC, ch 1 and turn
6. Make a HDC Dec, make 1 HDC in the next 2 stitches, and end with a HDC Dec (4 HDC), ch 1 and turn
7. Make 1 HDC in each stitch, ch 1 and turn (4 HDC)
8. Make 2 HDC Dec (2 HDC), ch 1 and turn
9. Make 1 HDC in each stitch, ch 1 and turn (2 HDC)
- SC around the whole ear
- Using the same pattern make another white ear and 2 light blue ears for the inside
- sew the “blue” ear to the “white” and sew onto the top of the hat

|

|
Newborn "chick" set
One of my dear girlfriends is about to have a baby. So, I decided to make her a baby set - a hat, a bib and a pair of booties. This did take a lot of time to make, but it was so worth it and it turned out so cute. I hope she'll love it as much as I do.....

1. Chick Booties:
Materials:
3.50 mm Crochet Hook
Yellow, orange yarn
Googly eyes
Yarn Needle, Scissors
Stitch Marker
Stuffing material
Steps and Procedure:
Sole (make 2)
- with 3.50 mm crochet hook and yellow yarn, start off by making a Slip Knot, then crochet 11 Chains
R1: 2 HDC into the second chain from your hook, 1 HDC into the next 8 chains. Make 6 HDC into the last chain.
- Working on the opposite side of foundation chain: Make 1 HDC into the next 8 stitches. Make 2 HDC into the last stitch. You should have 26 stitches.
R2: make your first stitch of this round by crocheting into the stitch with the stitch marker from the previous row – Make 2 HDC in the next 2 stitches, 1 HDC into the next 8 stitches, 2 DC in the next 6 stitches, 1 HDC into the next 8 stitches, 2 HDC in the next 2 stitches. You should have 36 stitches now.
R3: 1 HDC in the next 2 stitches, 2 HDC in the next 3 stitches, 1 HDC in the next 5 stitches, 1 DC in the next 3 stitches. *2 DC in the next stitch, 1 DC the next stitch*. Repeat from * to * 6 times. Make 1 DC in the next 3 stitches, 1 HDC in the next 5 stitches, 2 HDC in the next 2 stitches, 1 HDC and 1 SC in the next stitch. You should have 48 stitches now.
- Slip stitch to the 1st stitch made
Top Of Bootie (make 2)
R1–continue crocheting in the same direction, chain 1
- 1 SC into every stitch of this round, but through the back loop. You should have 48 SC in this round.
R2,3: Make 1 SC in every stitch around (in both loops)
R4: Make 1 SC in the next 14 stitches. *1 SC Decrease, 1 SC in the next stitch*. Repeat from* to the * - 7 times. Make 1 SC in the next 13 stitches. You should have 41 stitches now.
R5: Make 1 SC in the first stitch, 1 SC Decrease, 1 SC in the next 10 stitches. *1 SC Decrease, 1 SC in the next stitch.* Repeat from * to the * - 5 times. Make 1 SC in the next 10 stitches, 1 SC Decrease, 1 SC in the next stitch. You should have 34 stitches now.
R6: 1 SC in the next 12 stitches. 2 HDC Decreases, 2 DC Decreases, 2 HDC Decrease, 1 SC in the next 10 stitches. You should have 28 stitches now.
R7: 1 SC in the next 13 stitches, 2 DC Decreases, 1 SC in the next 11 stitches. You should have 26 stitches now.
R8 – 10: 1 SC in every stitch around. (26)
R11: 1 Crab Stitch SC in every stitch all around. (26)
- Slip Stitch into the first stitch of this round. Fasten off, and weave in loose ends.
Chick Head (make 2)
- with 3.5 mm crochet hook, yellow yarn and a stitch marker
R1: Make a Magic Ring and 6 SC inside the ring.
R2: 2 SC in the first stitch. You should have 12 stitches now.
R3: Make 2 SC in the first stitch, 1 SC in the next stitch. Repeat (2 SC – 1 SC) all around. You should have 18 stitches now.
R4: Make 2 SC in the first stitch, 1 SC in the next 2 stitches. Repeat around. You should have 24 stitches now.
R5 – 8: 1 SC in every stitch all around.
R9: Make 1 SC Decrease, make 1 SC in the next stitch. Repeat around. You should have 16 stitches now.
R10: Make 1 SC Decrease, make 1 SC in the next stitch. Repeat around.
- Fasten off, and weave in loose ends. Stuff the head with stuffing material.
- Repeat head pattern twice.
- Taking your tapestry needle, sew the chick head onto the top of each bootie
- I also sew on some yarn onto the top of each chicks’ head to create a feather like appearance.
Beak:
- with3.50 mm crochet hook and orange yarn, make a slip knot and ch 3
R1: Make a 1 SC into the second chain from your hook, and 1 SC in the next chain, ch 1 and turn
R2: Make 1 SC in each stitch, ch 1 and turn
R3: Make SC Dec, ch 1 and turn
- Make 1 SC in every stitch, fasten off
- Fold in half and sew onto the chick face
- glue on the googly eyes

2. Newborn Hat
Materials:
3.50 mm Crochet Hook
Yellow, white, orange yarn
Googly eyes
Yarn Needle, Scissors
Stitch Marker
Steps and Procedure:
Hat:
- with 4.00 mm crochet hook and yellow yarn, and using a stitch marker (DO NOT sl st at the end of each round)
R1: make a Magic Circle, and make 10 DC
R2: Make an Increase in every stitch around (20 DC)
R3: Make an INC in the 1st stitch and 1 DC in the 2nd stitch (repeat around) (30 DC)
R4: Make an INC in the 1st stitch and 1 DC in the next 2 stitches (repeat around) (40 DC)
R5-8: Make 1 DC in every stitch around (40 DC)
R9: Make 1 SC in every stitch around for a neater edge and finish (40 SC), fasten off
- I sew on some yarn onto the top of the hat to create a feather like appearance.
Eyes:
- with 4.00 mm crochet hook and a white yarn
R1: Make a Magic Circle and 6 SC
R2: Make an INC in every stitch around (12 SC)
R3: Make an INC in the 1st stitch and 1 SC in the next stitch (repeat around), ending with 2 SC in the last stitch (20 SC)
- Make 2 eyes and sew them onto the hat
- glue the googly eyes to the center of the eye
Beak:
- with 4.00 mm crochet hook and orange yarn
R1: chain 4, SC in the 2nd chain from the hook, HDC in the next and DC in the last stitch, ch 1 and turn
- continue with 1 SC in each stitch around the other side of the beak, making SC-ch1-SC in every corner
- sew onto the hat right below the eyes

3. Bib:
Materials:
3.50 mm Crochet Hook
Yellow, white, orange yarn
Googly eyes
Yarn Needle, Scissors
Steps and Procedure:
- with 4.00 mm crochet hook and yellow yarn, ch 21, chain 1 and turn
R1: Make 1 SC in every chain (20 SC), ch 1 and turn
R2: Make 2 SC in the 1st stitch, make 1 SC in the next 18 stitches, and end with 2 SC in the last stitch (22 SC), ch 1 and turn
R3: Make 1 SC in every stitch (22 SC)
R4: Make 2 SC in the 1st stitch, make 1 SC in the next 20 stitches, and end with 2 SC in the last stitch (24 SC), ch 1 and turn
R5-25: Make 1 SC in every stitch around (24 SC), ch 1 and turn
- Making 1st strap:
- Make 1 SC in the next 8 stitches, ch 1 and turn
- Make a SC Dec, make 1 SC in the next 6 stitches, ch 1 and turn (7 SC)
- Make 1 SC in the next 7 stitches, ch 1 and turn
- Make a SC Dec, make 1 SC in the next 5 stitches, ch 1 and turn (6 SC)
- Make 1 SC in the next 6 stitches, ch 1 and turn
- Make a SC Dec, make 1 SC in the next 4 stitches, ch 1 and turn (5 SC)
- Make 1 SC in the next 5 stitches, ch 1 and turn
- Make a SC Dec, make 1 SC in the next 3 stitches, ch 1 and turn (4 SC)
- Make 1 SC in the next 4 stitches, ch 1 and turn
- Make 30 rows of 4 SC, ch 1 and turn
- Making a button hole:
- Make 1 SC in the 1st st, ch 2, (skip 2 stitches),make 1 SC in the last stitch, ch 1 and turn
- Make 1 SC in the 1st st, make 2 SC in the ch 2 space (from the previous row), make 1 SC in the last stitch, ch 1 and turn
- Make 2 more rows of 4 SC, ch 1 and turn, fasten off
- Making 2nd strap:
- attach the yellow yarn to the other side of the body of the bib to make 2nd strap:
- Make 1 SC in the next 8 stitches, ch 1 and turn
- Make a SC Dec, make 1 SC in the next 6 stitches, ch 1 and turn (7 SC)
- Make 1 SC in the next 7 stitches, ch 1 and turn
- Make a SC Dec, make 1 SC in the next 5 stitches, ch 1 and turn (6 SC)
- Make 1 SC in the next 6 stitches, ch 1 and turn
- Make a SC Dec, make 1 SC in the next 4 stitches, ch 1 and turn (5 SC)
- Make 1 SC in the next 5 stitches, ch 1 and turn
- Make a SC Dec, make 1 SC in the next 3 stitches, ch 1 and turn (4 SC)
- Make 1 SC in the next 4 stitches, ch 1 and turn
- make 4 rows of 4 SC, ch 1 and turn
- change the yarn to white, and make 1 SC around the edge of the bib, making 3 SC in every corner
- sew on the button to the shorter strap and attach the longer strap
- sew on the same facial chick features used in the hat pattern if desired

|

|
Crochet Toddler frog Slippers
I make most of my crochet project for my family, especially for my sister's kids. My baby niece is 2 years old now and I have decided to make her some crochet Frog slippers.
I have used the ideas and patterns from multiple sources, changed them a bit, and here are the links:
thislovelylife-blog.blogspot.ba/2015/04/tinkerbell-slippers-free-pattern.html
thislovelylife-blog.blogspot.ba/2015/04/tinkerbell-slippers-free-pattern.html
Here is my version and the pattern:
Materials:
Green, brown, pink, black worsted weight yarn
4.00 mm and 4.50 mm crochet hooks
Steps and Procedures:
- the body of the slipper
- this pattern is worked in rounds, so use a stitch marker to mark the beginning stitch (no sl st or ch 1)
- use 4.5 mm for the bottom
R1: Chain 19, 2 SC in 4th ch from hook, SC 14, 6 SC in last ch. Working on other side of chain, SC 14, 2 SC in last ch (40 SC)
R2: hdc to the top of ch 3 at the very beginning, 2 hdc in next 3 stitches, hdc 9, SC 3, 2 SC in next 8 st, SC 3, hdc 9, 2 hdc in next 3 stitches (53)
R3: hdc in the each stitch of this round (53)
- make another sole (for a double sole effect)
- take 2 soles you made and work trough both soles from this point on
- use 4.00 mm crochet hook
R4: through both soles - SC around (53)
R5: SC in the 1st stitch, SC in next st, sc2tog, sc 12, hdc 2, dc2tog 10 times, hdc 2, SC 11, sc2tog (41)
R6: hdc in the 1st stitch, hdc in next st, hdc2tog, hdc 2, SC 9, hdc 1, dc2tog 6 times, hdc 1, SC 8, hdc 2, hdc2tog (33)
R7: SC in the 1st stitch, SC 15, sc2tog 4 times, SC 11 (29)
- Tie off and weave in ends
- make another slipper
Eyes
- use 4.00 mm crochet hook
- work in continuous round
R1- using brown yarn - make a Magic Ring and SC 6 inside the ring
R2- change yarn color to white. Make 2 SC in every stitch all around (12 SC)
R3- change yarn color to green. Make 2 SC in the first stitch. *Crochet 1 SC into the next stitch. Crochet 2 SC into the next stitch. Repeat from the * all around. Slip Stitch into the first stitch of this round. (18 SC)
- Fasten off, and weave in loose ends.
- Repeat pattern 4 times to make 2 pairs of eyes.
- Taking your tapestry needle, sew 2 eyes onto the front of each slipper, towards the top.
Smile/Cheeks
R1- sing pink yarn, make a Magic Ring and make 6 SC inside the ring.
- Fasten off, and weave in loose ends.
- Repeat cheek pattern 4 times to make 2 pairs of cheeks.
- Taking your tapestry needle, sew 2 cheeks onto each slipper, making sure to space them out evenly. Then taking so black yarn, stitch a smile between the 2 cheeks.
So, here you have it - cute Froggy slippers for a toddler. And, here are some pics....

|
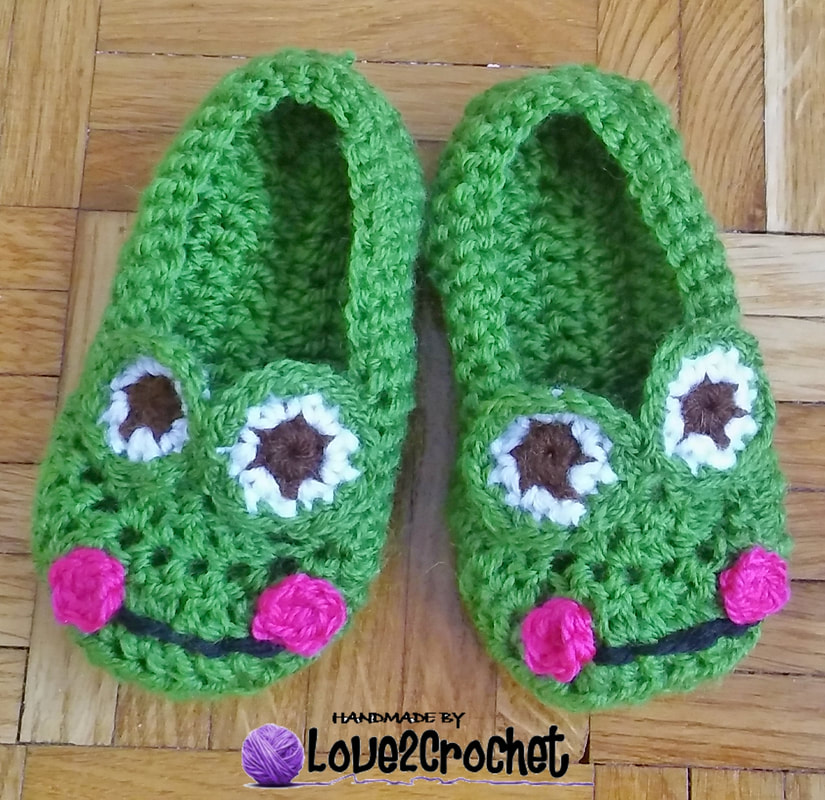
|

|
Crochet Baby Booties
I found this great link that I made women's boat slippers from a while back. I could not resist making baby booties of the same design and from the same designer! This is the link, and it rocks!
www.whistleandivy.com/2013/05/baby-boat-bootie.html
The booties turned out great, they are so easy to make, just follow Bethany's pattern. It took me about an hour to make both booties, so print the pattern out, sit in a quiet place and enjoy your "crocheting moments"....
This is how mine turned out... I will be giving them to my little baby niece in celebration of her 1st Birthday coming up soon!:)

|

|

|

|

|
Newborn Fox Cocoon and Hat
1. fox Hat

I made a baby shower gift for a friend who is about to have her baby boy. I wanted to make a cocoon and a hat for the baby that would fit up to 3 months of age. I decided to make this fox cocoon and a hat. I looked everywhere for the pattern, but have eventually decided to create my own pattern for the cocoon. The hat pattern is a variation of the fox hat pattern found on Repeat Crafter Me. Here is the link:
www.repeatcrafterme.com/2015/06/crochet-fox-hat.html
Fox Hat
Materials:
– Double strains of worsted weight yarn in orange, white, and black
– Size 5.00 Crochet Hook
– Tapestry needle
Size: 0-3 Months
Steps and Procedure:
(ch 2 at the beginning of each round DOES NOT count as a stitch)
Starting with orange yarn
R1: Make a magic ring, chain 2 and make 11 DC in ring, join to first DC
R2: ch 2, 2 DC in each stitch around, join to first DC (22 DC)
R3: ch 2, 2 DC in first, DC in next, repeat around, join (33 DC)
R4: ch 2, 2 DC in first, DC in next 2, repeat around, join (44 DC)
R5: ch 2, 2 DC in first, DC in next 2, repeat around, join (44 DC)
Change color to white
Round 6-10: ch 2, DC in each around, join (44 DC)
Round 11: SC in each around, join, fasten off, weave in ends (44 SC)
Nose Bridge:
Turn hat upside down. You are going to want to locate the 6 stitches in the middle of the hat.
R1: Attach orange yarn along the last row of orange stitches, chain and make 6 SC in the next 6 spots, chain 1, turn
R2: SC decrease, SC in next 2, SC decrease, chain 1, turn
Row 3: SC in each stitch across, chain 1, turn (4 SC)
Continue repeating row 3 until nose bridge is long enough to reach the base of hat. Slip stitch around the edge of the nose bridge for a cleaner look. Fasten off leaving long tail. I slip stitched the tip of the nose bridge to the edge of the hat.
Nose:
- using black yarn
- make a magic Ring, chain 2 and make 2 DC, HDC, 2 SC, HDC, 2 DC, HDC, 2 SC, HDC, and join to first DC. Pull tight and leave long tail to sew onto base of the nose bridge.
Cheek Fluff:
Right Side:
1. Attach yarn over the DC on the edge of the last row of hat.
2. Chain 6, SC in second chain from hook, HDC decrease over next two, DC decrease over next last two, join with a SC to next DC on edge of hat
3. Chain 5, HDC decrease over first two, DC decrease over last two, join with a SC to next DC row on hat
4. Chain 3, HDC decrease and join to next DC on edge of hat. Fasten off, weave in ends.
Left Side:
1. Starting on the 4th DC row of white from bottom of the hat, attach yarn
2. Chain 3, SC in second chain from hook, HDC in last, join to next DC space on edge
3. Chain 4, SC in second chain from hook, HDC in next, DC in last, join to next DC space on edge
4. Chain 5, SC in second chain from hook, HDC in next two, 2 DC in last, join and fasten off, weave in ends.
Outer Ear (Make 2):
With orange yarn…
R1: Chain 9, SC in second chain from hook and the rest of the way down chain, chain 1, turn (8 SC)
R2: SC decrease, SC in next 4, SC decrease over last two, chain 1, turn
R3: SC in each stitch across, chain 1, turn (6 SC)
R4: SC decrease, SC in next 2, SC decrease over last two, chain 1, turn
R5: SC in each stitch across, chain 1, turn (4 SC)
R6: SC decrease two times, continue to SC around edge of ear
R7: When you get back to the top, attach black yarn, SC Decrease + Chain 1 along top to make black tip of ear!
Inner Ear (Make 2):
White white yarn…
R1: Chain 7, SC in second chain from hook and rest of the way down chain, ch 1, turn
R2: SC decrease, SC in next 2, SC decrease, chain 1, turn
R3: SC across (4 SC)
R4: SC decrease over next two, chain 1, turn
R5: SC decrease, and continue to SC around edges of ear. Fasten off leaving long tail to sew inner ear onto outer ear.
Eyes (Make 2):
- make a Magic ring, ch 1 and make 6 SC inside the ring
- join to the 1st SC and leave a long tail for sewing onto the face
- I embroidered the “sparkle in the eye” using the white yarn
The Fox Hat is now complete... and this is how mine turned out....
2. Fox cocoon
I looked everywhere for the cocoon pattern but could not find the satisfactory one anywhere, so, here is my version…
The size of the cocoon should fit the baby up to 3 months – it is 27 cm wide and 49 cm tall
Materials:
Double Strains of orange yarn
Double Strain of white yarn
5.00 mm crochet hook
Steps and Procedures:
- using double strands of orange yarn
(ch 2 at the beginning of each round DOES NOT count as a stitch)
R1: make a Magic Ring, chain 2 and make 11 DC in ring, join to the 1st DC
R2: ch 2, 2 DC in each stitch around, join (22 DC)
R3: ch 2, 2 DC in first stitch, DC in next, repeat around, join (33 DC)
R4: ch 2, 2 DC in first stitch, DC in next 2, repeat around, join (44 DC)
R5: ch 2, 2 DC in first stitch, DC in next 3, repeat around, join (55 DC)
R6: ch 2, 2 DC in first stitch, DC in next 4, repeat around, join (66 DC)
R7-29: ch 2,DC in each stitch around, join (66 DC)
R30: ch 2, make 10 DC, then 2DCtog (DC decrease) and repeat around (60 DC)
- using double strands of white yarn
R31: ch 2, make 10 DC, then 2DCtog (DC decrease) and repeat around (55 DC)
R32 and R33: ch 2, DC in each stitch around (55 DC)
- fasten off and weave in the ends.
Fox’s Tail
(ch 2 at the beginning of each round DOES NOT count as a stitch)
- using white yarn
R1: make a magic ring, ch 2, and make 6 DC
R2: ch 2, make a 2DC in the first stitch, and 1 DC in the next and repeat around (9 DC)
R3: ch 2, make a 2DC in the first stitch, 1 DC in the second stitch, and 1 DC in the third stitch and repeat around (12 DC)
R4: ch 2, make a 2DC in the first stitch, and 1 DC in the next three stitches and repeat around (15 DC)
R5: ch 2, make a 2DC in the first stitch, and 1 DC in the next four stitches and repeat around (18 DC)
R6: ch 2, make a 2DC in the first stitch, and 1 DC in the next five stitches and repeat around (21 DC)
R7: ch 2, make a 2DC in the first stitch, and 1 DC in the next six stitches and repeat around (24 DC)
- change to orange yarn
R8: ch 2, make a 2DC in the first stitch, and 1 DC in the next five stitches and repeat around 4 times (28 DC)
R9: ch 2, make a 2DC in the first stitch, and 1 DC in the next six stitches and repeat around 4 times (32 DC)
R10: ch 2, make a 2DC in the first stitch, and 1 DC in the next seven stitches and repeat around 4 times (36 DC)
R11: ch 2, make a 2DC in the first stitch, and 1 DC in the next eight stitches and repeat around 4 times (40 DC)
R12-15: ch 2, make 1 DC into every stitch around (40 DC)
R16: ch 2, make 2DCtogether, and make 1 DC into the next six stitches and repeat around (35 DC)
R17: ch 2, make 2DCtogether, and make 1 DC into the next five stitches and repeat around (30 DC)
R18: ch 2, make 2DCtogether, and make 1 DC into the next four stitches and repeat around (25 DC)
R19: ch 2, make 1 DC in every stitch around (25DC)
R20: ch 2, make 2DCtogether, and make 1 DC into the next three stitches and repeat around (20 DC)
R21: ch 2, make 2DCtogether, and make 1 DC into the next two stitches and repeat around (15 DC)
R22: ch 2, make 2DCtogether, and make 1 DC into the next stitch and repeat around (10 DC)
- slip stitch the end of the fox’s tail together and leave a long tail for sewing onto a cocoon.
Paws:
I found this great tutorial on line and I followed it completely:
www.youtube.com/watch?v=A8KZokE6qco
And here is the written pattern:
- using 2.5 mm crochet hook
- using only 1 strand of orange yarn
1. Make a Magic ring, ch 2 and make 12 DC inside the ring
2. ch 2, and make 2 DC into every stitch around (24 DC)
3. make 1 DC into the first stitch and 2 DC into the second stitch and repeat around (36 DC)
4. skip 1 stitch, make 1 DC, 5 TRC, 1 DC, skip 1, SC – repeat this three more time for a total of four paws
5. 1DC + 1DC + 1DC + 2DC around (25 stitches)
6. when you get to the point you made your first fingertip make 1 slip stitch, 1 SC, 2 SC, 1 HDC, 2 HDC, 1 HDC, 2 SC, 1 SC, and 1 slip stitch between the fingertips (repeat around each fingertip)
7. 1DC + 1DC + 1DC + 2DC around (30 stitches)
Big Paw Fingertip:
- using only 1 strand of black yarn
- using 2.5 mm crochet hook
1. make a Magic Ring, ch 2 and make 15 DC
2. in the next 13 stitches make: ch 3+1 TRC - 1 TRC – 2 TRC – 1 TRC – 1 DC – 2 DC – 1 DC – 3 TRC – 1 DC – 2 DC – 1 DC – 1 TRC – 2 TRC – 1 TRC – ch 3 and slip stitch into the same stitch
Small fingertips:
- using 2.5 mm crochet hook
- using only 1 strand of black yarn
1. make a Magic ring and ch 2 and make 3 SC, 4 DC, 3 SC into the ring.
2. make 3 more fingertips
- sew the fingertip and paw and the small fingertips to the orange base.
- sew the paws onto the body
White chest fluff
- using white yarn and a 5.00 crochet hook
(ch 2 at the beginning of each row DOES NOT count as a stitch)
R1: ch 24 and make 1 DC in the third chain from the hook and continue making DC all the way down the chain for a total of 22 DC, ch 2 and turn
R2: make 22 DC, ch 2 and turn
R3- 18: Make 22 DC, ch 2 and turn
R19: make 2DCtog and 8 DC (repeat down the row) - for a total of 18 DC
R20: make 2DCtog and 3 DC (repeat down the row) + 2 DC at the end of the row - for a total of 15 DC
R21: make 2DCtog and 1 DC (repeat down the row) - for a total of 10 DC
R22: make 2DCtog (repeat down the row) - for a total of 5 DC
R23: make 5 SC
- make a SC around the whole chest fluff and slip stitch to the first SC made
- change to 2.50 mm crochet hook to make picot edging:
- ch 5, slip stitch to the 1st chain, slip stitch into the next 2 chains (repeat all the way around the chest fluff for a total of 58 picots)
- sew the chest fluff onto the orange body in the same line with the white collar
I am so proud of how both the cocoon and the hat turned out and here are some pics....

|
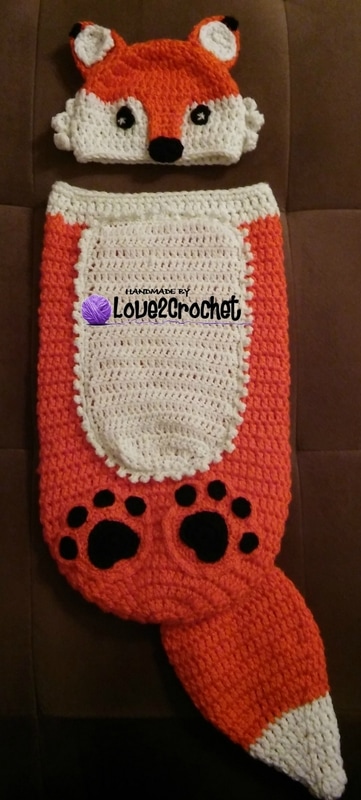
|

|
Crochet A Newborn Set
A friend of mine had a baby shower recently. I found out about it late and found myself in a rush, so I had to acquire something that afternoon! Yikes! And then I thought..... Wait! Why go shopping and spending money, time and losing my sanity in shopping malls and traffic jams - I know how to crochet! (Although I am a very much so a-self-taught-crocheter, I remember crocheting and knitting with my Aunt in my adolescence years. Thank you Aunt Lydia for the basics!:)
Anyways, to make the long story short, I decided to make a baby shower gift for my friend. We knew it was a boy, so the choice of color came naturally. I made this adorable set containing a pacifier holder, a bib and a newborn scratch gloves. I found the patterns super easy, and it turned out great. Best of all my friend appreciated it. I hope her new baby boy finds it useful as well.
The pattern for the bib is found on:
www.youtube.com/watch?v=5-_XrdA7Dbw
The pattern for the newborn scratch mitts is found on:
www.youtube.com/watch?v=wFbCnkSsd-o
The pattern for the baby pacifier is found on:
www.youtube.com/watch?v=W0W7TU1PI9M
I love using a youtube crocheting video tutorials since as a beginner crocheter I need some guidance. I am slowly moving away from the tutorial videos and am beginning to read patterns on my own, yeah!:)
Thank you to the lovely ladies who created these patterns, I found their tutorials very useful, helpful and overall wonderful!
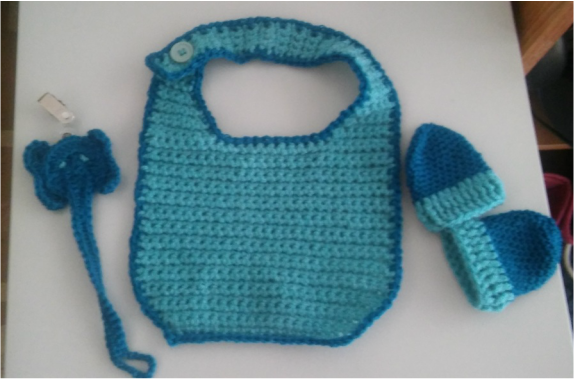
Baby Pacifier Holders
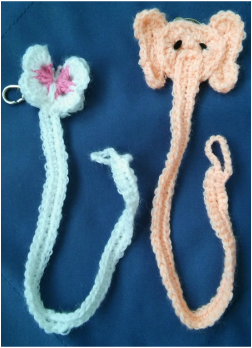
I decided to make this awesome baby pacifier holders for my sister's baby. They turned out great.
Again, the patterns used here are not mine, I just followed the instructions from this lovely lady's blog Bag-O-Day and her youtube channel. Her videos are very concise and to the point and she explains it so well:
www.youtube.com/watch?v=W0W7TU1PI9M
The butterfly pattern came from this youtube video. Thank you Bella Coco for the pattern.
www.youtube.com/watch?v=jm_F_TbybRI
Crochet Baby Booties
Looking for a gift to make for me new baby niece, I found this awesome tutorial. It is easy to follow and so concise, and the lady from the HappyBerry Crochet had done a wonderful job teaching and leading through the tutorial. Thank you HappyBerry Crochet for this tutorial. I changed the coloring a bit, but for the first baby booties I made, mine look awesome, I think.....
The link to the pattern is here:
www.youtube.com/watch?v=B_lgN8Ux0Qs
And this is how is turned out for me.....
The link to the pattern is here:
www.youtube.com/watch?v=B_lgN8Ux0Qs
And this is how is turned out for me.....
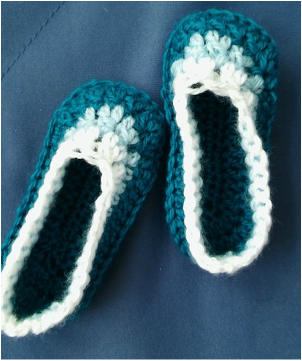
|

|
Baby Monster Bib

I know there are so many of these monster bibs crochet patterns on line and this one I found worked the best for me. I did the eyes, teeth, the whole shebang...... Turned out great!
The link to the patterns for the eyes and the teeth is from this lady Cilla Monsta and is done in a sort of crochet-with-me with no pauses. It goes fast and it is for a not-so-much-a-beginner crocheter, but it worked great for me. Thank you Cilla Monsta:)
www.youtube.com/watch?v=M673zo60Svw
The pattern for the bib is the one I used before when I made the baby set (pacifier holder, bib, scratch mittens) and is here. Thank you Bag-O-Day:)
www.youtube.com/watch?v=5-_XrdA7Dbw
Crochet Baby Booties 2

My second attempt to make the baby booties turned out easier than I thought. I used the same pattern as in my first set of baby booties I made. Thank you to HappyBerry Crochet. I will post her video pattern here:
www.youtube.com/watch?v=B_lgN8Ux0Qs
I made the flowers about two years ago, when I attempted to make a baby blanket. I was left with 30 additional flowers and no ideas what to do with them. These worked wonderfully as an addition for these booties. Thank you Bella Coco for the pattern:
www.youtube.com/watch?v=8lZlX9f8YVo

|
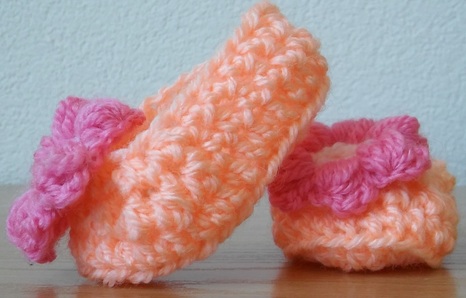
|
Crochet kids' Bath Mitt

As yet another project created for my baby niece and nephew, I chose to do these Crochet Bath Mitts. They are relatively easy to do but it does take some time. I used two different patterns - one for the mitt (thank you bobwilson123):
www.youtube.com/watch?v=6O8rBxJ6VLM
For the eye I used a part of the following pattern (thank you Yolanda Soto Lopez):
www.youtube.com/watch?v=MwVclkN95Ts
This is how mine look like:
www.youtube.com/watch?v=6O8rBxJ6VLM
For the eye I used a part of the following pattern (thank you Yolanda Soto Lopez):
www.youtube.com/watch?v=MwVclkN95Ts
This is how mine look like:

|
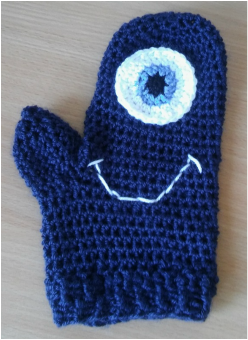
|
Crochet Minion Inspired Cell Phone Cover
Wow! What a great project this was! When I started this morning, I thought I was going to end up slaving over this cell phone cover all day long. But, it actually turned out to be a quick and easy project, which I finished in an hour and a half! And C-U-T-E as a button! I love it! The tutorial is from Jonna Martinez's youtube tutorial, and it is out of this world!!!! Since this is a gift for my niece, I will be giving this one away, but will make a new one soon! Lovin' it!
This is the link:
www.youtube.com/watch?v=aKbzpEINZdo
And this is how mine turned out.... Hope you like it as much as I do!
This is the link:
www.youtube.com/watch?v=aKbzpEINZdo
And this is how mine turned out.... Hope you like it as much as I do!

|

|

|

|
Crochet Simple Flower Applique
I have been fixating on crocheting simple flowers lately. I have a 6-year-old niece and have been looking into what kind of a crocheted gift to make for her. As most little girls, she is very much a girly-girl, so I have decided to make her something "flowery". I went shopping the other day and found these simple black hair clips, so I thought to add flowers to it, to make them more unique and cute.
This was a simple project. When I looked into making crocheted flowers, there were so many choices on Pinterest, but I opted for these simple ones. The flower pattern is actually from Serina's Crochet and Knitting Blog, and she used the flowers to make a necklace.
craftedfromstories.weebly.com/craft-blog/how-to-crochet-a-flower-necklace
The pattern for the actual flowers is super simple and it makes a 5-petal flower:
- make a Magic Circle
- *Chain 2, double crochet 2 times into the magic circle, chain 2, slip stitch into the magic circle Rep from * to make 4 more petals
I used the hot-glue gun to glue each petal to the hair clip.
This is how they turned out. I thought they were pretty cute:)


|

|

|

|

|
Crochet Elsa Crown with Hair
I am absolutely in love with the Disney cartoon "Frozen"! I think it tells a remarkable story and teaches us girls a fabulous message, especially those girls who have sisters (like I do)! I also love the music, the songs, the movie characters - all about "Frozen" rocks! - in my humble opinion....
Also, my 4-year-old nephew now runs around his house with the towel over his head (pretending it was his hair), proclaiming loudly and proudly - "Look at me, I'm Elsa!" I felt bad for the poor kid running around with nothing but a towel on his head, so I decided to make him a crown with a long braid, so he could be a "real princess Elsa"! After all, my little nephew has an aunt who can crochet.... the rest is history...
I followed the two sets of patterns and the links are as follows:
overtheappletree.blogspot.ba/2015/01/crochet-elsa-crown-with-hair.html?m=1
hattingmadlycrochet.wordpress.com/2011/12/01/free-toddler-princess-crown/
I've combined these two patterns to make one unity, and the crown and the braided hair turned out great. This was a long process, especially putting the strains of hair on the crown, but it was worth it. Here is the written pattern:
Hook 4.00 mm
Yarn - Blue, White
US crochet terms
Ch 72 (white yarn), join to first chain (if you want smaller or bigger crown you need to crochet in multiples of 6)
Crown:
Row 1: ch1, sc across in white, join(72)
Row 2: Change to blue, ch1, hdc around, join
Row 3: ch1, sc around, join
Row 4: ch1, hdc around, join
Row 5: ch1, sc around, join
Row 6: begin V stitch (hdc, ch2, hdc, in joining st and every 3rd st around) join
Row 7: shell (6dc in first v-stitch, sc in next v-stitch, repeat around) join
Row 8: join to top of beginning chain, sc in same, sc, hdc, ch2, sl st in first ch, hdc in next stitch, sc, sc across the top of shell. Skip over the sc in center of shell from previous row and continue across top of next shell(sc, sc, hdc, ch2, sl st in 1st ch, hdc, sc, sc) Join and tie off.
Attaching white yarn for hair:
Cut strands of yarn for hair twice as long as desired length. This will be folded in half. The length will depend on how long you want your braid. I new my nephew will love it long, so I cut it super long. Also, think about when you pull the hair to one side for the braid. You'll want to make the strands that are far away from the braid longer. That way the end of the braid won't be as uneven and you'll have less wasted yarn to trim.
Take two strands of the yarn and fold in half, giving you the center point. Insert hook through two loops at the base of crown. Grab the two strands folded at the center point and pull up. Now pull the rest of the yarn up through loop, pull tight. I did two strands in every third stitch and it was great.
Now just twist and braid hair. It's very helpful to have a head to put this on while you're styling! I secured with an elastic hair tie and added a blue ribbon at the end. The patterns call for snowflakes sequins but I had a very impatient little Elsa waiting for his crown, so I x-nay on the sequin-ay.
Thank you Over the Apple Tree and Hatting Madly Crochet for the patterns.
This is how mine turned out:

|

|

|

|
Crochet Baby lovie

My little niece has a birthday coming up soon. She will be 1 year old!:)
As always, I love homemade gifts, so I have crocheted her a gift - a baby lovie! I found this MARVELOUS pattern on line, and I just had to make it. The Amigurumi style head and hands (which are sewn on) and a granny square blanket - C-U-T-E!:) The patterns is entirely from LuLu's Crafts and I found it on Ravelry.
www.ravelry.com/patterns/library/giraffe-lovey-4
I did the entire pattern with crochet hook 4.00 mm although it specified 3.5 mm, 4.00 mm and 5.00 mm. I liked it better with the 4.00 mm. I also hot-glued the googly eyes and hot-glued the felt nostrils, although they were crocheted in the pattern...
This is how mine turned out....

|
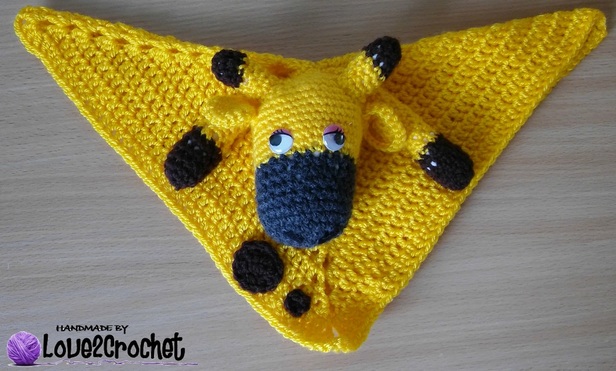

|
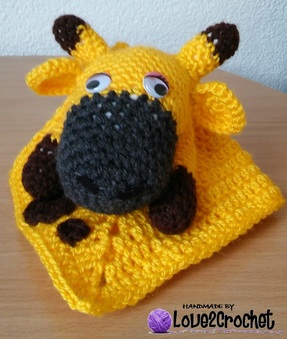
|
Crochet an Eye Patch
,My little nephew has developed some minor vision issues so the doctor is making him 'practice' looking through only one eye at a time. It is really not a big deal except when they put on the cotton patch on his eye and tape it on his poor little face he looks like he is in so much pain and it looks really ugly! So, as a kind Aunty, I have decided to make him an actual eye patch and double it material so it serves a purpose - he could use it to improve his vision and he can look stylish at the same time:)
It took me literately 15 minutes to whip this bad boy up. I used the 4.00 mm hook; white, black, green,and blue yarn; some elastic; and some non see through material.....
Here is the pattern:
- using black yarn make the center of the eye: make a magic circle, chain 1 and make 8 HDC in the circle, slip stitch into the ch 1, change color
- using blue and green yarn (2 stands of yarn) make the iris of the eye: ch 3, DC into the same stitch, 2 DC into every stitch around, (total of 16 DC) slip stitch into 3rd chain, change color
- using white yarn: ch 2, HDC into the same stitch, 2 HDC into every stitch around (32 stitches)
slip stitch into ch 2, HDC into same stitch, 1 HDC into every stitch around (32 stitches)
- using blue/green yarn: 32 HDC around
- continue the round with 5 HDC, ch 1 and turn
- make 5 HDC, ch 1 and turn (I did 24 rows of 5 HDC ch1).
- count 11 stitches from the base of the strap, along the HDC you made in the previous row - join in the string with ch 1, and make 5 HDC, ch 1 and turn. Make another 24 rows.
- sew in the elastics, sew in the soft material on the other side of the eye if you want it to be completely non-see-through, and you are good to go.
- if you need it bigger, make the straps longer.
This is how mine turned out....


|

|

