"Kinder pal" frog
It is time for another "Kinder Pal" critter..... this time I chose to do a frog. To be completely honest, I have a lot of green yarn that I wanted to use.... so a frog came to mind first. Here is the pattern.....
Materials:
green, black worsted weight yarn
2.5 mm crochet hook
scissors, sewing needle
googly eyes
an empty Kinder Egg container
hot glue gun
a marker
Steps and Procedures:
Bottom: (Body)
1. make a Magic Ring and make 6 SC inside the ring
2. make an increase (2 SC) in each stitch around (12 SC)
3. make 1 SC in the first stitch, make 2 SC in the next stitch and repeat around 6 times (18 SC)
4.-10. make 1 SC in each stitch around (18 SC)
- fasten off and weave in the ends
Top: (Head)
1. make a Magic Ring and make 6 SC inside the ring
2. make an increase (2 SC) in each stitch around (12 SC)
3. make 1 SC in the first stitch, make 2 SC in the next stitch and repeat around 6 times (18 SC)
4.-8. make 1 SC in each stitch around (18 SC)
- fasten off and weave in the ends
Eyes: (make 2)
1. Make a Magic Ring and make 5 SC inside the ring
2. make an increase (2SC) in each stitch around (10 SC)
3-4. make 1 SC in each stitch around (10 SC)
- stuff the eyes and leave a long tail for sewing onto the head - top part
Legs: (make 2)
1. Make a Magic Ring and make 5 SC inside the ring
2-11. Make 1 SC in each stitch around (5 SC)
12. Make an increase (2 SC) in each stitch around (10 SC)
13. Make 1 SC in each stitch around (10 SC)
- fold the circle - ends together so you can start making the flipper
- now you have two layers and you will be crocheting through both layers
- now you actually have 5 SC in a row
14. in the 1st stitch - slip stitch
in the 2nd stitch - slip stitch, SC, HDC, DC, ch 2
in the 3rd stitch - slip stitch, SC, HDC, DC, ch 2
in the 4th stitch - slip stitch, SC, HDC, DC, ch 2
in the 5th stitch - slip stitch
- now that you have three toes, fasten off and leave a long tail for sewing
- fold the legs (as on the picture) and sew them onto the body
Face:
- sew on the eyes (stuffed) onto the head
- glue the googly eyes on the eyes
- make 1 SC in 10 stitches on the border of the head to make the mouth
- embroider the nose holes
- glue the bottom and the top to the empty Kinder Egg container and your "Kinder Pal" Frog is ready to be displayed:)

|

|

|

|

|

|
"Kinder Pal" BUnny
This is an awesome idea I found online. All you need is an empty yellow shell you can find inside the Kinder-egg and some imagination.... I found these WONDERFUL websites with patterns and pdf tutorials.... I used them for an inspiration and came up with the one of my own. The websites are worth checking out. The first one is in Dutch and the second one in Italian:
halager.blogspot.ba/2015/03/flere-opskrifter-med-kinderg.html
airalidesign.com/tutorial-ovetti-amigurumi/
And here is my own pattern for this adorable bunny....
Materials:
2.5 mm crochet hook
Grey and White yarn
googly eyes
a small amount of pink felt
glue gun
sewing needle
kinder-egg container
Procedure:
I crocheted in rounds with no joining. Use a stitch marker to mark your beginning chains and count.
Bottom of the egg:
- make a magic ring, and SC 6 inside
- SC 2 in each stitch around (12 SC)
- make 1 SC in the first stitch, and 2 SC in the next stitch -. repeat all the way around (18 SC)
- make 5 rows of 18 SC, slip stitch and sew in the ends
Top of the egg:
- make a magic ring, and SC 6 inside
- SC 2 in each stitch around (12 SC)
- make 1 SC in the first stitch, and 2 SC in the next stitch -. repeat all the way around (18 SC)
- make 3 rows of 18 SC, slip stitch and sew in the ends
Your basic body is now made. Now you need to add the ears and the snout.
Ears: (Make 2)
- make a magic ring, and SC 4 inside
- SC 2 in each stitch around (8 SC)
- make 1 SC in the first stitch, and 2 SC in the next stitch -. repeat all the way around (12 SC)
- SC around this row (12 SC)
- make 1 SC in the next 2 stitches and then make 1 decrease (2SC together) around (9 SC)
- SC around this row (9 SC)
- make 1 SC in the next 1 stitch and then make 1 decrease (2SC together) around (6 SC)
- SC around this row (6 SC)
- 2 SC together around (3 SC)
- slip stitch and sew in the ends and sew them on the top of the egg.
Snout: (Make 2)
- make a magic ring, and SC 3 inside
- SC 2 in each stitch around (6 SC)
- slip stitch and sew in the ends to form a small ball and sew it to the head.
Tail:
- make a magic ring, and SC 4 inside
- SC 2 in each stitch around (8 SC)
- slip stitch and sew in the ends to form a small ball and sew it to the back of the body.
Additional info:
- use a glue gun to hot glue the nose (small piece of pink felt) and the eyes to the head.
- use a glue gun to glue the head and the body to the kinder-egg shell.
Your Kinder Pal Bunny is ready. You can use it to keep your pocket change. Or, as a key chain. Your imagination if the limit. and I know that the kids will go crazy for it. Wait until I show this to my nephew.... I am planning to include this to my craft fair items to display and sell.....

|

|

|

|

|
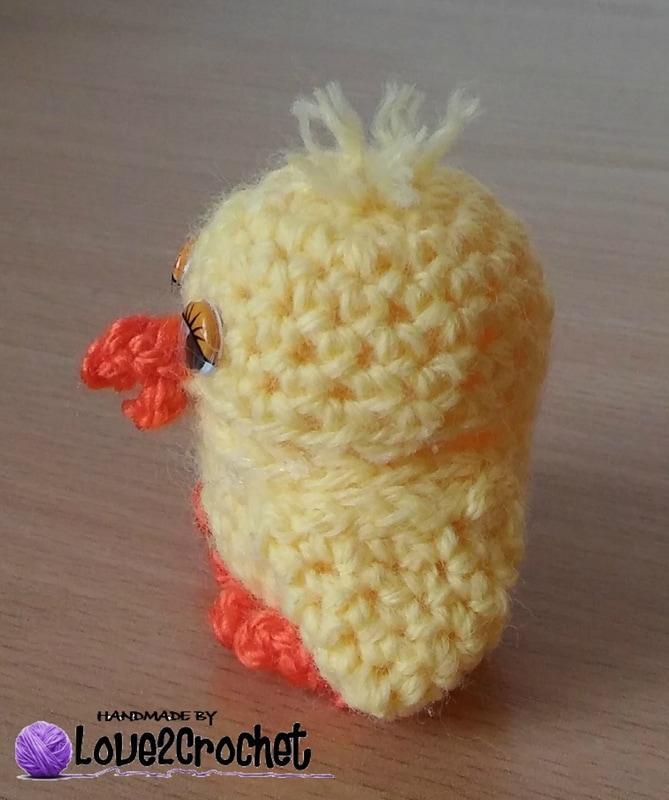
"Kinder Pal" Chick
Another "Kinder" pal idea I found online... Again, all you need is an empty yellow shell you can find inside the Kinder-egg and some imagination.... These websites are worth checking out. They are in Dutch and in Italian:
halager.blogspot.ba/2015/03/flere-opskrifter-med-kinderg.html
airalidesign.com/tutorial-ovetti-amigurumi/
And here is my own pattern for this adorable chick....
(the pattern for the body is the same as in the previous "Kinder" pal Bunny post)
Materials:
2.5 mm crochet hook
yellow and orange yarn
googly eyes
glue gun
sewing needle
kinder-egg container
Procedure:
I crocheted in rounds with no joining. Use a stitch marker to mark your beginning chains and count.
Bottom of the egg:
- make a magic ring, and SC 6 inside
- SC 2 in each stitch around (12 SC)
- make 1 SC in the first stitch, and 2 SC in the next stitch -. repeat all the way around (18 SC)
- make 7 rows of 18 SC, slip stitch and sew in the ends
Top of the egg:
- make a magic ring, and SC 6 inside
- SC 2 in each stitch around (12 SC)
- make 1 SC in the first stitch, and 2 SC in the next stitch -. repeat all the way around (18 SC)
- make 5 rows of 18 SC, slip stitch and sew in the ends
Your basic body is now made. Now you need to add the beak, wings and the feet.
Wings (make 2):
using yellow yarn
- make a magic ring, and SC 3 inside
- SC 2 in each stitch around (6 SC)
- make 1 SC in the first stitch, and 2 SC in the next stitch, repeat all the way around (9 SC)
- SC around for 3 rows (9 SC)
- finish off and sew the top of the wing onto the edge of the body on both sides
Beak:
- ch 3, slip stitch in the 2nd stitch, SC in the next stitch, ch 3, slip stitch in the 2nd stitch, SC in the next stitch, slip stitch in the very first beginning chain you made
- sew onto the edge of the top part to form the chick's beak
Feet (make 2):
- ch 7, slip stitch in the second stitch from the hook, ch 5, slip stitch in the 1st chain, ch 5, slip stitch in the 1st chain, slip stitch in the very first chain you started with.
- sew the feet on the bottom of the chick's body
Additional info:
- sew some fluff on the top of the head
- use a glue gun to hot glue the eyes.
Your "Kinder" Pal Chick is ready.

|
|

|

|

|

|

|

|

|

|
"Kinder Pal" Owl
Here we go....another "Kinder" Pal! I am planning to make a whole collection of "Kinder" Pals..... Here are the original websites and here is my version of the "Kinder" Pal Owl. The websites are in Dutch and in Italian:
halager.blogspot.ba/2015/03/flere-opskrifter-med-kinderg.html
airalidesign.com/tutorial-ovetti-amigurumi/
And here is my own pattern for this cute owl....
- I used a very thick yarn so I made less rounds and less SC in a round. Adjust according to the thickness of your yarn.
Materials:
2.5 mm crochet hook
light pink and dark pink, white, black yarn
a small amount of orange felt
glue gun
sewing needle
kinder-egg container
Procedure:
I crocheted in rounds with no joining. Use a stitch marker to mark your beginning chains and count.
Bottom of the egg:
- make a magic ring, and SC 6 inside
- SC 2 in each stitch around (12 SC)
- make 1 SC in the first stitch, make 1 SC in the next stitch, and 2 SC in the next stitch, repeat all the way around (16 SC)
- make 5 rows of 16 SC, slip stitch and sew in the ends
Top of the egg:
- make a magic ring, and SC 6 inside
- SC 2 in each stitch around (12 SC)
- make 1 SC in the first stitch, make 1 SC in the next stitch, and 2 SC in the next stitch, repeat all the way around (16 SC)
- make 3 rows of 16 SC, slip stitch and sew in the ends
Your basic body is now made. Now you need to add the ears, the wings, and the eyes.
Ears: (Make 2)
- make a magic ring, and SC 2 inside
- make 2 SC in each stitch (4 SC)
- slip stitch and sew in the ends and sew them on the top of the egg.
Wings: using dark pink yarn (make 2)
- make a magic ring, and SC 6 inside
- SC 2 in each stitch around (12 SC)
- SC in the first stitch, and 2 SC in the next stitch all the way around (18 SC)
- slip stitch and sew in the ends
- fold the wings slightly, and sew onto the body on both sides
Eyes: using white yarn (make 2)
- make a magic ring, and SC 6 inside
- SC 2 in each stitch around (12 SC)
- embroider a black line on the eyes, and sew the eyes on the edge of the top of the egg.
- use a glue gun to hot glue the beak (small piece of orange felt)
- use a glue gun to hot glue the top and the bottom onto the kinder-egg shell and you are done. Your "Kinder" Pal Owl is ready....

|

|

|

|

|

|

|

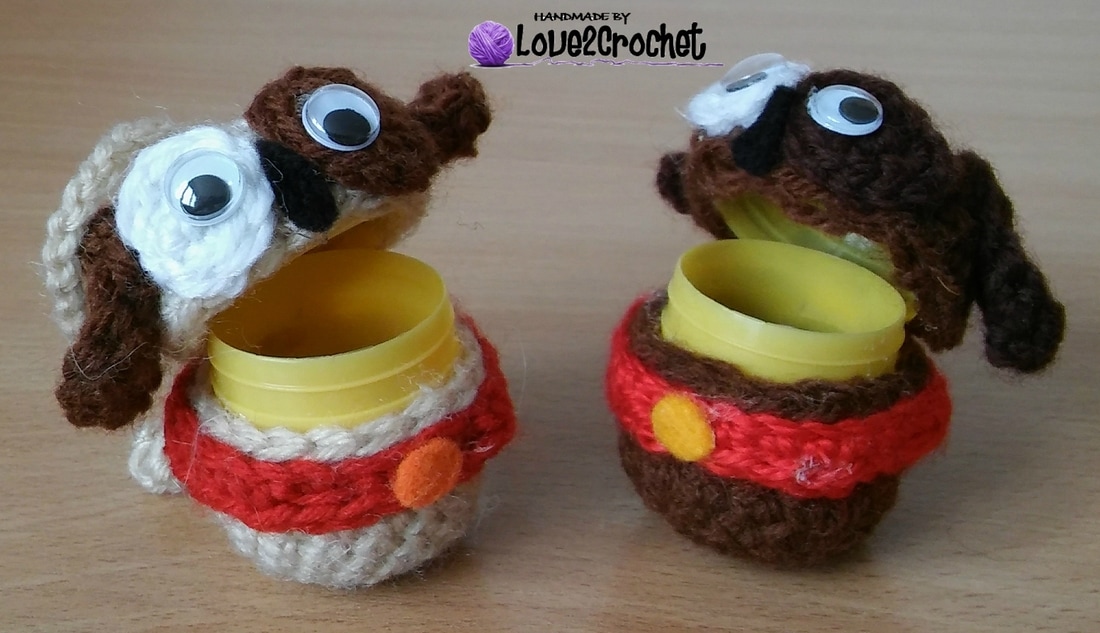
"Kinder Pal" Dog
Here we go.... another one of the "Kinder" Pals was born today... Again, I used these WONDERFUL websites for inspiration and came up with this doggy pattern:
halager.blogspot.ba/2015/03/flere-opskrifter-med-kinderg.html
airalidesign.com/tutorial-ovetti-amigurumi/
Materials:
2.5 mm crochet hook
Light brown, dark brown, red and white yarn
googly eyes
a small amount of yellow and black felt
glue gun
sewing needle
kinder-egg container
Procedure:
I crocheted in rounds with no joining. Use a stitch marker to mark your beginning chains and count.
Bottom of the egg:
- make a magic ring, and SC 6 inside
- SC 2 in each stitch around (12 SC)
- make 1 SC in the first stitch, and 2 SC in the next stitch, repeat all the way around (18 SC)
- make 5 rows of 18 SC, slip stitch and sew in the ends
Top of the egg:
- make a magic ring, and SC 6 inside
- SC 2 in each stitch around (12 SC)
- make 1 SC in the first stitch, and 2 SC in the next stitch, repeat all the way around (18 SC)
- make 3 rows of 18 SC, slip stitch and sew in the ends
Floppy Ears: (Make 2)
- ch 2
- make 2 SC in the first stitch, ch 1 and turn
- make 1 SC in each stitch (2 SC) for 4 rows
- do not forget to ch 1 and turn after every row
- SC around the whole ear
- slip stitch and sew in the ends and sew the top of the ears onto the head
Eyes: (Make 2)
- Smaller eye: make a magic ring, and SC 4 inside
- SC 2 in each stitch around (8 SC)
- slip stitch and sew in the ends and sew them to the head.
- Bigger eye: make a magic ring, and SC 6 inside
- SC 2 in each stitch around (12 SC)
- slip stitch and sew in the ends and sew them to the head.
Collar:
- ch 28
- SC down the chain making 27 SC
- slip stitch and sew in the ends and sew them along the rim of the bottom of the body
- use a glue gun to hot glue the yellow tag (small piece of yellow felt)
Tail:
- connect to the bottom of the body
- ch 15 and slip stitch down the chain
- sl stitch to the body and sew in the ends
Additional info:
- hot glue the googly eyes onto the crochet circle eyes
- hot glue the nose between the eyes (small piece of black felt)
- hot glue the whole body to the top and the bottom of the kinder-egg shell
Your "Kinder" Pal Doggy is ready....

|

|

|


|

|
"Kinder pal" wolf
Yes, it is time for yet another "Kinder Pal" critter:) This time, it is a wolf....... I have looked everywhere for the pattern I liked, but could not find anything to my liking, so I decided to make and create a pattern of my own..... It turned out great, and here is the pattern:
Materials:
crochet hook 2.5 mm
grey, white, black yarn
needle, scissors
Steps and Procedure:
Bottom of Body: (made in continuous rounds)
- using grey yarn, make a Magic Ring, and 6 SC inside the MR
- make 2 SC in each stitch around (12 SC)
- make 1 SC in the first stitch, 2 SC in the next stitch (repeat around) - (18 SC)
- make 18 SC in the next four rows
- using white yarn, make 18 SC in the next 2 rows, slip stitch and finish off
Top of Body: (made in continuous rounds)
- using grey yarn, make a Magic Ring, and 6 SC inside the MR
- make 2 SC in each stitch around (12 SC)
- make 1 SC in the first stitch, 2 SC in the next stitch (repeat around) - (18 SC)
- make 18 SC in the next five rows, slip stitch and finish off
Ears (make 2):
- using grey yarn, ch 4, make a SC in the 2nd stitch from the hook,
- make a HDC in the 3rd stitch from the hook
- make a DC in the last stitch, ch 1, and finish off
Fluff: (the fluff surrounds the face and the muzzle)
- using white yarn, attach the yarn to the stitch on the rim of the face
- ch 2, and DC in the same stitch
- turn the head and crochet toward the top now:
- insert your hook in the next stitch and make another DC
- insert the hook in the next stitch still going towards the top of the head and make a HDC
- insert the hook in the next stitch and make a HDC
- insert the hook in the next stitch and make a SC and a slip stitch in the same stitch
- choose a stitch on the other side of the face and make another fluff following the same directions
Muzzle:
- find a stitch on the rim of the center of the face
- using grey yarn, ch 1, and make 3 SC along the rim of the face, ch 1 and turn
- make a decrease (2 SC together) and make another SC (2 SC in this row)
- using black yarn, ch 1 and turn, and make a decrease (2 SC together), ch 1 and fasten off
Tail:
- using grey yarn, ch 4
- make 3 SC down the row, ch 1 and turn
- make a decrease (2 SC together) and another SC (2 SC in this row), ch 1 and turn
- make 2 SC, ch 1 and turn
- make a decrease (2 SC together), fasten off
- make 2 grey tails, and slip stitch them together
- using white yarn, ch 4
- make a decrease (2 SC together), make another SC down the row, ch 1 and turn
- make a decrease (2 SC together), fasten off
- make 2 white tails, and slip stitch them together
- sew the white to the grey part of the tail, and sew it unto the bottom of the body
Your "Kinder Pal" Wolf is now done. Hot glue the googly eyes to the head and hot glue the body to the Kinder Egg. Proudly display your "Kinder Pal" and enjoy it!:) And here is mine.....

|

|

|

|

|

|
"Kinder pal" butterfly
This was a super quick project and a pattern. The butterfly turned out wonderfully, and it looks adorable:)
Here is the pattern:
Materials:
black yarn for the body, and a yarn of your choice for the wings
2.5 mm crochet hook
needle and scissors
Bottom of the body:
- make a magic ring, and 6 SC inside the MR
R1 - make 2 SC in every stitch around (12 SC)
R2 - make 1 SC in the first stitch and 2 SC in the second stitch and repeat all the way around (18 SC)
R3-R8 - make 18 SC in the next 6 rows
Top of the body:
- make a magic ring, and 6 SC inside the MR
R1 - make 2 SC in every stitch around (12 SC)
R2 - make 1 SC in the first stitch and 2 SC in the second stitch and repeat all the way around (18 SC)
R3-R6 - make 18 SC in the next 4 rows
Butterfly wings:
I have used the pattern from this website:
www.bellacoco.co.uk/2015/08/crochet-butterfly-pattern.html
but have added an extra row to make the wings larger. Here is the written pattern of the whole butterfly:
- Ch 6 and insert hook into first chain and slip stitch to create circle.
- Ch 3, DC into the center circle, *ch 2, DC into center circle* 7 more times, ch 2. Insert hook into third chain from the bottom and join with slip stitch. (You should have 8 clusters of 2 DC stitches at the end of this row)
- (Change color if desired connecting new color in DC space or if you stay with the same color, just slip stitch to the DC space)
- *6 DC into chain 2 space, slip stitch in the next DC space* 7 times, 6 DC into ch 2 space, slip stitch into top of original stitch to connect.
(now this part is not on the Bellacoco's website, I have added it to make the wings bigger):
- connect with the slip stitch to the first DC of the row
- ch 2, make a DC into the same stitch and ch 2 again
- count off 2 DC (from the previous row) and make a 2 DC/ch 2 cluster inside that space
- continue making 2 DC/ch 2 cluster after every other DC from a previous row
(you should have a total of 24 DC/ch 2 clusters in this row)
- ch 12, fold the work in half (wrong sides facing) and wrap the chain around the middle of the butterfly body connecting at the base of the chain with a slip stitch. Tie off.
Antenna:
- slip stitch the black yarn to the top of the head, ch 9 and make 8 SC down the chain, connect with the slip stitch to the head
- make another antenna on the other side of the head
Your butterfly is now done. All that is left is to hot glue the googly eyes on the head and hot glue the body to the actual kinder egg shell. I have sewn the wings to the body. Enjoy your butterfly, and display it proudly:)

|

|

|

|

|

|

|

|
"KINDER PAL" Lion
It is time for yet another "Kinder Pal" creation...... This time it is a lion. I looked everywhere for the pattern, but could not find one to my liking, so I decided to make my own - here it is....
Materials:
2.5 mm crochet hook
beige, brown and dark brown yarn
googly eyes
needle and scissors
Steps and Procedure:
- using beige yarn and a crochet hook 2.5 mm:
Bottom of the body:
- make a Magic circle and 6 SC inside the MC
- make 2 SC in each stitch around (12 SC)
- make 1 SC in the first stitch and 2 SC in the second stitch (repeat all the way around for a total of 18 SC)
- make 7 rows of 18 SC
Top of the body:
- make a Magic circle and 6 SC inside the MC
- make 2 SC in each stitch around (12 SC)
- make 1 SC in the first stitch and 2 SC in the second stitch (repeat all the way around for a total of 18 SC)
- make 5 rows of 18 SC
Muzzle:
- using beige yarn, make a magic circle and 3 SC inside the MC
- using beige yarn make 2 SC in the 1st stitch, change to white yarn, and make 2 SC in the remaining 2 stitches (total of 6 SC in this row)
tip: when you change to white yarn, DO NOT cut the beige yarn, but continue working it into the stitches, so you do not have to sew the ends consistently
- using beige yarn make 2 SC in the next two stitches, and make 1 SC in the next stitch; using white yarn make 1 SC in the next stitch, make 2 SC in the next two stitches, make 1 SC in the next 2 stitches (12 SC in this row)
- using beige yarn make 5 SC, using white yarn make 7 SC (12 SC in this row)
- using the dark brown yarn embroider the nose on the muzzle
- sew the muzzle to the lion's head
Ears: (make 2)
- using dark brown yarn, make a MC and make 4 SC in the MC
- make 2 SC in each stitches around (8 SC)
- using beige yarn, make 1 SC in each stitch around for 2 rows (8 SC)
- sew the ears onto lion's head
Tail:
- using beige yarn, chain 15 and slip stitch down the chained line
- attach the light brown yarn to the tip of the tail (as if making a tassel)
- attach the tail to the body of the lion, sew in the ends
Mane:
- cut the light brown yarn into 20 cm long pieces
- attach the yarn piece by piece to the head of the lion surrounding its face (as if making tassels) - this is a long and tedious process, but well worth it
- I then separated each string into its fine strands to make it fuller, brushed the main and trimmed it
And this is what my lions looks like, after I have hot glued the googly eyes to the face, and the body to the yellow Kinder egg shell....

|

|

|

|

|
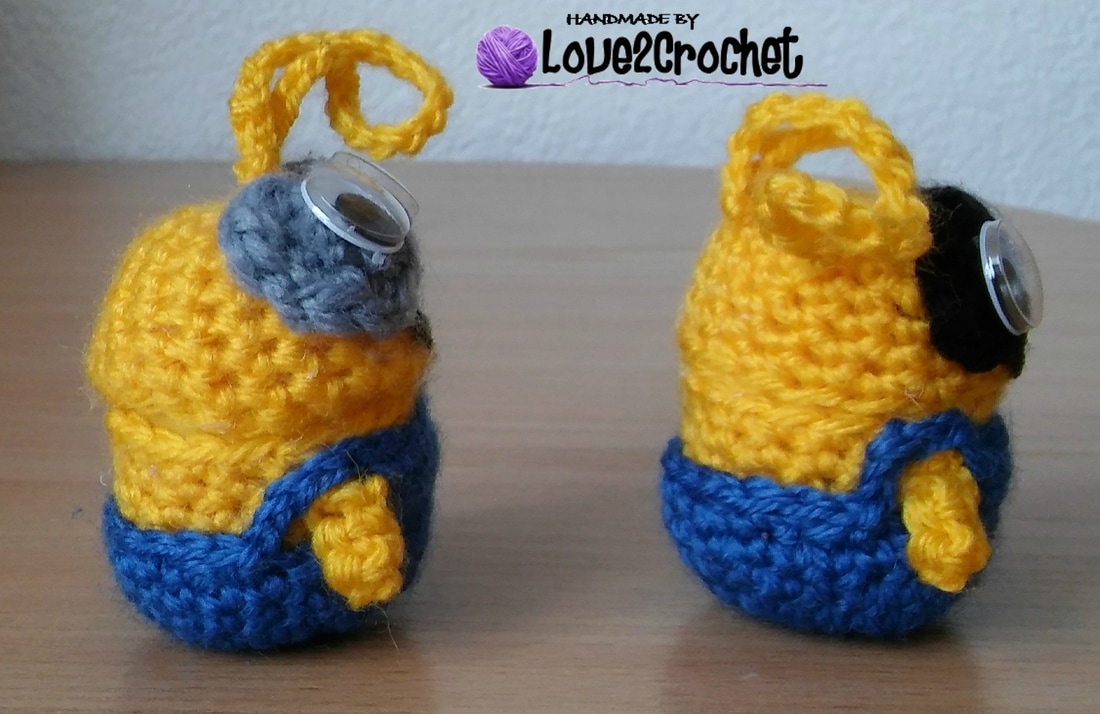
"Kinder Pal" Minion
I decided to make another "Kinder Pal" creation. This time it is the Minion:) I looked for the pattern everywhere and have used this one as an inspiration: www.youtube.com/watch?v=XfAcGce3-R4
This is the pattern I came up with:
Materials:
2.5 mm crochet hook
yellow, black, blue yarn
googly eyes
needle and scissors
Steps and Procedure:
- using yellow yarn and a crochet hook 2.5 mm:
Bottom of the body:
- make a Magic circle and 6 SC inside the MC
- make 2 SC in each stitch around (12 SC)
- make 1 SC in the first stitch and 2 SC in the second stitch (repeat all the way around for a total of 18 SC)
- make 7 rows of 18 SC
Top of the body:
- make a Magic circle and 6 SC inside the MC
- make 2 SC in each stitch around (12 SC)
- make 1 SC in the first stitch and 2 SC in the second stitch (repeat all the way around for a total of 18 SC)
- make 5 rows of 18 SC
Arms: (make 2)
- chain 4, and make 1 SC in each chain (3 SC),
- leave a long string for sewing onto the body
Googles: (make 2)
- using black or grey yarn
- make a magic circle and make 5 SC inside the circle
- make 2 SC in each stitch around (10 SC)
- sew the googles onto the head
Pants:
- using blue yarn, make a magic circle
- make a Magic circle and 6 SC inside the MC
- make 2 SC in each stitch around (12 SC)
- make 1 SC in the first stitch and 2 SC in the second stitch (repeat all the way around for a total of 18 SC)
- make 1 SC in the first stitch, 1 SC in the send stitch and 2 SC in the third stitch (1+1+2) and repeat all the way around (24 SC total)
- make 2 rows of 24 SC
- SC 7, ch 1 and turn
- SC 7, ch 1 and turn
- SC 7, and chain 5
- skip 1 SC from the flap, slip stitch to the body of the pants to connect
- make 14 SC, ch 5 and connect to the 1st stitch to the top of the flap
Additional info:
- sew the googles to the head
- sew the pants to the bottom of the body
- sew the arms to the body (in the arm holes of the pants)
- glue the googly eyes and the whole body to the Kinder egg shell:)
- since I decided to make this into a key chain (or loose change container) I chained 30 and slip stitched to the top of the head

|

|

|

|
|


